Stardog Designer
This chapter discusses Stardog Designer - a no-code, visual tool for creating and maintaining your Knowledge Graph.
Page Contents
Overview
Stardog Designer is the visual environment for creating and maintaining your Knowledge Graph model and data. For the best experience in Stardog Designer, use Stardog version 7.9.0 or above.
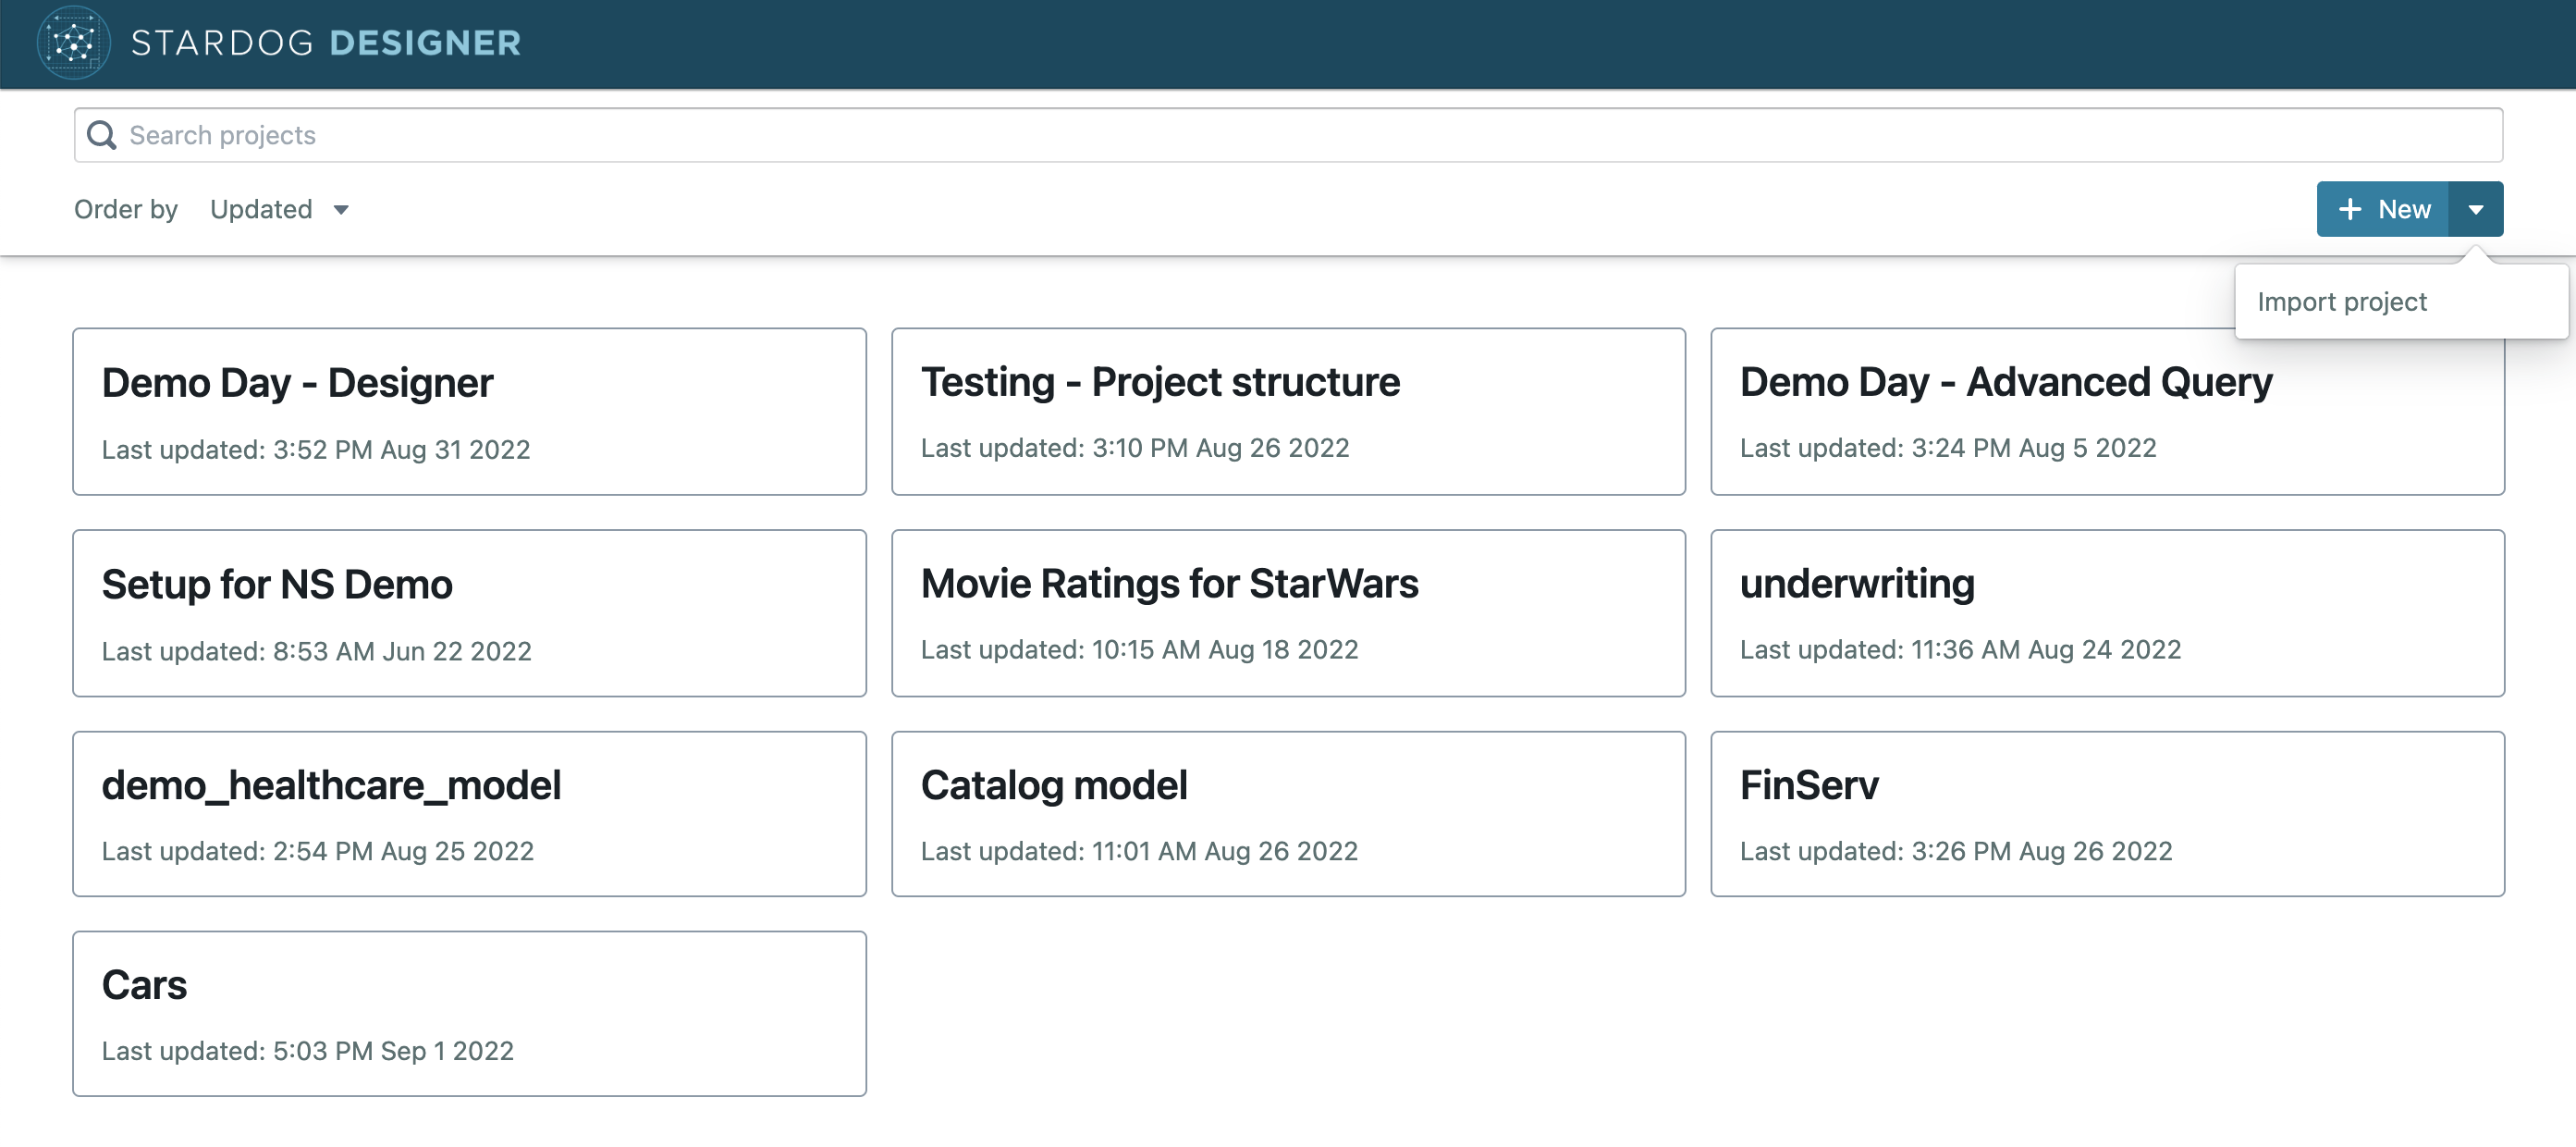
Projects
Stardog Designer uses projects to help users organize their modeling and mapping efforts. Projects may use existing models in a Stardog database to jump-start the modeling process.
Work completed in Designer can be exported to your local filesystem or published directly to a Stardog server. A file with the extension .stardogdesigner is included in the export. To import a project, upload the file with the extension .stardogdesigner.
Project settings
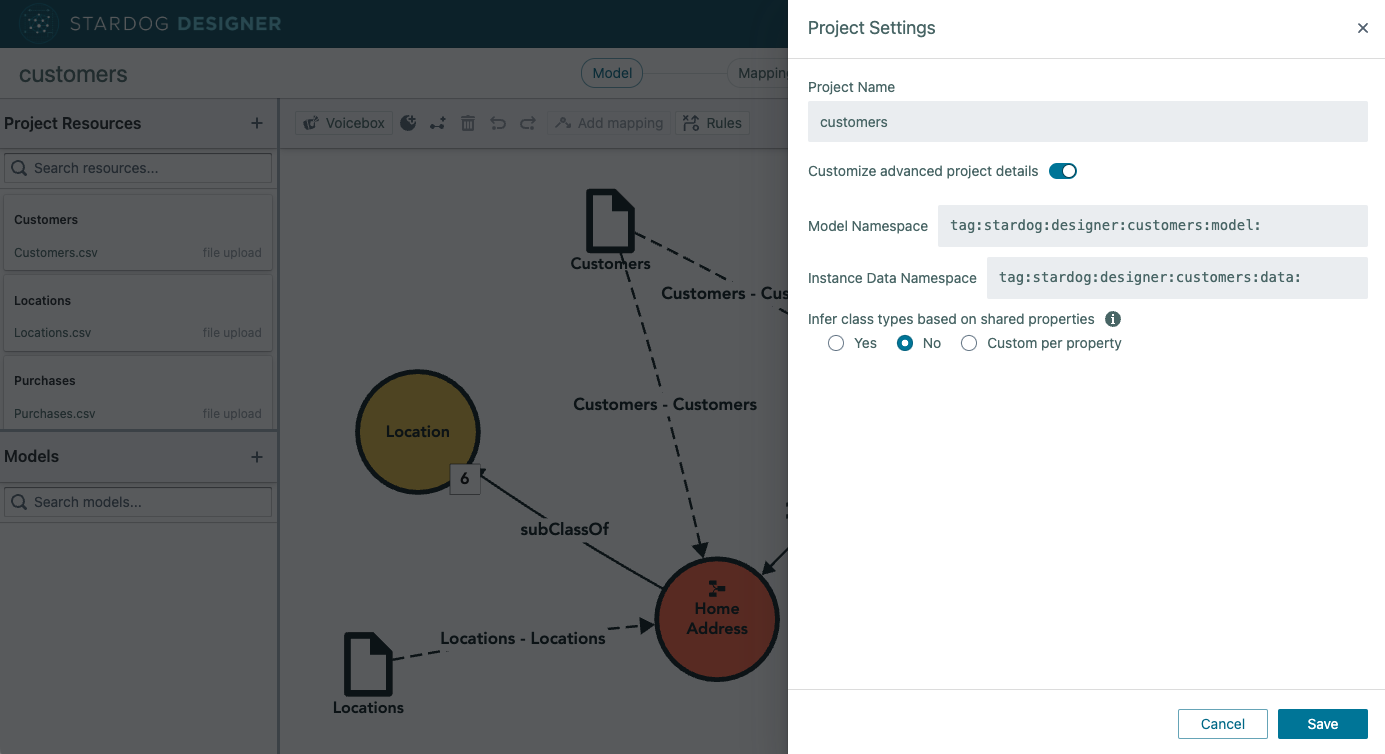
- Project name
- The project name sets the namespace of a project and is used to identify the project throughout Designer.
- The project name can be updated, and the project namespace will be automatically updated to match. Changing the project namespace will not change any existing model concepts or the namespace of model concepts from imported models. All new model concepts will use the updated project namespace.
- Advanced project details
- Set a custom model namespace. All projects have a default model namespace of
tag:stardog:designer:[PROJECT NAME]:model:, where[PROJECT NAME]is the name of the project. This namespace will be used for all model concepts defined through Designer unless a custom IRI is defined. - Set a custom instance data namespace. All projects have a default instance data namespace of
tag:stardog:designer:[PROJECT NAME]:data:, where[PROJECT NAME]is the name of the project. This namespace will be used for all instance data mapped through Designer unless a custom IRI is defined. - Infer class types based on shared properties. By default, Designer does not infer class types based on shared properties. When enabled, a class can be inferred to also be another class that shares the same properties. For example, if
ClassAshares the same properties asClassB, instances ofClassAcan be inferred to also be of typeClassB. Setting toCustom per propertyallows changing this option at the relationship and attribute level.
- Set a custom model namespace. All projects have a default model namespace of
Modeling
The models created in Designer use OWL and RDFS standards to ensure models are compatible with open source semantic tools.
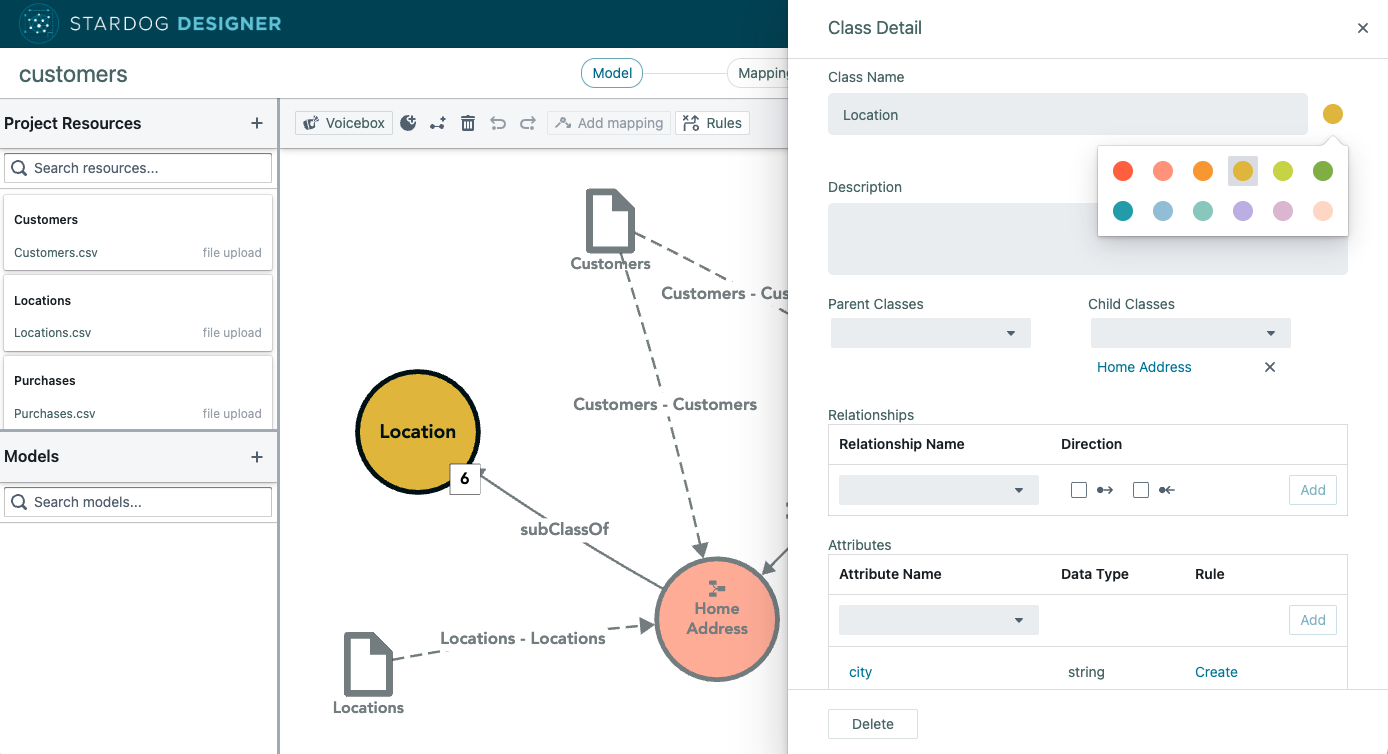
The toolbar can be used to create classes and add new relationships. When the new object is selected, a right-hand panel opens with additional editing capabilities. For classes, this includes defining parent and child classes, relationships, and attributes.
Relationships are edited on the canvas by hovering over either end of the relationship. If the relationship does not have a source or a target, the relationship can be clicked and dragged to an existing class. If the relationship already has a source or target, the source or target can be unlinked from the source or target by hovering over the end of the relationship and selecting the unlink icon. Relationships, like classes, can also be edited in the right-hand panel.
Classes and relationships can be modified in their detail drawers by double-clicking a class or relationship. The detail drawer may also be opened by right-clicking the class or relationship and selecting Edit. Attributes can be modified by clicking on an attribute from any class detail drawer for which the attribute is associated with. You may change the IRI of any model concept by hovering over the concept’s name, selecting Show IRI, and editing the IRI displayed. IRIs of concepts created in a project begin with [Project namespace], which represents the namespace defined in the Project Settings.
Classes are automatically assigned a Stardog color which will be used in the Designer canvas and in Explorer. The color of a class may be changed by opening the class detail drawer and clicking on the colored circle to the right of the class name.
Define Inference Rules
Inference rules can be defined to capture business and domain logic in your model. To add and edit inference rules associated with your model, click the Rules option in the toolbar. Inference rules follow an If… Then… format to add attributes, connect instances through relationships, and classify instances as additional class types. You can learn more about the Stardog Inference Engine here.
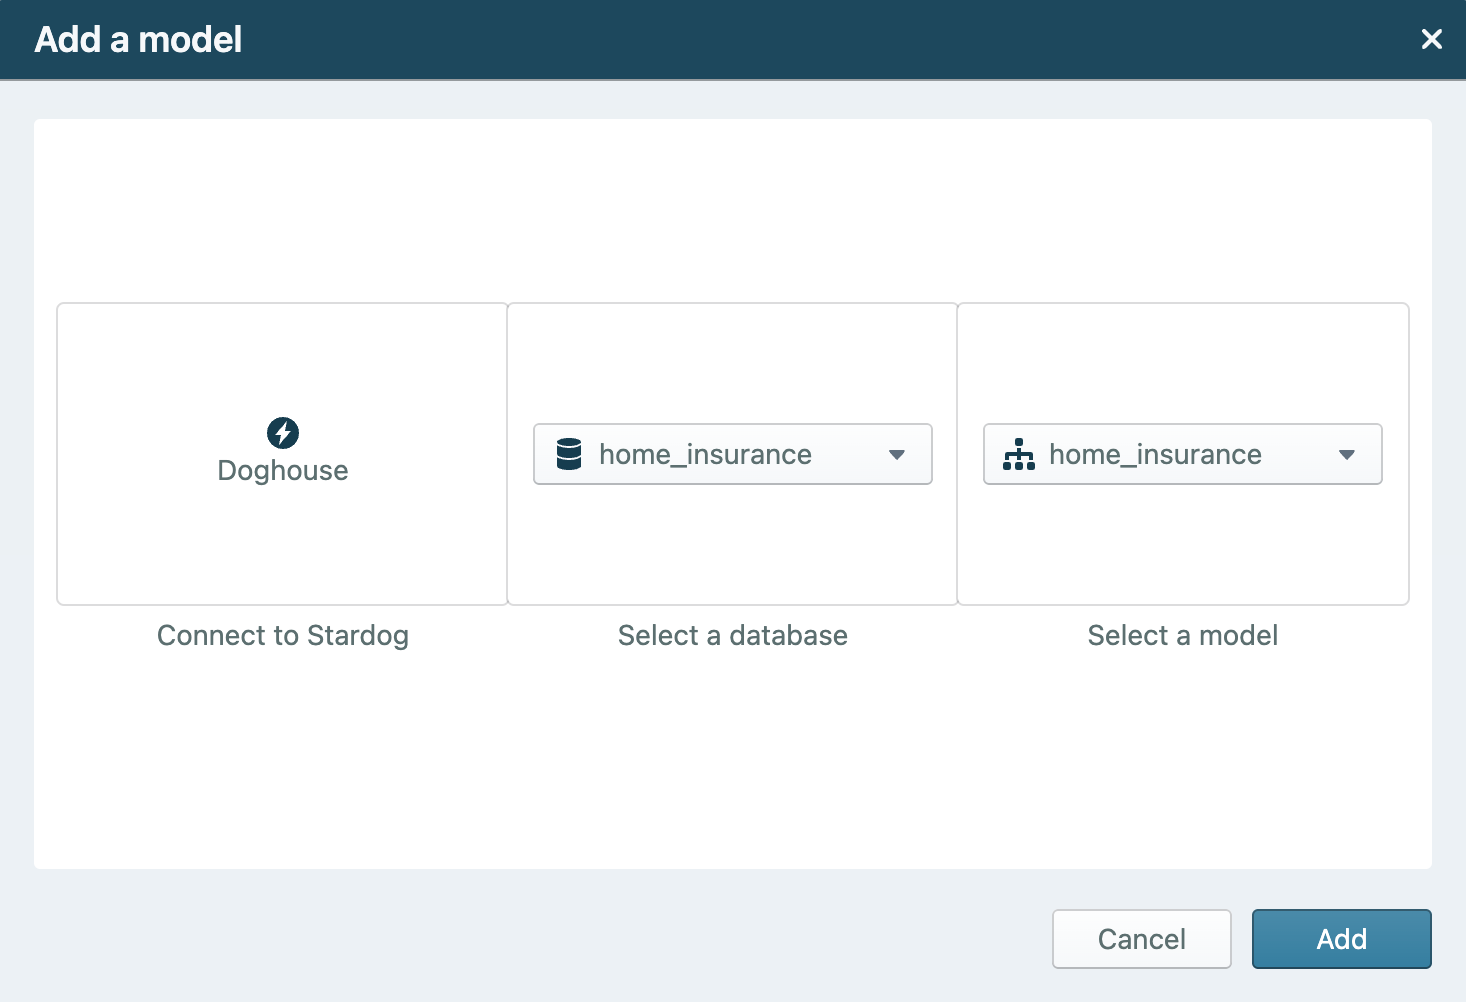
Using an Existing Model
Existing models can be imported from Stardog servers. To do so, simply select the plus icon next to Models in the left-hand panel and follow the screens to confirm your server connection and model selection.
Mapping Project Resources
Designer facilitates mapping new data sources to Stardog. Designer currently supports mapping data from CSVs and relational database data sources.
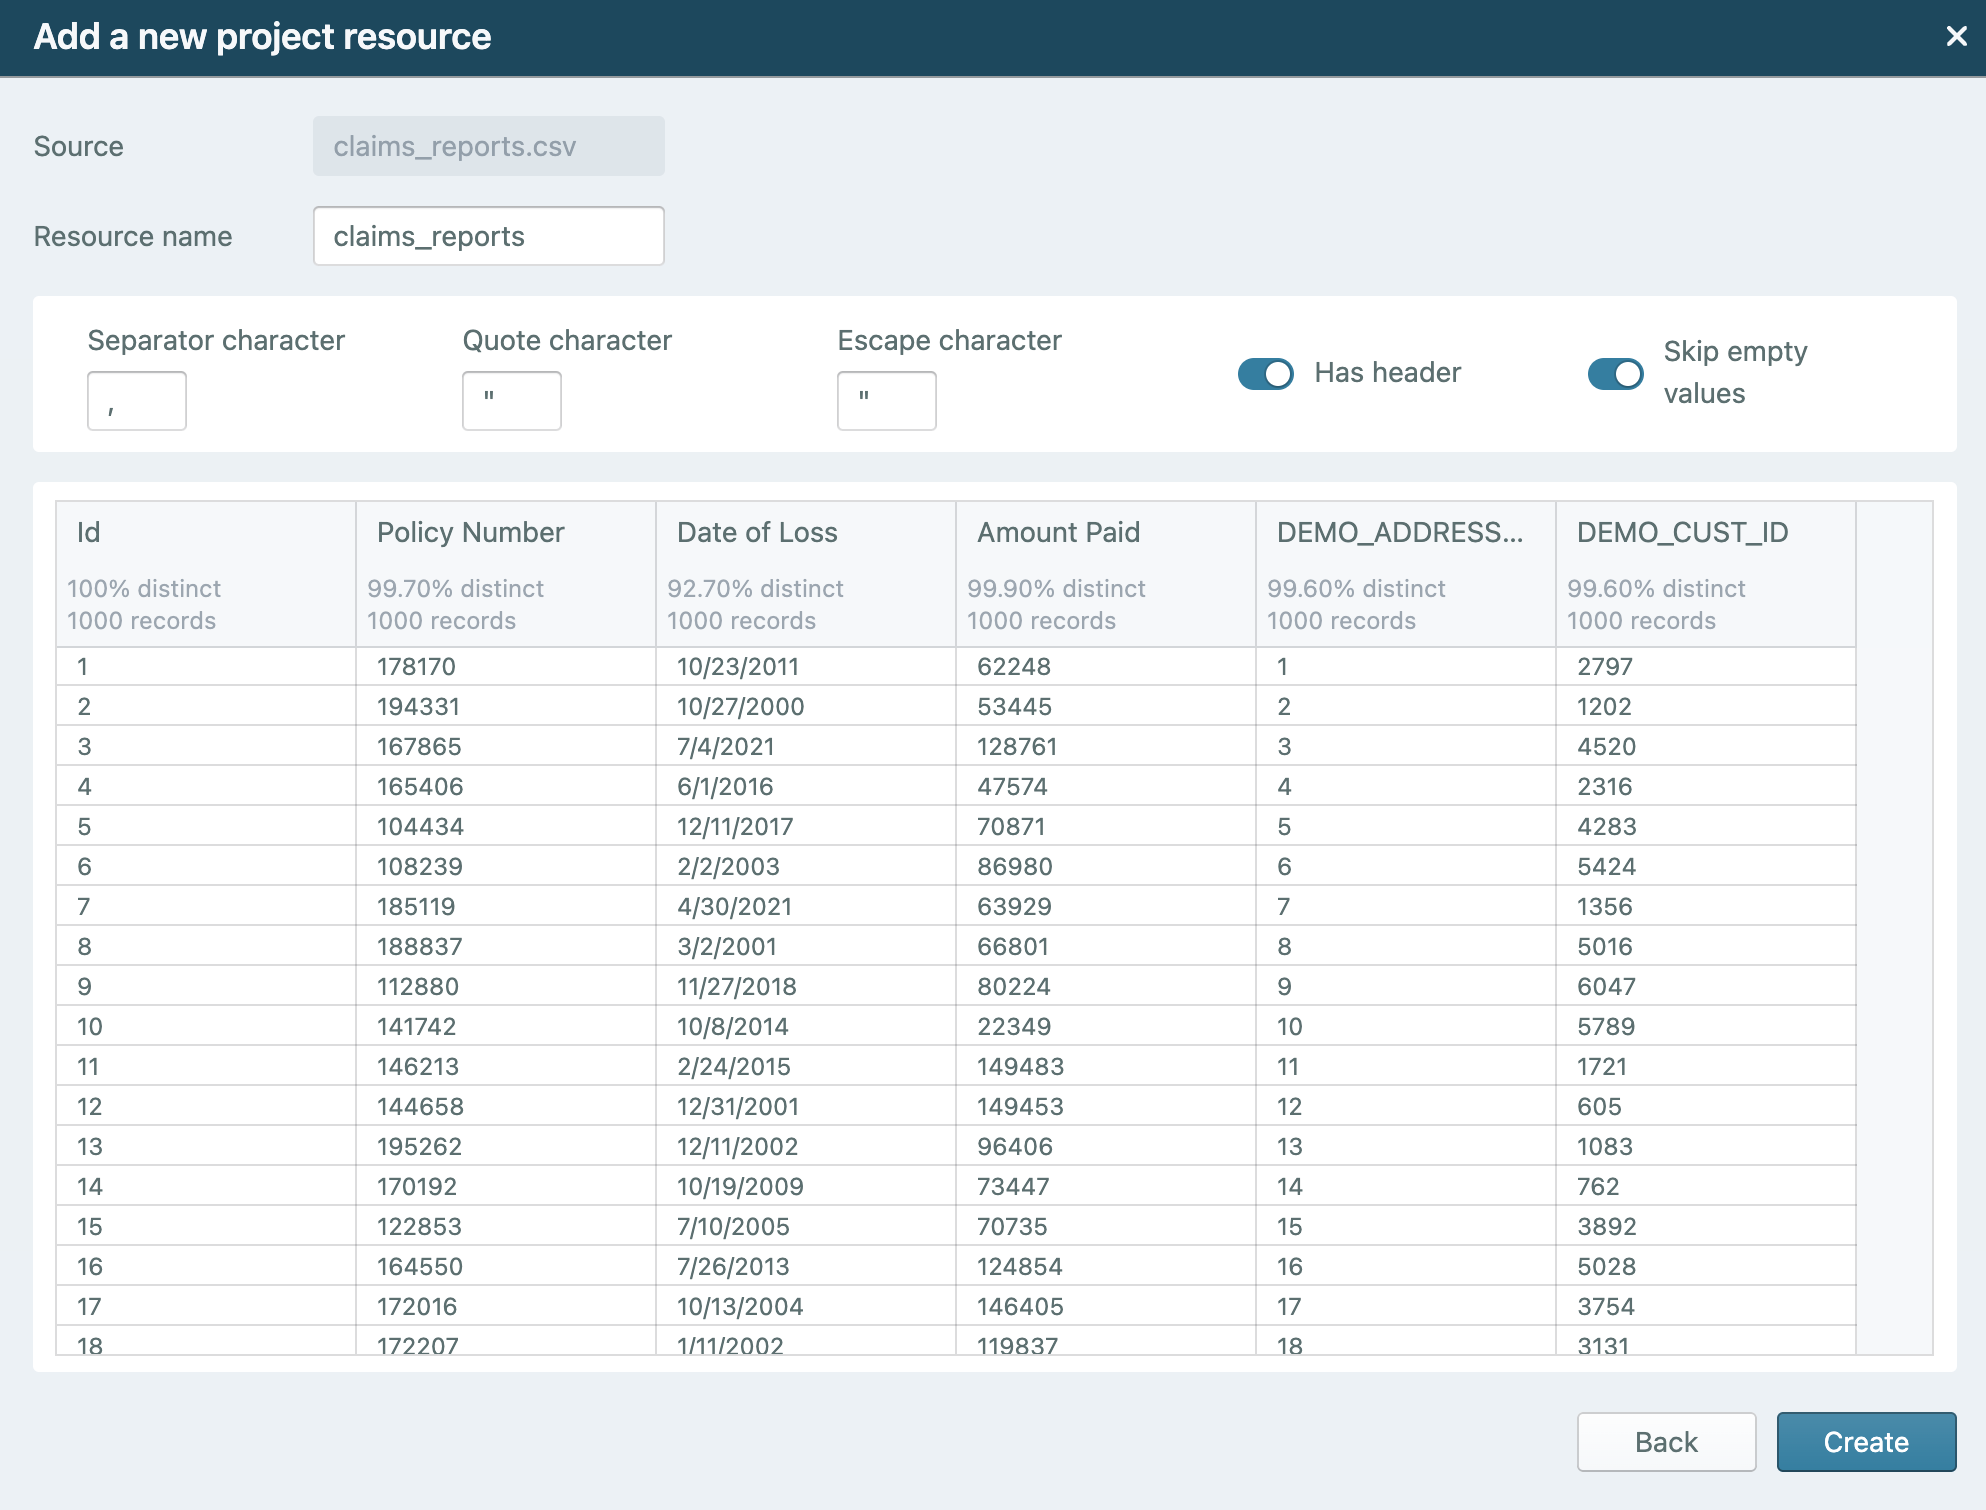
CSV Upload Options
- Local CSV files can be uploaded as project resources. Only CSV files below 2 Mb will be stored as part of a project; as a result, CSV files above 2 Mb must be uploaded again when publishing.
- When uploading a CSV file, the resource name, separator character, quote character, and escape character can be customized.
- If a CSV file has duplicate columns in the first row, the first row of the file may not be used to indicate column headers.
Virtual Graph Options
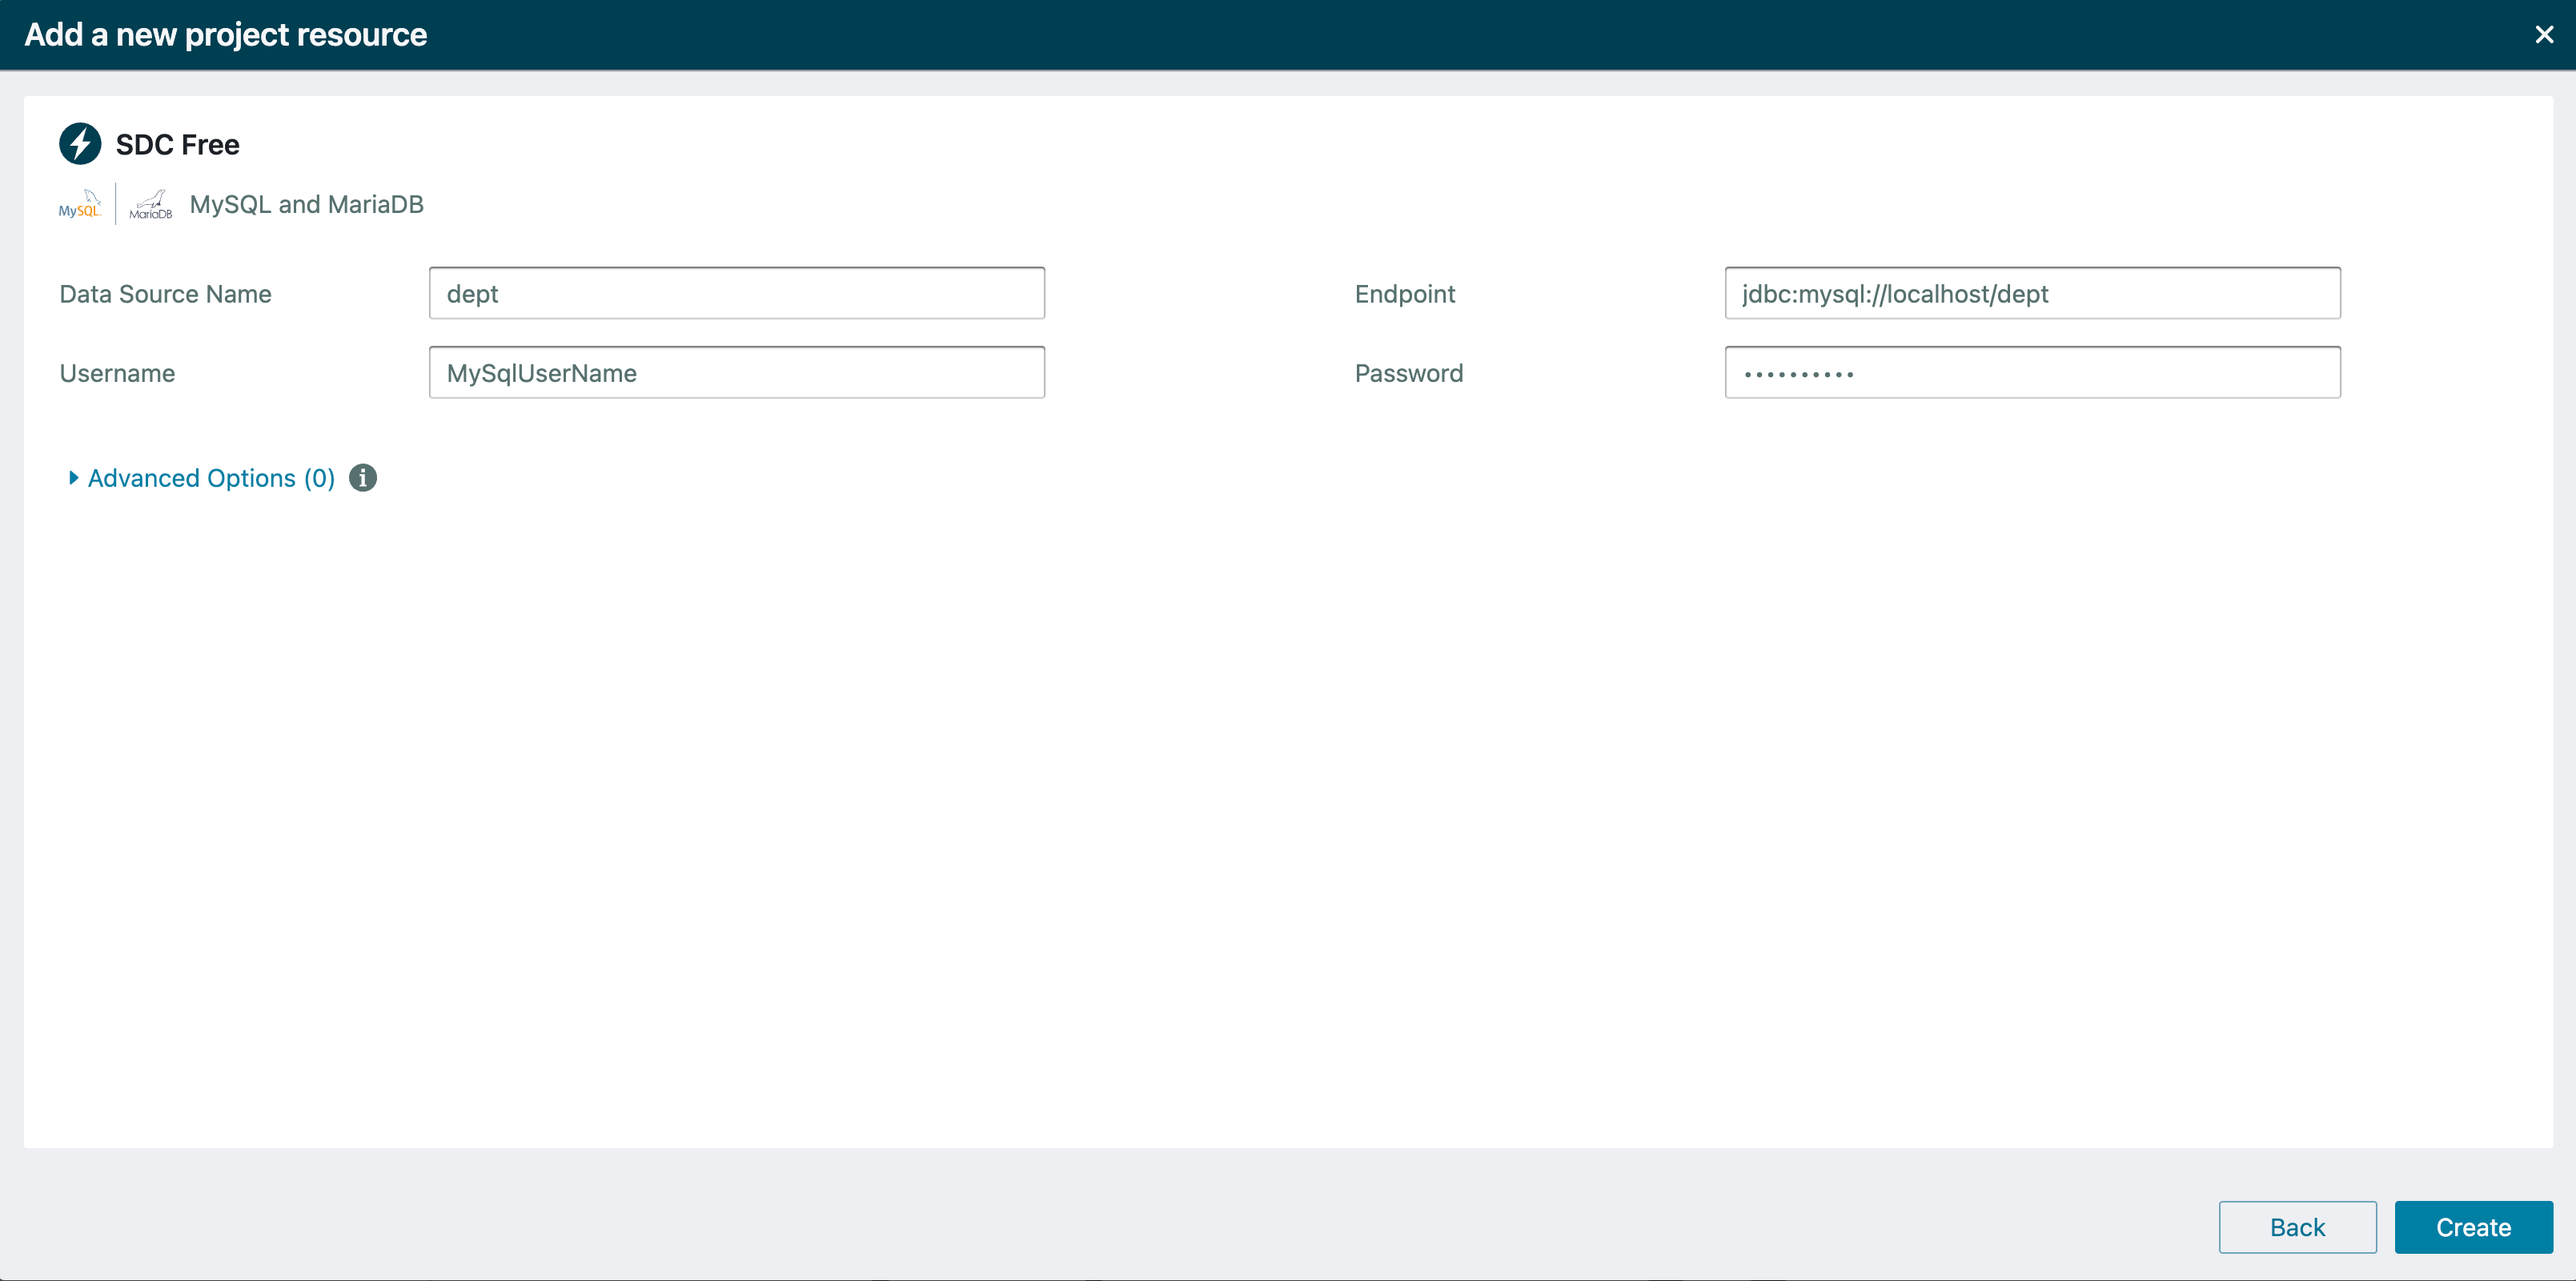
- Virtual graphs can be created for any data source type for which a driver is installed on your Knowledge Graph endpoint.
- To define a new data source when adding a virtual graph, select the data source type, and then the option to
Create new Data Source. You can see an example configuration (using the example data source properties found here) below: - Please note that new data sources will be created for your Knowledge Graph endpoint when added as project resources.
- To publish your virtual graph, the data source used to create the project resource must be defined for the Knowledge Graph endpoint you are publishing to.
- To define a new data source when adding a virtual graph, select the data source type, and then the option to
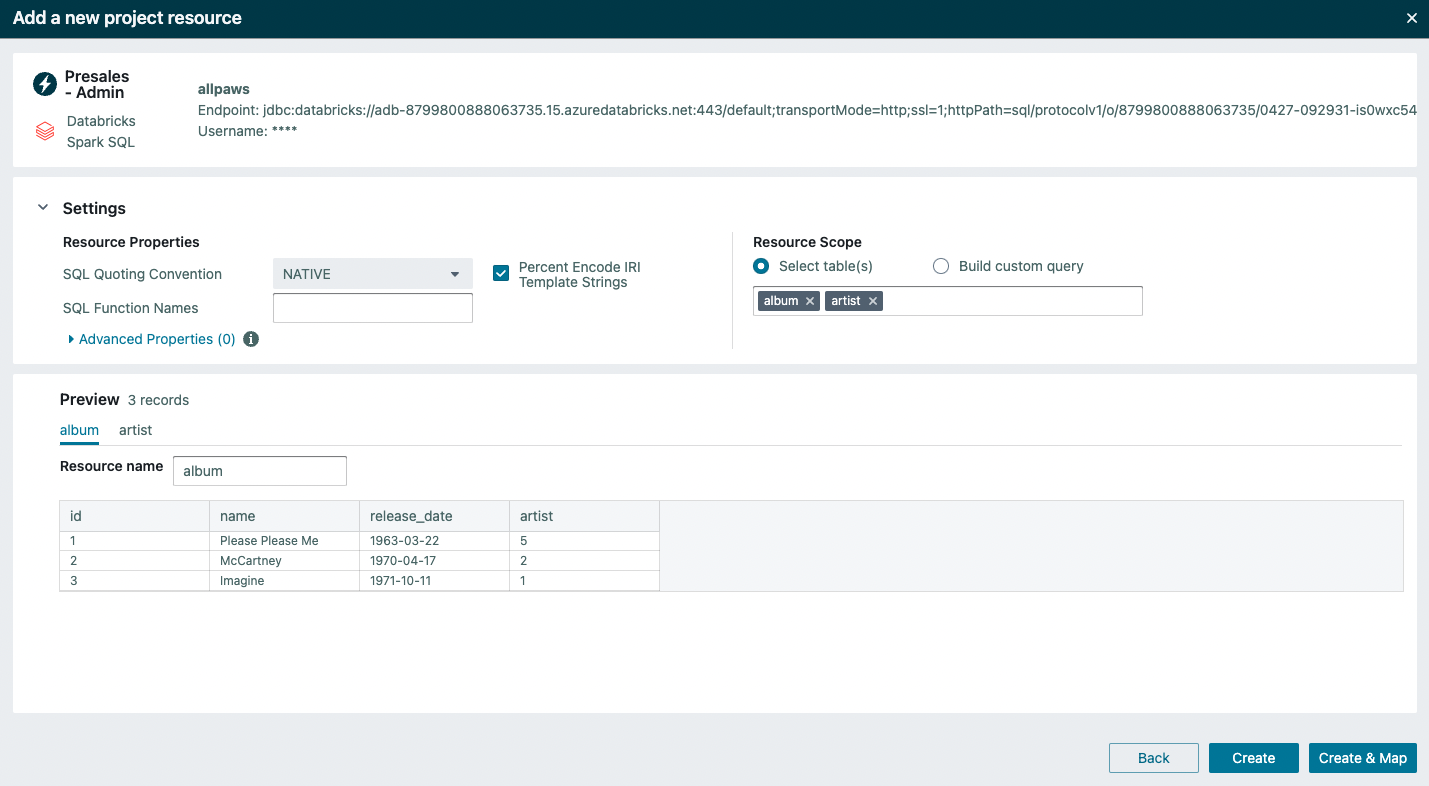
- When creating a virtual graph, the resource name, scope, and properties (such as SQL quoting convention) can be customized.
- The scope can be a single table from the selected data source connection or a custom SQL query.
- Note: when a reserved SQL keyword is used as a schema or table name, you must write a custom SQL query with quotes around the reserved keyword to define a virtual graph. For example, if the virtual graph you want to define is from a schema named
DEFAULTand a table namedTABLE, a custom query would be required when defining the virtual graph. An example query for this schema and table pair is:SELECT * FROM 'DEFAULT'.`TABLE`
- Note: when a reserved SQL keyword is used as a schema or table name, you must write a custom SQL query with quotes around the reserved keyword to define a virtual graph. For example, if the virtual graph you want to define is from a schema named
- The project resource name will be used as part of the virtual graph name when published.
- The scope can be a single table from the selected data source connection or a custom SQL query.
- Only relational database data sources are supported at this time. Please see Supported Data Sources for the complete list.
Mapping Capabilities
Designer includes a model view and a mapping view. The model view is a canvas for creating, importing, and viewing model concepts and project resources. The mapping view is a structured interface for mapping project resources to model concepts.
Project resources are mapped to classes by adding a link from the toolbar when the project resource is selected. Once dragged to a class, the mapping link creates a mapping. When a mapping is started a class will show an outline mapping icon.
![]()
For a mapping to be completed, a primary identifier is required and is used to identify unique class instances. The mapping icon will become filled when a primary identifier has been set in order to show that the mapping is complete.
![]()
Mapping to relationships and attributes is part of the class mapping pages. When mapping a relationship, you must first select the source or target class type and then define the primary identifier for the source or target.
If a project resource is mapped to both a source and target for a relationship, the relationship will be automatically mapped for the user based on the defined source and target primary identifiers.
Mapping multiple fields to an attribute
If you wish to map multiple project resource fields to the same attribute, you can select Duplicate mapping from the three dot menu in the row of the attribute. The duplicated attribute enables you to map an additional field from your resource to that attribute. Mapping to a duplicated attribute can be done any number of times.
Mapping suggestions
Designer also provides a suggestion service to suggest mappings between a project resource and a class. To approve a suggestion, click on the green check icon. To reject a suggestion, click on the red cross icon. All mappings, including those you have approved from the suggestion service, may be modified by clicking on the field dropdown and clearing the selection (removing the mapping to the attribute) or selecting a new field (replacing the field mapped to the attribute).
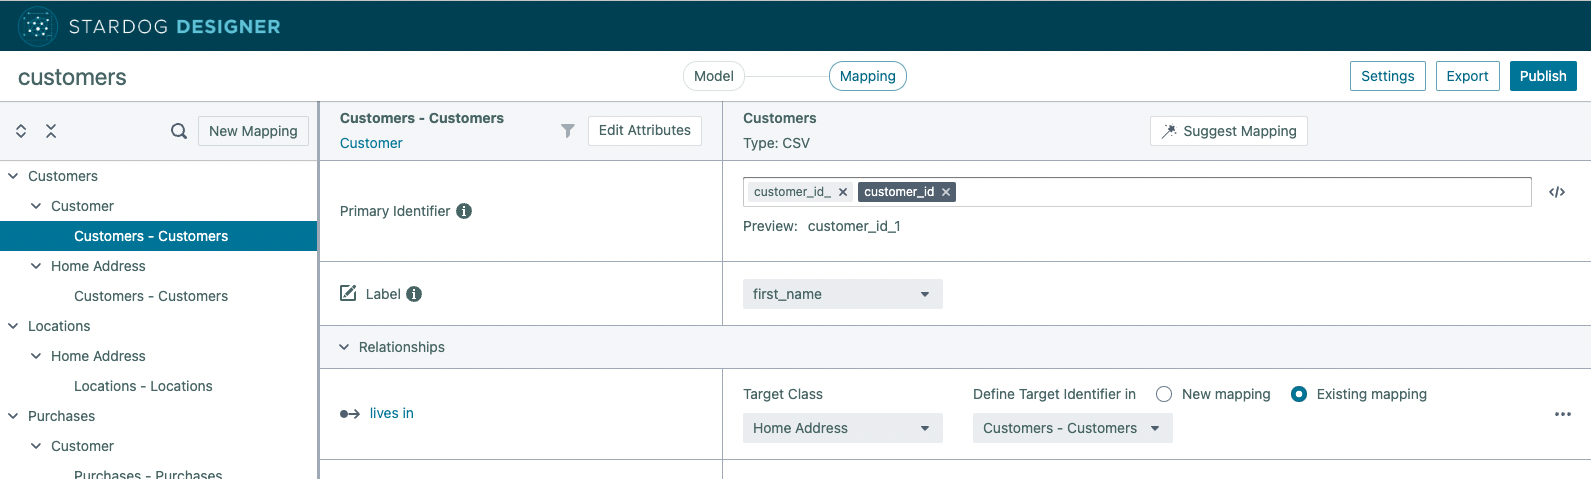
Primary identifiers
Designer enables multi-field and static text input to be used when setting a primary identifier. The primary identifier must include at least one input field from the mapped project resource. Field inputs are shown in dark grey, and static text inputs are shown in a light gray. Once an input field from the mapped project resource is selected, a preview of the primary identifier is shown.
Inherited relationships and attributes
If your model contains parent and child classes, there might be scenarios where you want to map to the parent relationship and attributes when creating an instance of the child class. For example, let’s imagine you have a model containing a class Person with a single attribute for First Name and a subclass Employee. In a Knowledge Graph model, the attribute First Name is inherited by the Employee class because Employee is a subclass of Person. This parent-to-child inheritance applies for all attributes (e.g., if Person also had an attribute for Last Name) and across multiple parent-child associations (e.g., Manager subclass to Employee subclass to Person, Manager also inherits the attributes of Person).
Designer supports mapping to inherited relationships and attributes. All inherited relationships and attributes are identified by a reference below the relationship’s or attribute’s name, which includes the root parent class(es) from which the relationship or attribute was inherited. To limit the displayed relationships or attributes for a mapping, use the filter icon next to Edit Attributes.
Publishing
Designer supports publishing projects in two ways: to a zipped folder or directly to a Stardog server. The zipped folder contains all the inputs needed to publish the model and mappings to Stardog. The contents can be used in version control systems to document model and mapping changes.
When publishing to a zipped folder, the contents will include:
- A zipped folder with the name of the project.
- A turtle (.ttl) document containing the model.
- A folder for each project resource with the name of the project resource. The folder will contain:
- A Stardog Mapping Syntax 2 (SMS2) mapping file.
- Please see SMS2 (Stardog Mapping Syntax 2) to learn more about SMS2.
- A properties file.
- If the project resource was a CSV, the original CSV renamed to the project resource name.
- A Stardog Mapping Syntax 2 (SMS2) mapping file.
- A file with an extension of
.stardogdesigner.- The file may be loaded into any Designer environment to re-create the project.
When publishing directly to a Stardog server, there are three steps.
- Server and Database Selection
- Set the server and database to which you want your project published.
- Additionally, you can publish the namespace of your project.
- Model Configuration
- Specify if you want to create a new model or replace an existing model.
- When creating a new model, you may choose to modify the model name or the schema graph a model will be published to.
- Mapping Configuration
- Only shown if there are valid mappings in a project.
- Choose to create a new graph or replace an existing graph for each mapped project resource.
- CSV sources are materialized to the database in the specified named graph.
- All non-CSV project resources are published as virtual graphs, and the virtual graphs are published for the chosen database on the selected server.
Created Model Definition
-
Classes are defined as:
http://www.w3.org/2002/07/owl#Class. - Relationships are defined as:
http://www.w3.org/2002/07/owl#ObjectProperty.- Relationship domains (e.g., sources), by default, are defined by
https://schema.org/domainIncludes. If the project settingInfer class types based on shared propertiesisYesorCustom per propertyand this option is set toYesfor a relationship, the relationship domain will be defined byhttp://www.w3.org/2000/01/rdf-schema#domain. - Relationship ranges (e.g., targets), by default, are defined by
https://schema.org/rangeIncludes. If the project settingInfer class types based on shared propertiesisYesorCustom per propertyand this option is set toYesfor a relationship, relationship range will be defined byhttp://www.w3.org/2000/01/rdf-schema#range.
- Relationship domains (e.g., sources), by default, are defined by
- Attributes are defined as:
http://www.w3.org/2002/07/owl#DatatypeProperty.- Attribute domains, by default, are defined by
https://schema.org/domainIncludes. If the project settingInfer class types based on shared propertiesisYesorCustom per propertyand this option is set toYesfor an attribute, the attribute domain will be defined byhttp://www.w3.org/2000/01/rdf-schema#domain. - Attribute ranges, by default, are defined by
https://schema.org/rangeIncludes. If the project settingInfer class types based on shared propertiesisYesorCustom per propertyand this option is set toYesfor an attribute, the attribute range will be defined byhttp://www.w3.org/2000/01/rdf-schema#range.
- Attribute domains, by default, are defined by
-
Model concept labels are defined using:
http://www.w3.org/2000/01/rdf-schema#label. - Model concept descriptions are defined using:
http://www.w3.org/2000/01/rdf-schema#comment.
Additional Notes
-
To authenticate using Kerberos, both the Stardog server and your browser must be correctly configured. Check out the detailed documentation on how.
-
Designer does not support project resources with field names that start with underscores, such as
_columnOne. Underscores are supported in non-starting positions. For example, a field labeledcolumn_oneis supported. -
To improve performance of inference rules which reference specific data instances, we recommend using the
inproperty option and specifying the IRI of the instance(s) using backticks (`). -
Inherited relationships and attributes are shown for subclasses.
-
When deleting a class, all attributes solely associated with that class will also be deleted. A warning message will be shown to the user listing the attributes to be deleted.
-
Class instances are only defined for mappings that have primary identifiers set. When mapping a project resource to a relationship, if you would like instances of classes created for both the source and target classes, the project resource must be mapped to each source and target class. It is not possible to only define relationship associations across source and target instances. Either, the source or target must have a primary identifier mapping and, therefore, instances of that class will be defined.
Getting Support
For questions, comments, or feature requests, please post in the Designer section of the Stardog Community.
Learning More
The Stardog blog includes posts about new Designer functionality. All of those posts are available under the Designer Tag.