Usage
This page discusses how to use the Stardog Spark connector for running graph analytics algorithms.
Page Contents
We provide basic instructions to run graph analytics using command line, Databricks environment, and Amazon EMR, taught through a motivating example. If you are using a different Spark installation, you should be able to use these steps as guides to submit jobs.
If you have not read the Setup page, please do so before proceeding. All files used throughout this tutorial can be found in the stardog-examples GitHub repository.
Setup
The data for this example are very simple. The use case is a collection of routers and their connections. CSV file routers.csv contains an edge list of the connections between the routers. The connections are uni-directional. Each router belongs to one of two classes: Local or Regional. The regional routers typically have more out-edges than the local ones. We can think of them as major junction points for the network.
In this tutorial, you will learn:
- How to perform a graph analytics algorithm on the database to identify connected components in the graph.
- How to create different ontological schemas for the same data.
- How to the graph analytics algorithms with different schemas and how the results differ.
Creating the data base
The following script builds the demo and runs a couple of test queries. If you are running the example against some instance other than localhost with the default username and password (admin, admin), you will need to add parameters for the server, username, and password. For example, line 3 becomes stardog-admin --server "https://my-stardog-instance.com:5820" db drop -u myUsername -p myPassword router
01: #! /bin/bash

03: stardog-admin db drop router
04: stardog-admin db create -n router


07: stardog namespace add --prefix net --uri http://routers.stardog.com/ router

09: stardog-admin virtual import router scope.sms routers_scope.csv
10: stardog-admin virtual import router routers.sms routers.csv

12: stardog data add router -g net:basic basic.ttl
13: stardog data add router -g net:onto onto.ttl
14: stardog data add router -g net:sym onto_symmetric.ttl

16: stardog reasoning schema --add basic --graphs net:basic -- router
17: stardog reasoning schema --add onto --graphs net:onto -- router
18: stardog reasoning schema --add sym --graphs net:sym -- router

20: stardog query router "select (count(*) as ?n) {?s ?p ?o .}"

23: echo 'stardog query --schema onto  router "select * {  net:r_465 net:connects ?o .}"'
24: stardog query --schema basic  router "select * {  net:r_465 net:connects ?o .}"

26: echo 'stardog query --schema sym router "select * {  net:r_465 net:connects ?o .}"'
27: stardog query --schema sym router "select * {  net:r_465 net:connects ?o .}"
- Lines 3-4. Drop and create database
router - Line 7. Add a namespace
- Lines 9-10. Import the two data files and their mappings (scope.sms, routers_scope.csv, routers.sms, routers.csv)
- Lines 12-14. Import 3 different ontologies (basic.ttl, onto.ttl, onto_symmetric.ttl) to 3 named graphs
- Lines 16-18. Create 3 schemas from these named graphs.
- Line 24. Find
r_465’s connections using thebasicschema - Line 27. Fine
r_465’s connections using thesymschema.
Three Ontologies
Turtle files basic.ttl, onto.ttl and sym.ttl contain three different ontologies for the router data. basic defines properties and classes. onto further indicates that Regional and Local are subclasses of a common class, Router. sym provides a rule to make the connection edges symmetric.
The queries in lines 24 and 27 of the build file illustrate the difference that symmetry makes. Router net:r_565 connects to 4 routers when ignoring edge direction and only connects to 2 when respecting edge direction.
Command Line
If you download Apache Spark library locally, you can use the standard spark-submit command to run the graph analytics algorithms. In the console, navigate to the Apache Spark directory, and execute the following command:
$ bin/spark-submit --master local[*] --files router.properties <path-to-connector>/stardog-spark-connector-VERSION.jar router.properties
The argument local[*] means the job is being submitted to a local Spark cluster with as many worker threads as logical cores on your machine. You can change the number of threads or use a remote Spark cluster location. Please refer to the Spark documentation for details. The <path-to-connector> should point to the directory where you downloaded the Stardog Spark connector, and the VERSION should be replaced by the version you downloaded. The properties file contains the parameters needed to specify the jobs. Here is a sample properties file.
A sample properties file
01: # Algorithm parameters
02: # algorithm.name=ConnectedComponents
03: # algorithm.name=LabelPropagation
04: # algorithm.name=PageRank
05: algorithm.name=StronglyConnectedComponents
06: # algorithm.name=TriangleCount
07: algorithm.iterations=10

09: # Stardog connection parameters
10: stardog.server=http://localhost:5820
11: stardog.database=router
12: stardog.username=admin
13: stardog.password=admin
14: stardog.query.timeout=10m
15: #stardog.reasoning=true
16: stardog.reasoning.schema=sym
17: #stardog.query=construct {?s ?p ?o .} from <some:graph> where {?s ?p ?o .}

19: # Output parameters
20: output.property=http://routers.stardog.com/sym/component
21: output.graph=http://routers.stardog.com/sym

23: # Spark parameters
24: spark.dataset.size=12000
You can find this file here.
- Lines 1-7 give the available graphX algorithms. For a brief description of what they do, see Algorithms. This tutorial uses connected components.
- Lines 9-14. Endpoint of the Stardog instance, the username and password.
- Line 15. If the query needs reasoning ON, set it here
- Line 16. If using a named schema, name it here. If
stardog.reasoning.schemais not null, reasoning is assumed and there is no need to setstardog.reasoning. - Line 17. By default, the algorithm is applied to the ENTIRE graph, including any ontology pieces you may have thrown in there. The query allows you to limit the scope of the algorithm. Note that it is a
CONSTRUCTquery, rather than the usualSELECT. Note also that it is not surrounded by quotes, even though it is a string. - Line 20-21. The results of the analysis are added to a named graph. With strongly connected components, each class node from the query is assigned a component label, using the datatype property defined in Line 20.
- Line 24.
spark.dataset.sizeis the approximate number of triples in the graph. Obtain these number by running the standard query,select (count(*) as ?n) {?s ?p ?o .}.See what other Spark parameters are available here. In most cases, the defaults are fine.
Command line all the way!
You can specify these parameters on the command line, dispensing with the properties file, as follows:
$ bin/spark-submit --master local[8] <path-to-connector>/stardog-spark-connector-VERSION.jar algorithm.name=StronglyConnectedComponents algorithm.iterations=10 stardog.server=http://localhost:5820 stardog.database=router output.property=http://routers.stardog.com/sym/component output.graph=http://routers.stardog.com/sym
Using schemas
You can experiment with the router schemas and the strongly connected components algorithm.
The onto schema allows us to treat Regional and Local routers as entities of class Router. The relevant lines from the properties file are:
stardog.reasoning.schema=onto
stardog.query=construct {?r1 ?p ?r2 .} where {?r1 a net:Router ; ?p ?r2 . ?r2 a net:Router . }

# Output parameters
output.property=http://routers.stardog.com/ontoComp/component
output.graph=http://routers.stardog.com/ontoComp
Next, we can run the algorithm with the symmetric ontology, sym, which allows connections to run both ways. The data are saved to a different named graph.
stardog.reasoning.schema=sym
stardog.query=construct {?r1 ?p ?r2 .} where {?r1 a net:Router ; ?p ?r2 . ?r2 a net:Router . }

# Output parameters
output.property=http://routers.stardog.com/symComp/component
output.graph=http://routers.stardog.com/symComp
In the first case, we get 2113 distinct components. In other words, each router is its own component. With bi-directional edges (when using the sym ontology), we get only 1 component, as the graph is connected when directionality is ignored.
To check this result, run
stardog query router "select (count(distinct(?component)) as ?n) {graph net:symComp {?s ?p ?component}}"
followed by,
stardog query router "select (count(distinct(?component)) as ?n) {graph net:ontoComp {?s ?p ?component}}"
Databricks
You can use Stardog graph analytics in Databricks Runtime 7.0 or later, which supports Apache Spark 3.0. You should make sure that the Spark cluster is launched with a compatible runtime:
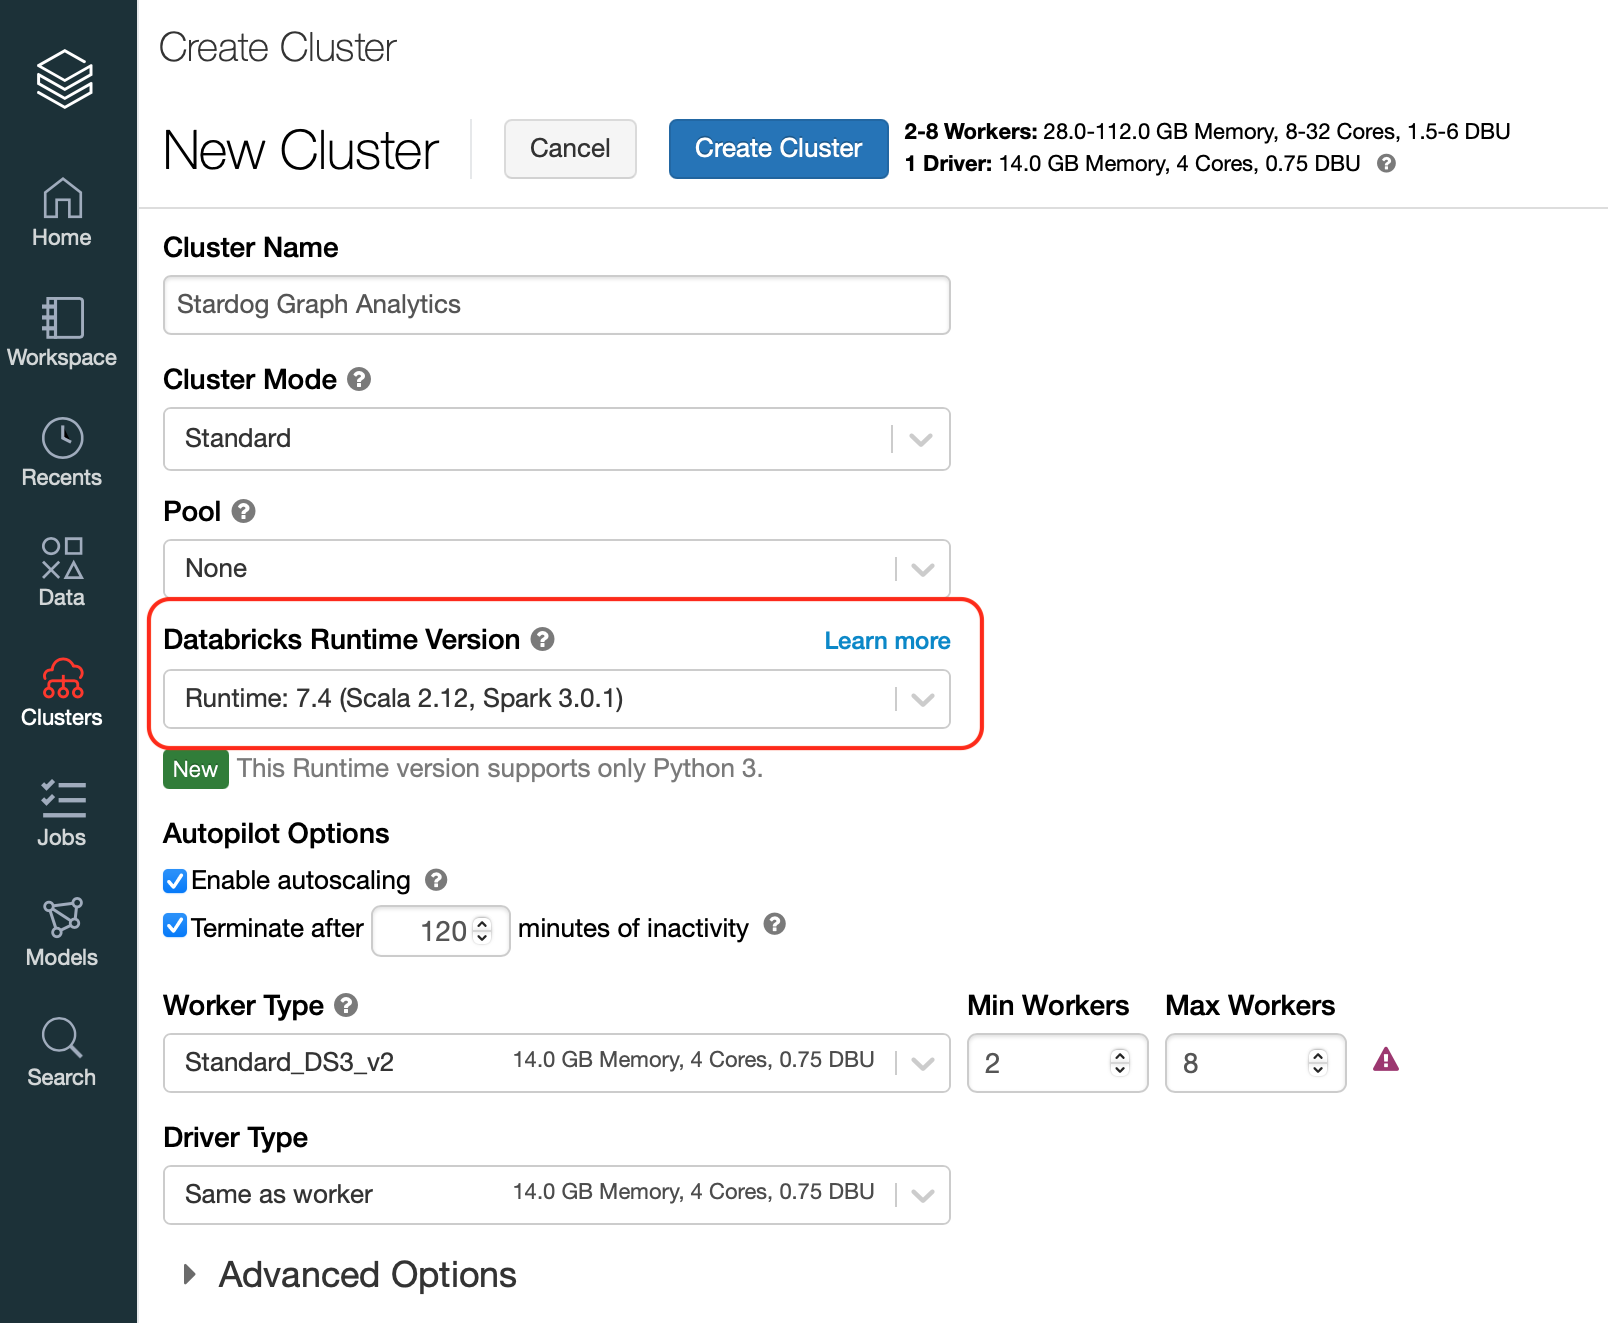
Graph analytics can be run from Databricks, along the other utilities in the Spark Connector. The best ways are:
- Run from a notebook.
- Create a job to run the notebook if you want this to be part of a larger workflow or to occur at a scheduled time.
A GraphAnalytics notebook
Add the spark connector jar to the Databricks workspace. (right click in the workspace => create library => upload jar)
Create a databricks notebook with Scala and add the following code to the cells.
// Databricks notebook source
import com.stardog.spark.GraphAnalytics

val sgServer = "https://solutions-demo.stardog.cloud:5820"
val pw = dbutils.secrets.get("your_scope", "your_password_key")
val userName = dbutils.secrets.get("your_scope, "your_username_key")
val dbName = "router"


// COMMAND ----------

val q = "construct {?r1 ?p ?r2 .} where {?r1 a net:Router; ?p ?r2 . ?r2 a net:Router . }"

// COMMAND ----------

val params = Array(
  "algorithm.name=StronglyConnectedComponents",
  "algorithm.iterations=5",
  "stardog.server=" + sgServer,
  "stardog.database=" + dbName,
  "stardog.username=" + userName,
  "stardog.password=" + pw,
  "stardog.query.timeout=10m",
  "stardog.reasoning.schema=onto",
  "stardog.query=" + q,
  "output.property=http://routers.stardog.com/ontoComp/component",
  "output.graph=http://routers.stardog.com/ontoComp",
  "spark.dataset.size=12000"
)

// COMMAND ----------

GraphAnalytics.main(params)

// COMMAND ----------
This notebook runs the Strongly Connected Components algorithm using the onto ontology.
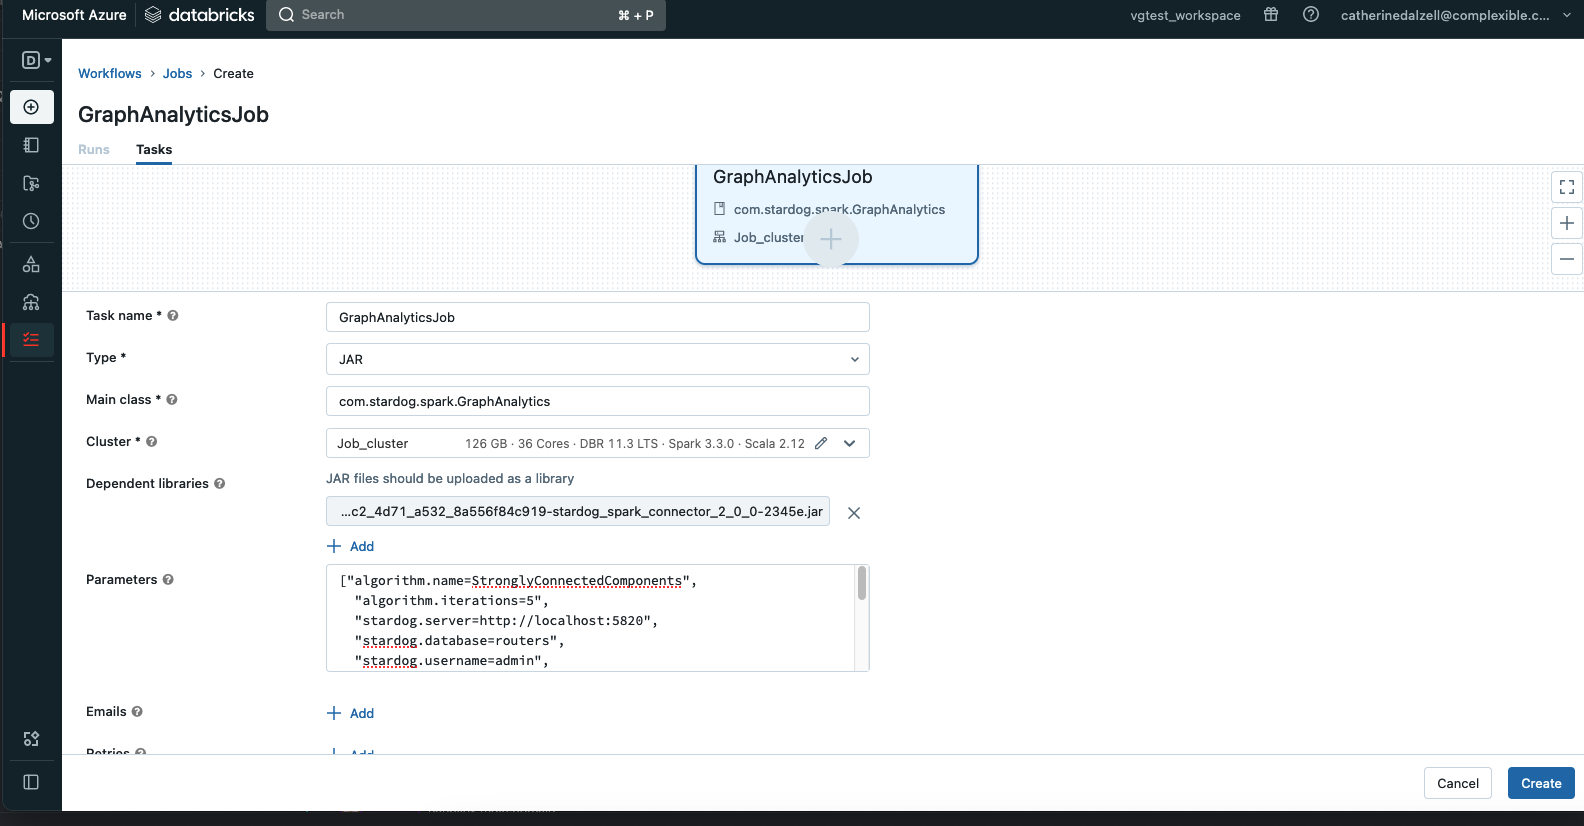
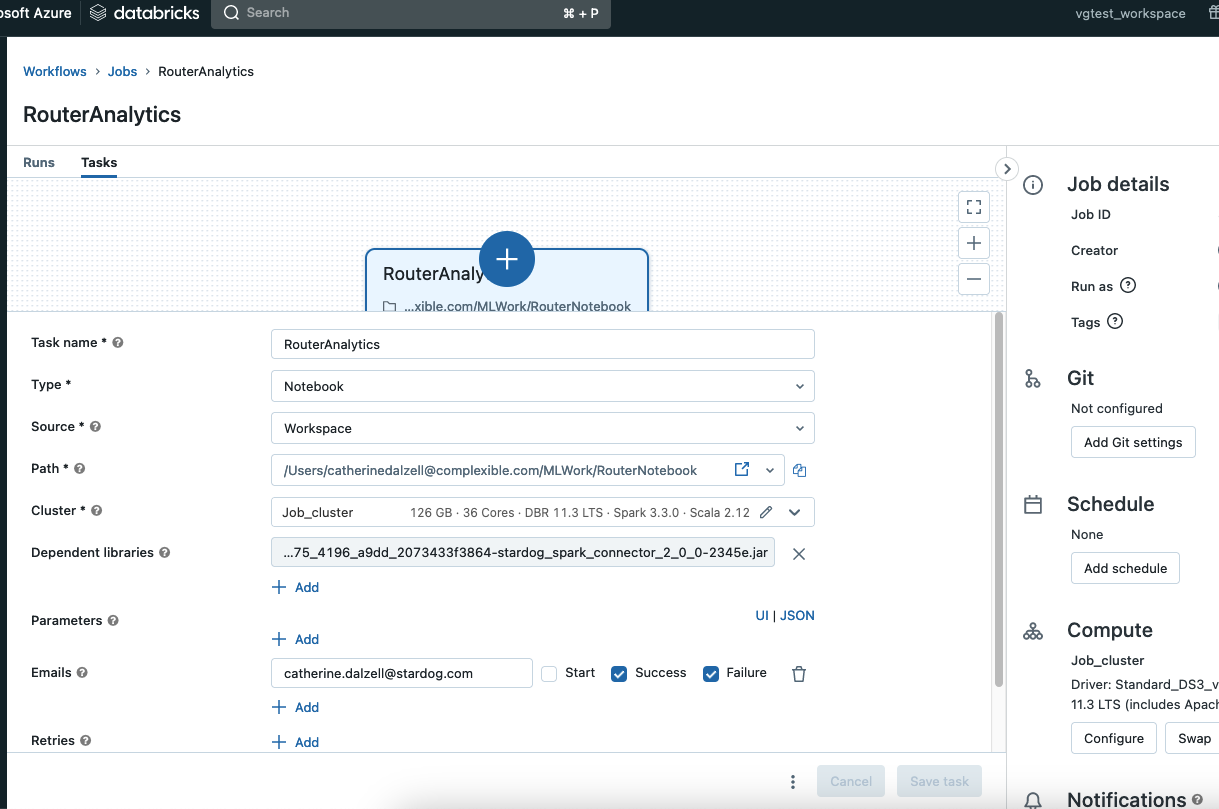
Run as a Job
Select the Workflows tab from the menu. Select create job. Complete the task page with the following information. Under Path*, insert the path to your notebook. For Dependent libraries, click on the form and you will get the opportunity to load the jar file. The jar uploaded to the workspace library does not work in this context. Now, run the job!
Amazon EMR
You can use Stardog graph analytics with Amazon EMR 6.1.0 or later, which supports Apache Spark 3.0. You should make sure that the EMR environment is launched with a compatible runtime:
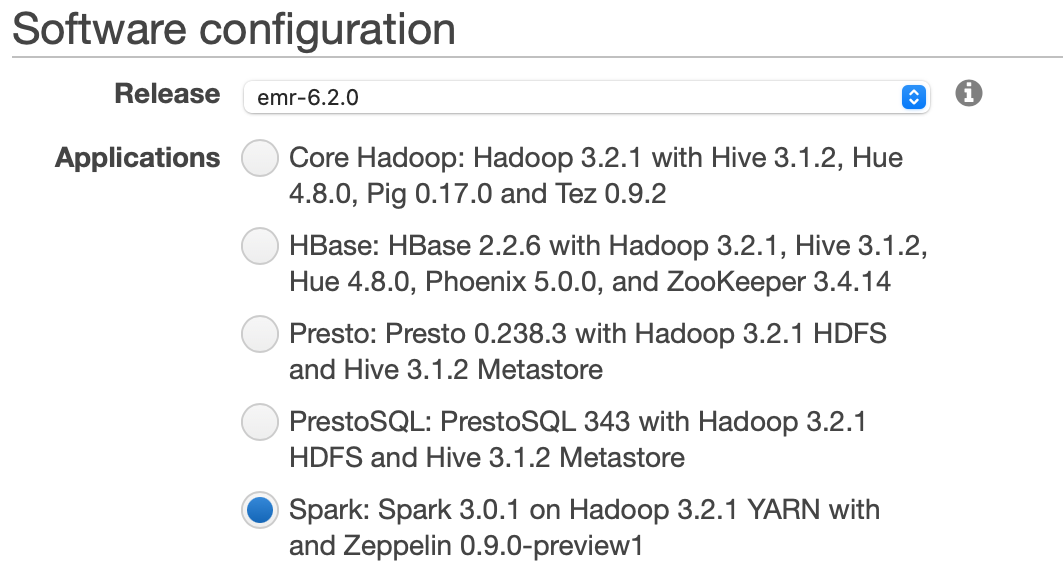
You need to upload the Stardog spark connector you downloaded to an S3 bucket that is accessible by your EMR cluster. Please follow AWS instructions to upload the jar to a bucket.
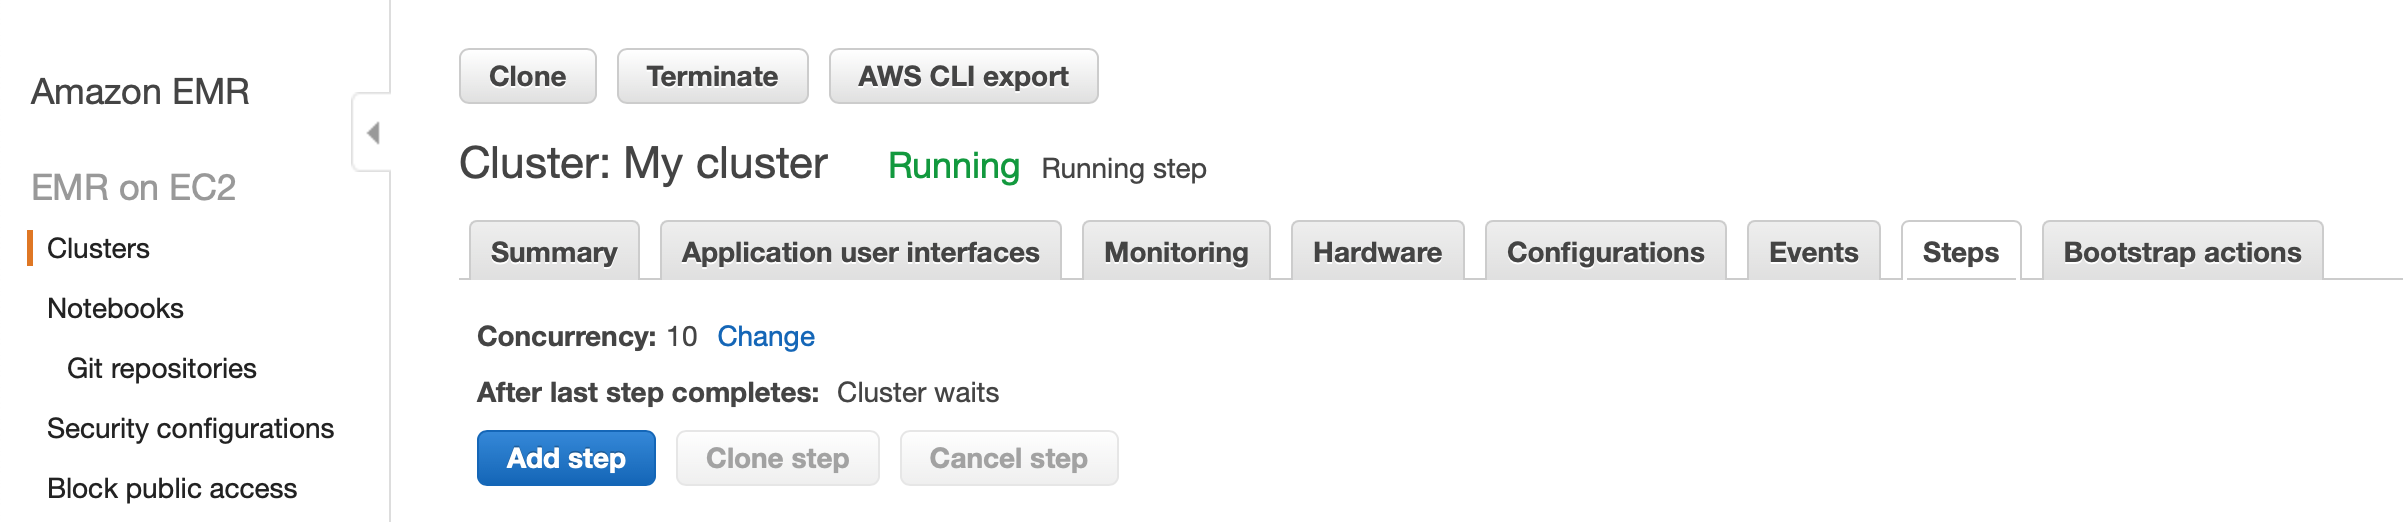
In the EMR console, go to the “Steps” tab and click “Add step” button:
In the “Add step” dialog, select “Spark application” as the “Step type”, enter a descriptive step name, select the S3 location the connector is uploaded to, and enter the input parameters as key value pairs:
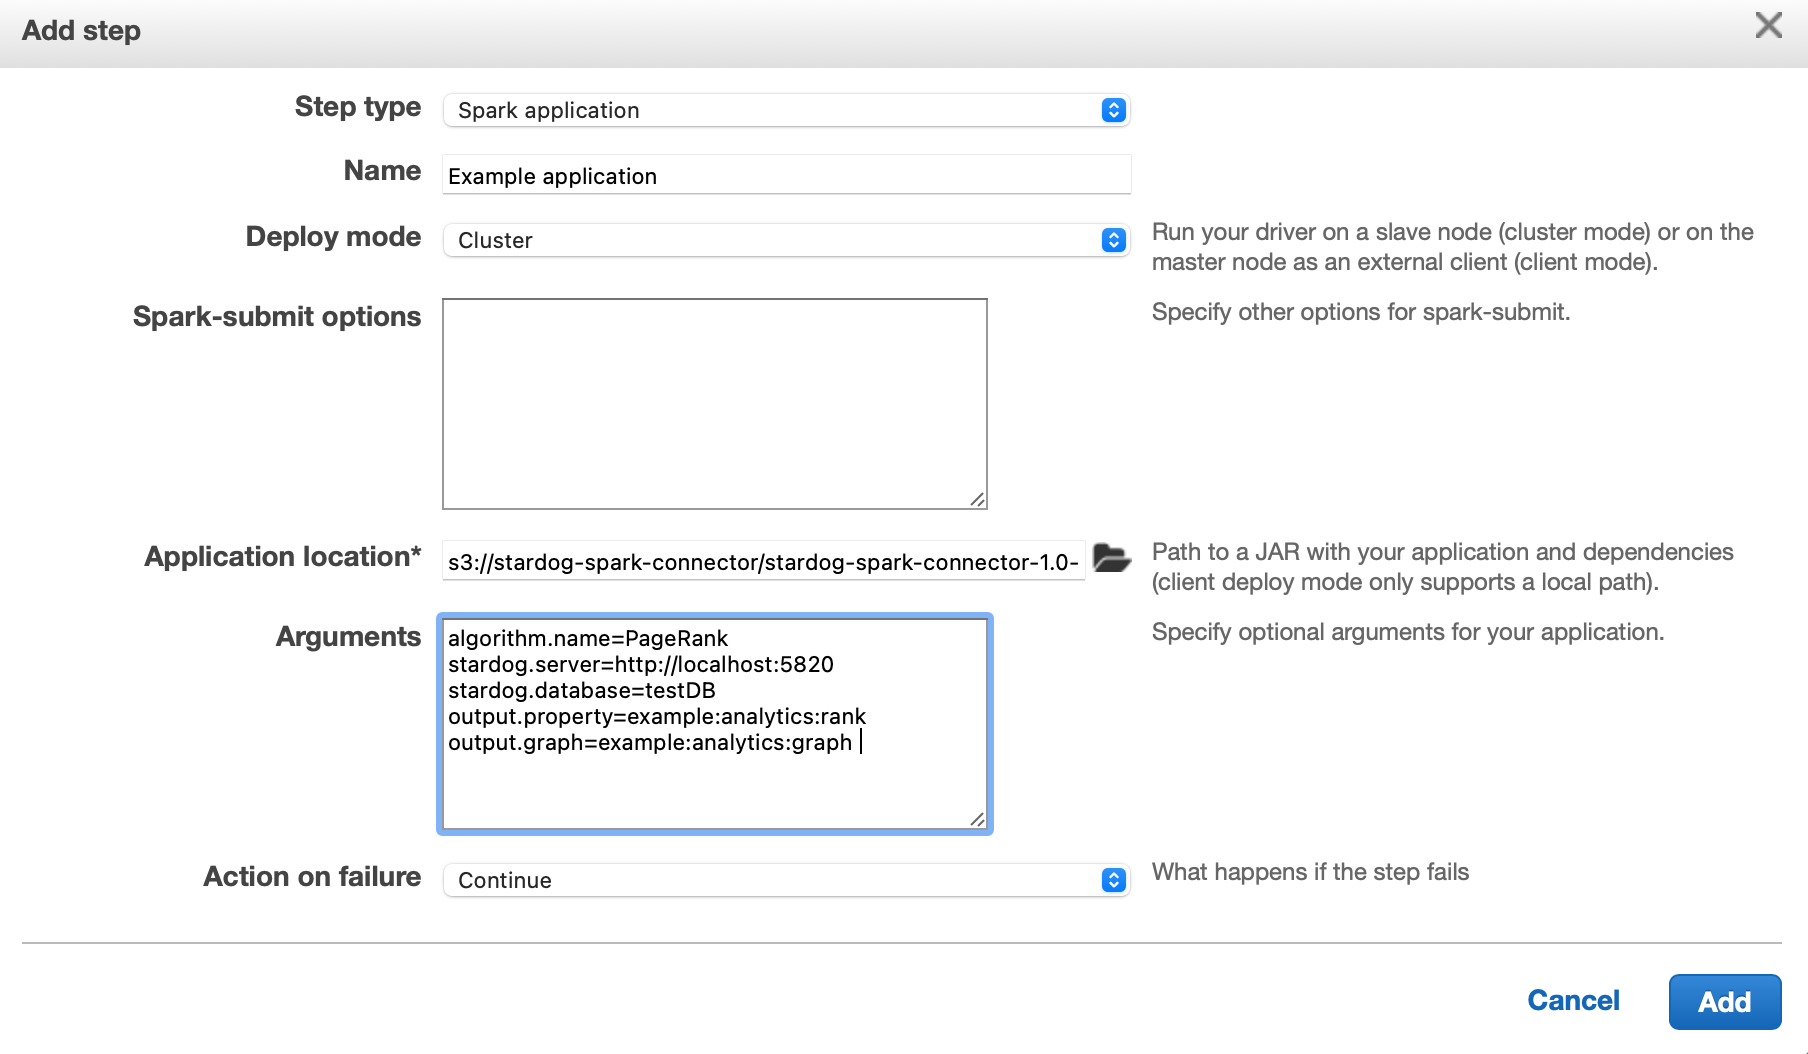
Once you click the “Add” button in this dialog, the graph analytics algorithm will start running immediately.
If you would like to rerun the algorithm, you can select the step from the list and click “Clone step”. In the dialog that pops up, you can edit the input parameters and then run the step again.