AWS Marketplace setup
This page describes how to run Stardog from the AWS Marketplace.
Page Contents
Requirements
To launch Stardog from the AWS Marketplace, make sure you have an AWS Account and you have the following permissions:
- EC2
- VPC
- ACM
- Route53 (Optional)
You also will need an SSH key created beforehand in the region you want to deploy Stardog.
Setup
Step 1: Subscribe to Stardog Enterprise Knowledge Graph Platform
Look for Stardog in the AWS marketplace. You can get directly by following this link. Click on Continue to subscribe. If you are not logged in, you will be prompted to log in into AWS.

Accept the terms and then Continue to Configuration.
Step 2: Configure Cloudformation as delivery method
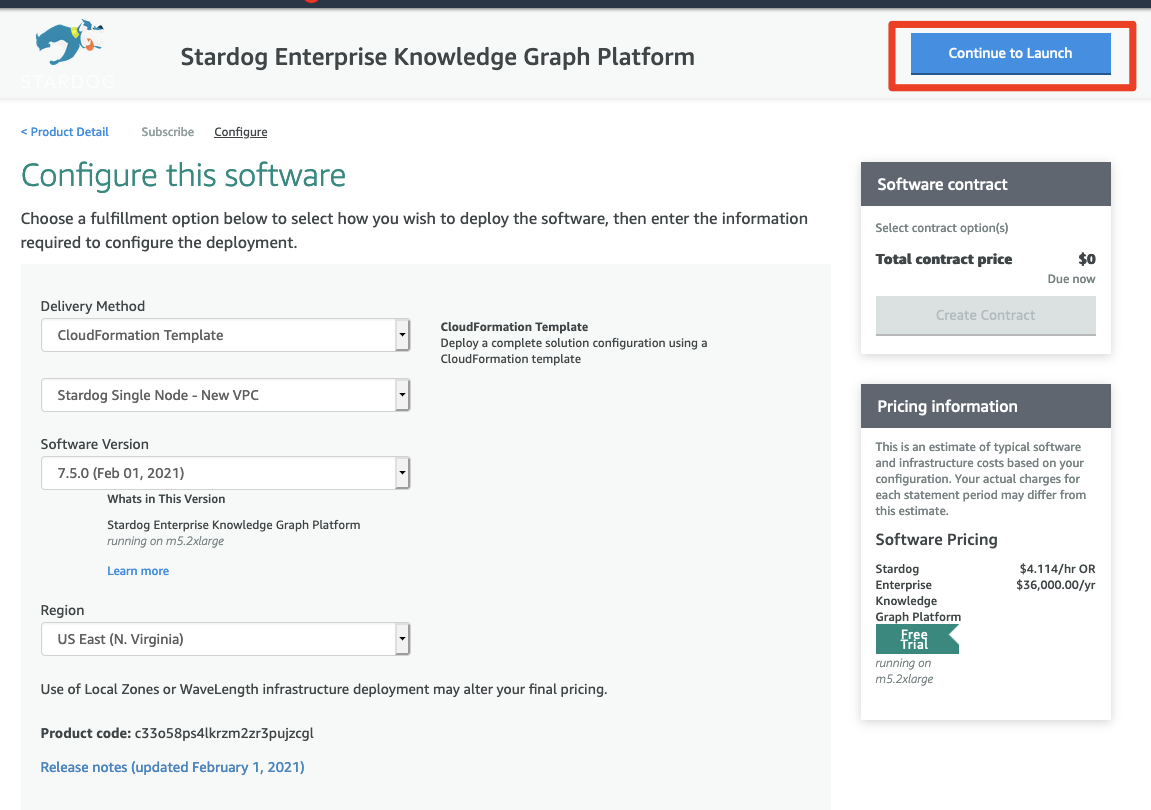
Next, Select Cloudformation Template for Delivery Method, choose Stardog Single Node - New VPC (you can select Existing VPC if you want to reuse an existing VPC. You will be prompted to select a VPC and a public subnet when setting up Cloudformation), Version (the default will always be the latest, and the recommended), and Region. Hit Continue to Launch, then review and hit Launch in the next window.
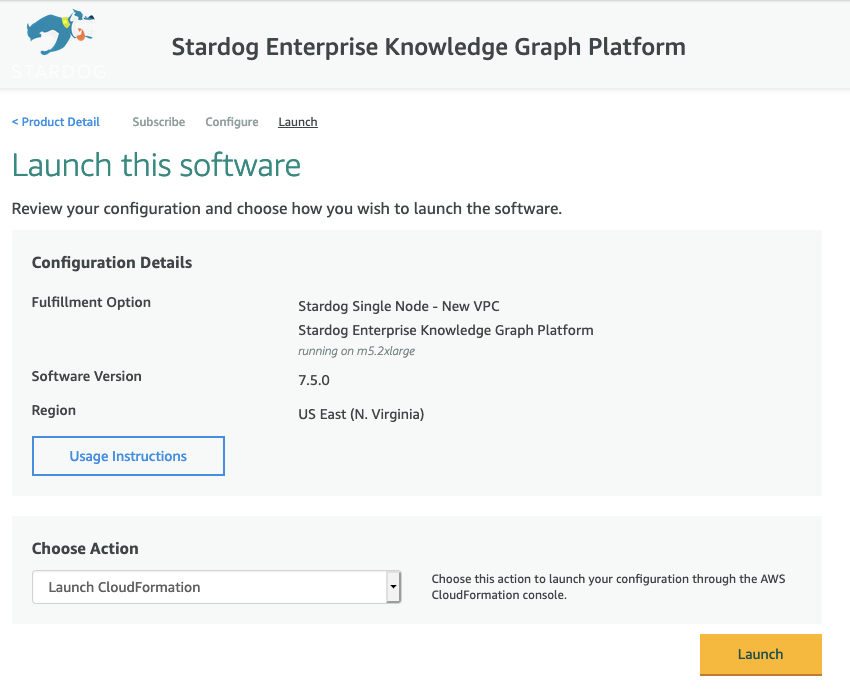
- Choose Action: Launch Cloudformation, and then Launch
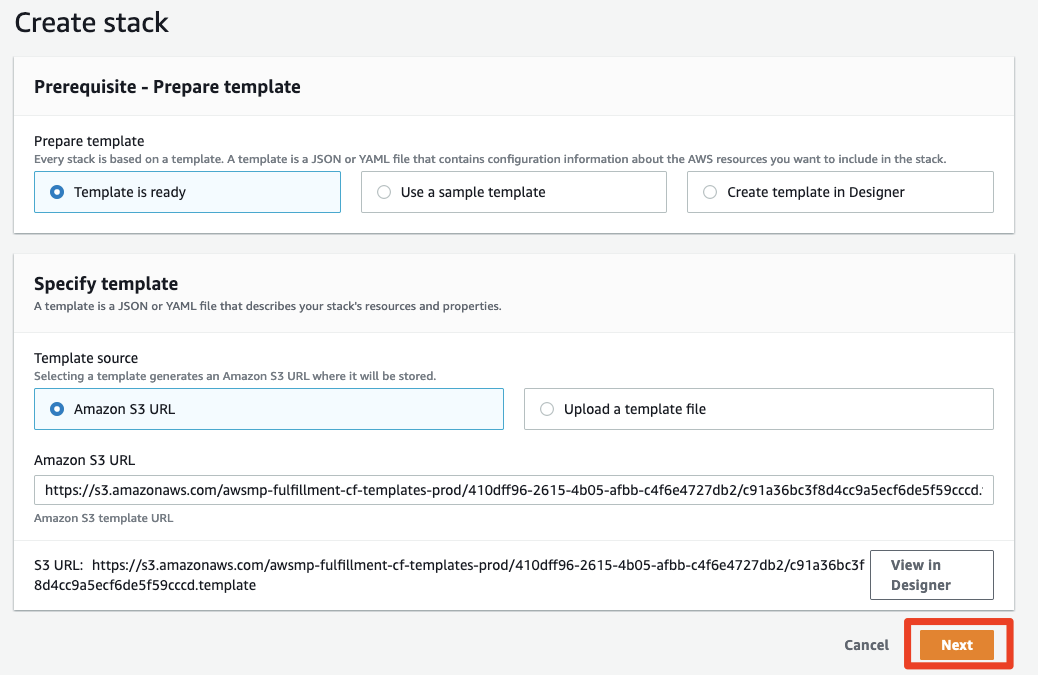
- You will be redirected into your AWS Cloudformation view. Leave everything as it is and click Next
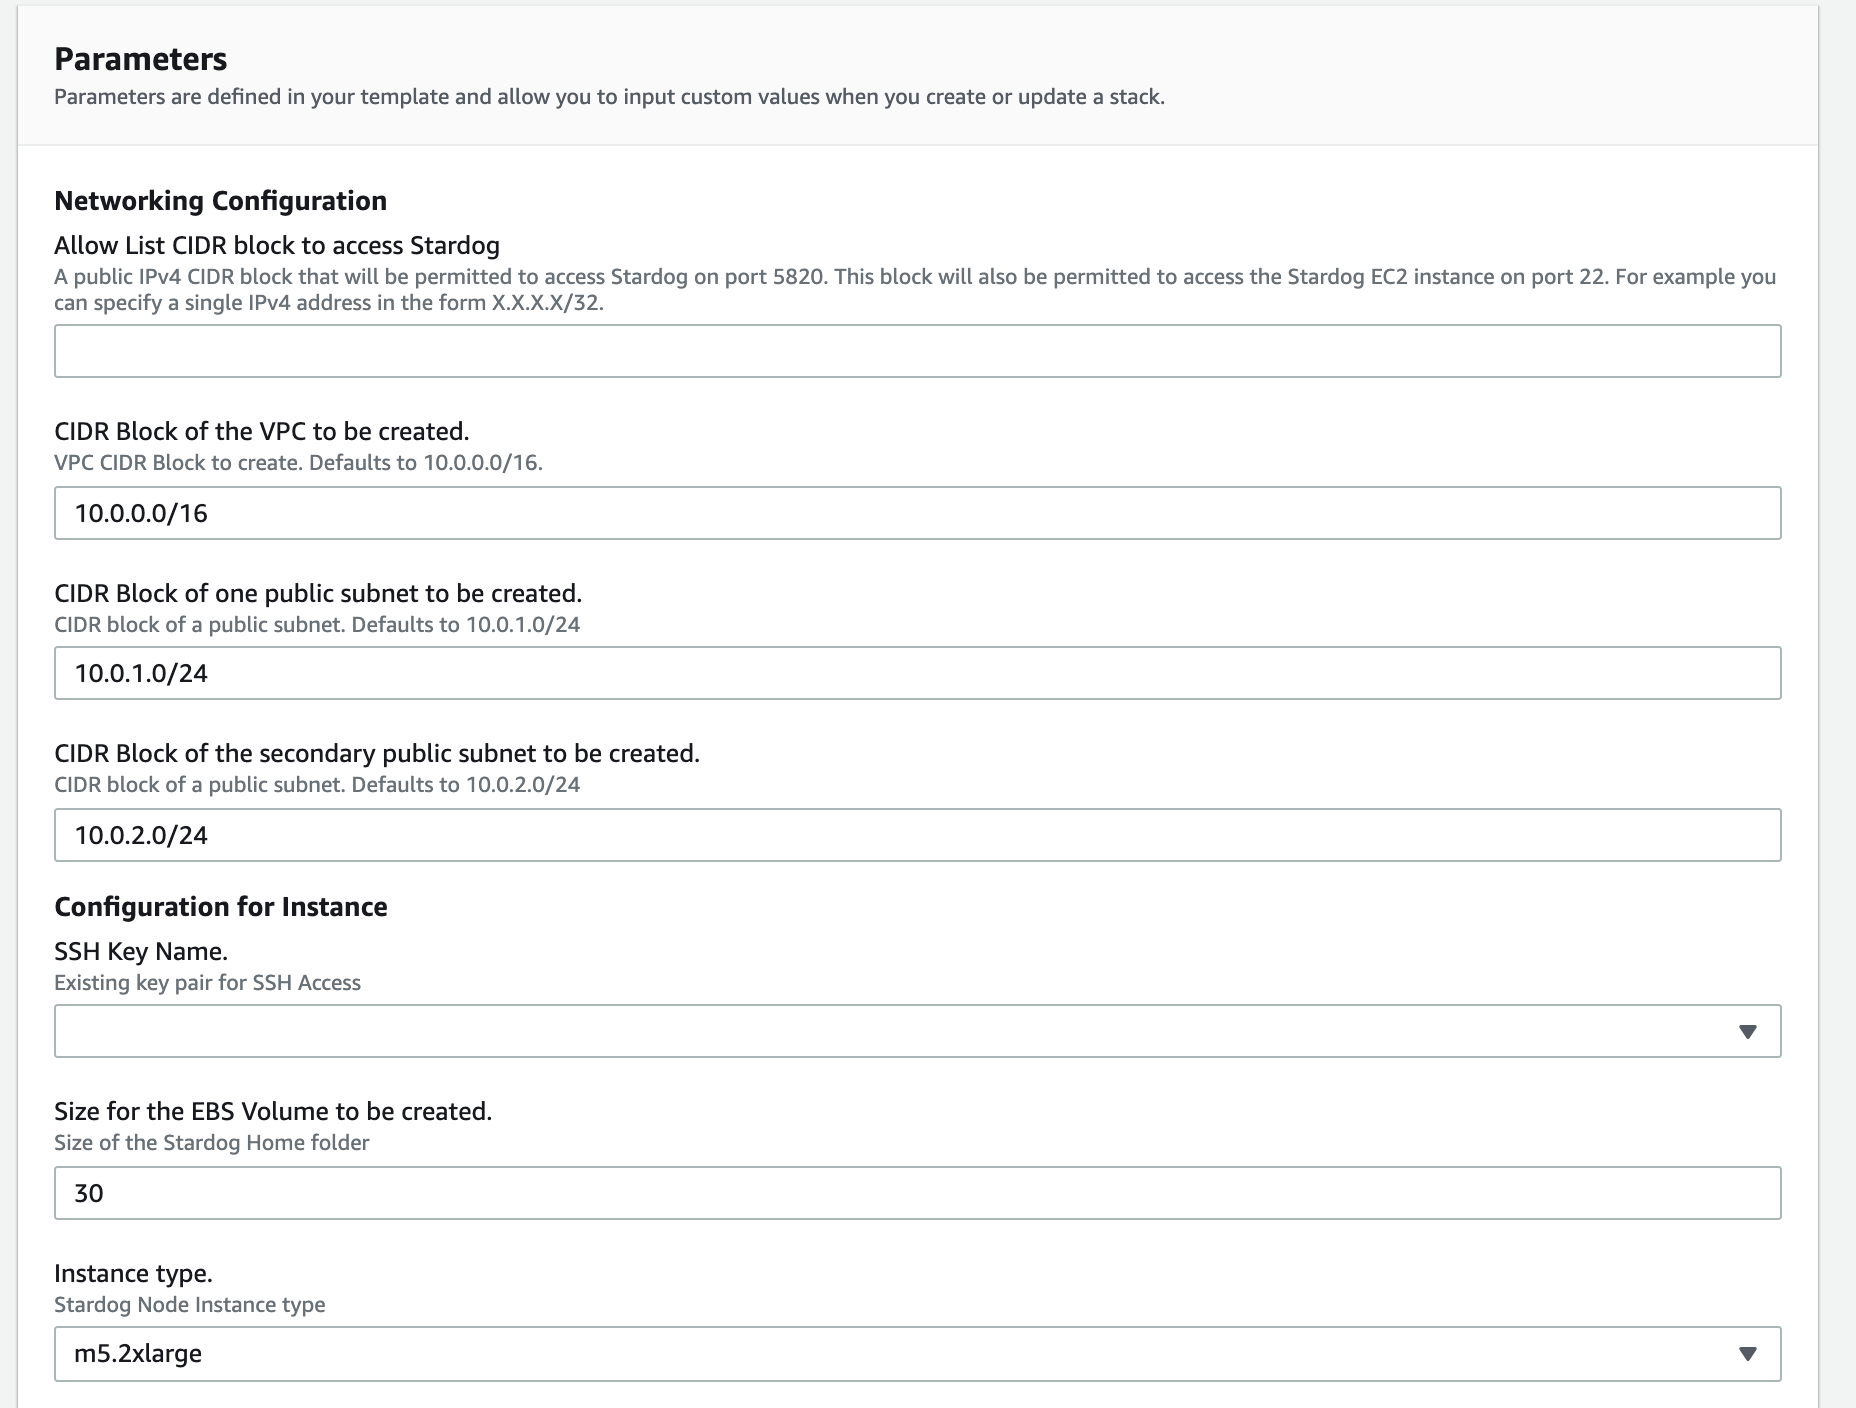
Step 3: Configuring Stack
-
For the Allow List, add the allowed CIDR blocks that will be accessing the Stardog endpoint. For example if your public IP address is
104.198.14.52, you will need to input104.198.14.52/32. -
CIDR blocks for the VPC and public subnets can be left as default.
-
Select an existing SSH key from the dropdown. Make sure you have access to the private key you select here. If you don’t, you need to create your own key-pair
-
Specify the size of the disk in GB to be provisioned to store the Stardog data (Recommended is 30GB).
-
Specify the instance type and size (Recommended is m5.2xlarge).
Step 4: Configuring SSL/TLS for an existing domain (Optional, but recommended).
If you already have an existing wildcard certificate in ACM, and you have access to modify recordsets in Route53, the recommended way to deploy Stardog is using your existing certificate. You will need to specify in this section the ARN of the wildcard certificate, and the hosted zone name you want to create the recordset. You also need to specify the subdomain you want to use for this recordset, which defaults to Stardog. If you don’t have an existing wildcard certificate, or you don’t have access to create records in Route53, you can skip this step.
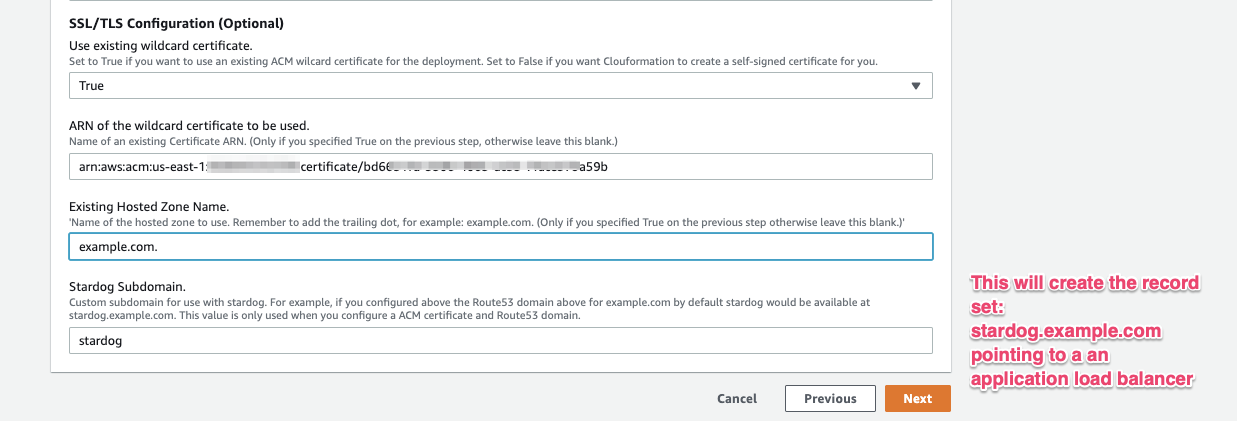
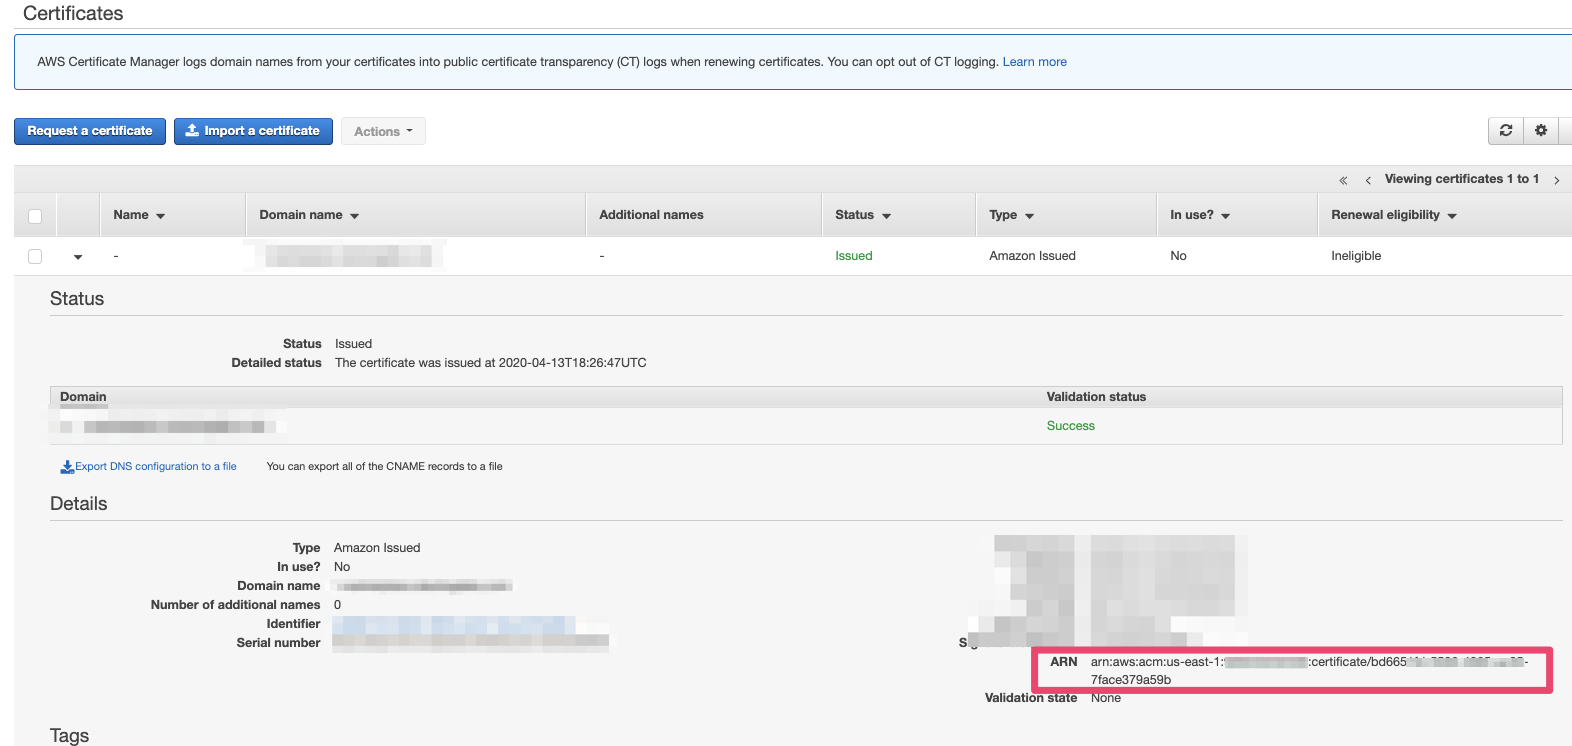
You can grab the requested values from here: ACM ARN: (Go to Services → Certificate Manager)
Hosted Zone Name (Go to Services → Route 53 → Hosted zones):

Step 5: Create Stack
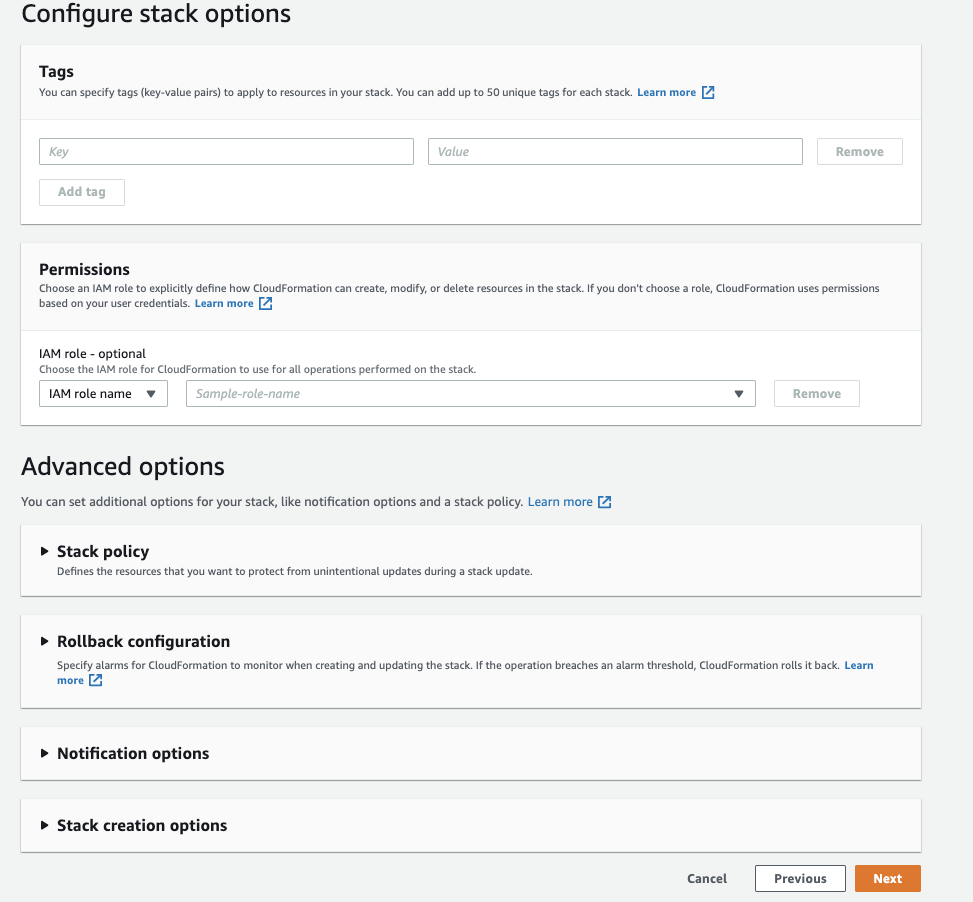
We won’t be configuring any stack options. Leave everything as it is, and hit Next.
Make sure you check this box, then Create Stack. Creating all resources takes about 5 min.

After the Stack is created successfully, click on the outputs tab. You will need these values for the next steps.

If you don’t see these values, something happened during the deployment. Refer to the common problems to solve it. Now, let’s start using Stardog!
AWS Marketplace: Run Stardog in Linux
Install the Stardog client following the Linux Installation guide
Connect to Stardog using self signed certificate
If you did not use an existing ACM certificate in the step 4 of the setup you will need to manually add the self signed certificate created by Cloudformation into your system trust store.
cd /opt/stardog/bin/
alb_dns=<<DNS generated in CF template>>
openssl s_client -host "$alb_dns" -port 5820 -showcerts </dev/null | openssl x509 -text | sed -ne '/-BEGIN CERTIFICATE-/,/-END CERTIFICATE-/p' > stardog-self-signed-cert.crt
yes | keytool -importcert  -keystore my-truststore.jks -alias stardog-server -file stardog-self-signed-cert.crt -storepass changeit
export STARDOG_JAVA_ARGS="-Djavax.net.ssl.trustStore=my-truststore.jks"

# default-password can be found in the Cloudformation outputs
./stardog-admin --server https://"$alb_dns":5820 server status -u admin -p <<default-password>>
# Reset default password
./stardog-admin --server https://"$alb_dns":5820 user passwd admin -p <<default-password>>
Connect to Stardog using your own ACM certificate
If you used an existing ACM certificate in the step 4 of the setup
stardog_endpoint=<<Stardog Subdomain + Existing Hosted Zone Name>>
# Both specified in step 4 for the Cloudformation setup
# For example:
# stardog_endpoint=stardog.example.com

# default-password can be found in the Cloudformation outputs
./stardog-admin --server https://stardog_endpoint:5820 server status -u admin -p <<default-password>>
# Reset default password
./stardog-admin --server https://stardog_endpoint:5820 user passwd admin -p <<default-password>>
On Stardog usage, refer to the docs
AWS Marketplace: Run Stardog using macOS
Download Stardog from here, and double click to unzip it.
Press command (⌘) + space, look for “Terminal” and open it. Run the following commands
Connect to Stardog using self signed certificate
If you did not use an existing ACM certificate in the step 4 of the setup you will need to add the self signed certificate to the system trust store.
# Install dependencies
brew tap AdoptOpenJDK/openjdk
# Installing dependencies will ask for system password. Usually takes about 2-4 min
brew cask install adoptopenjdk8

cd ~/Downloads/stardog-7.5.0/bin
alb_dns=<<alb-dns from the cloudformation otput>>

openssl s_client -host "$alb_dns"  -port 5820 -showcerts </dev/null | openssl x509 -text | sed -ne '/-BEGIN CERTIFICATE-/,/-END CERTIFICATE-/p' > stardog-self-signed-cert.crt

yes | keytool -importcert  -keystore my-truststore.jks -alias stardog-server -file stardog-self-signed-cert.crt -storepass changeit

export STARDOG_JAVA_ARGS="-Djavax.net.ssl.trustStore=my-truststore.jks"
# default-password can be found in the Cloudformation outputs
./stardog-admin --server https://"$alb_dns":5820 server status -u admin -p <<default-password>>

# Reset default password
./stardog-admin --server https://"$alb_dns":5820 user passwd admin -p <<default-password>>
Connect to Stardog using your own ACM certificate
If you used an existing ACM certificate in the step 4 of the setup
stardog_endpoint=<<Stardog Subdomain + Existing Hosted Zone Name>>
# Both specified in step 4 for the Cloudformation setup
# For example:
# stardog_endpoint=stardog.example.com

cd ~/Downloads/stardog-7.5.0/bin
# default-password can be found in the Cloudformation outputs
./stardog-admin --server https://stardog_endpoint:5820 server status -u admin -p <<default-password>>
# Reset default password
./stardog-admin --server https://stardog_endpoint:5820 user passwd admin -p <<default-password>>
On Stardog usage, refer to the docs
AWS Marketplace Usage: Stardog Cloud
Connect to Stardog using self signed certificate
If you did not use an existing ACM certificate in the step 4 of the setup, you will need to manually add the self signed certificate created by Cloudformation into your keychain.
#Get the cert. You can find the alb dns from the Cloudformation outputs.
alb_dns=<<url / hostname>>
cd ~/
openssl s_client -host "$alb_dns"  -port 5820 -showcerts </dev/null 2>/dev/null | openssl x509 -text | sed -ne '/-BEGIN CERTIFICATE-/,/-END CERTIFICATE-/p' > stardog-self-signed-cert.crt
Hit command(⌘) + space, open Keychain Access, look for the import items option:
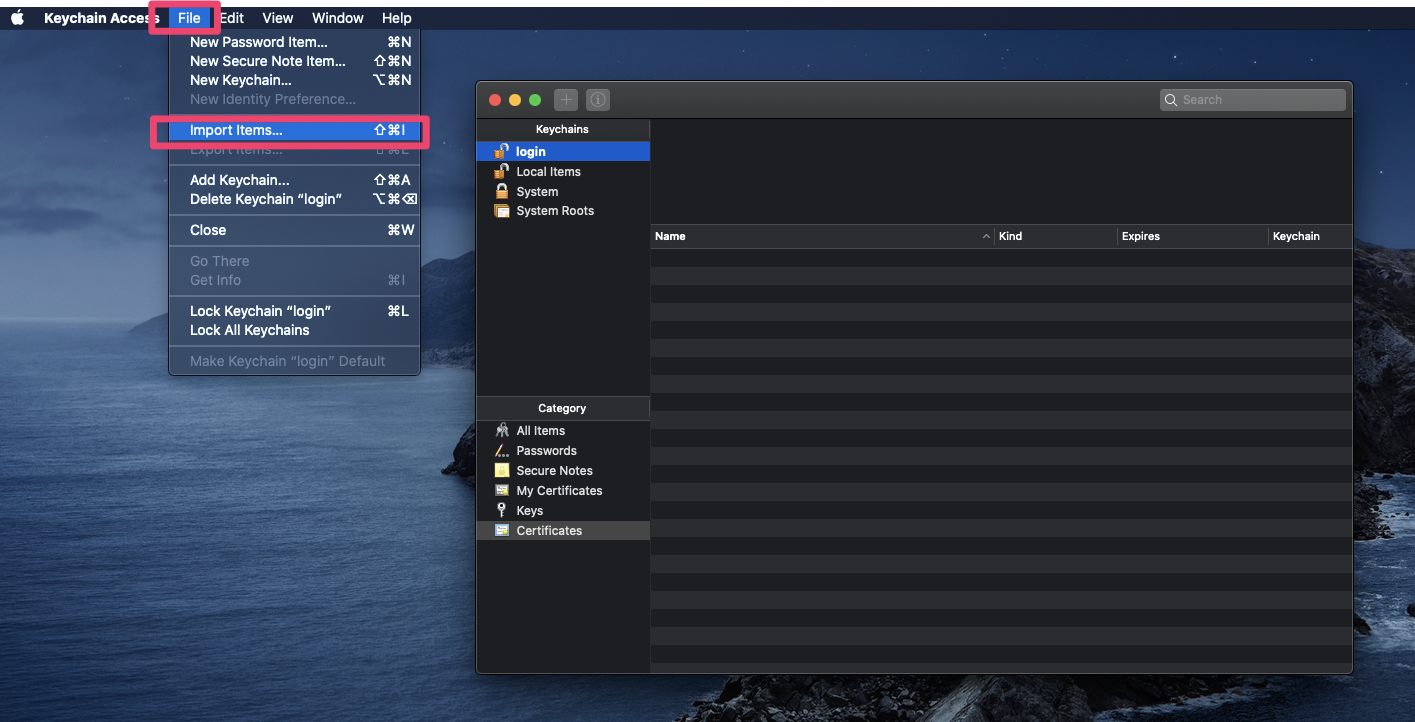
Select the stardog-self-signed-cert.crt file just created, it should appear under the Certificates tab.
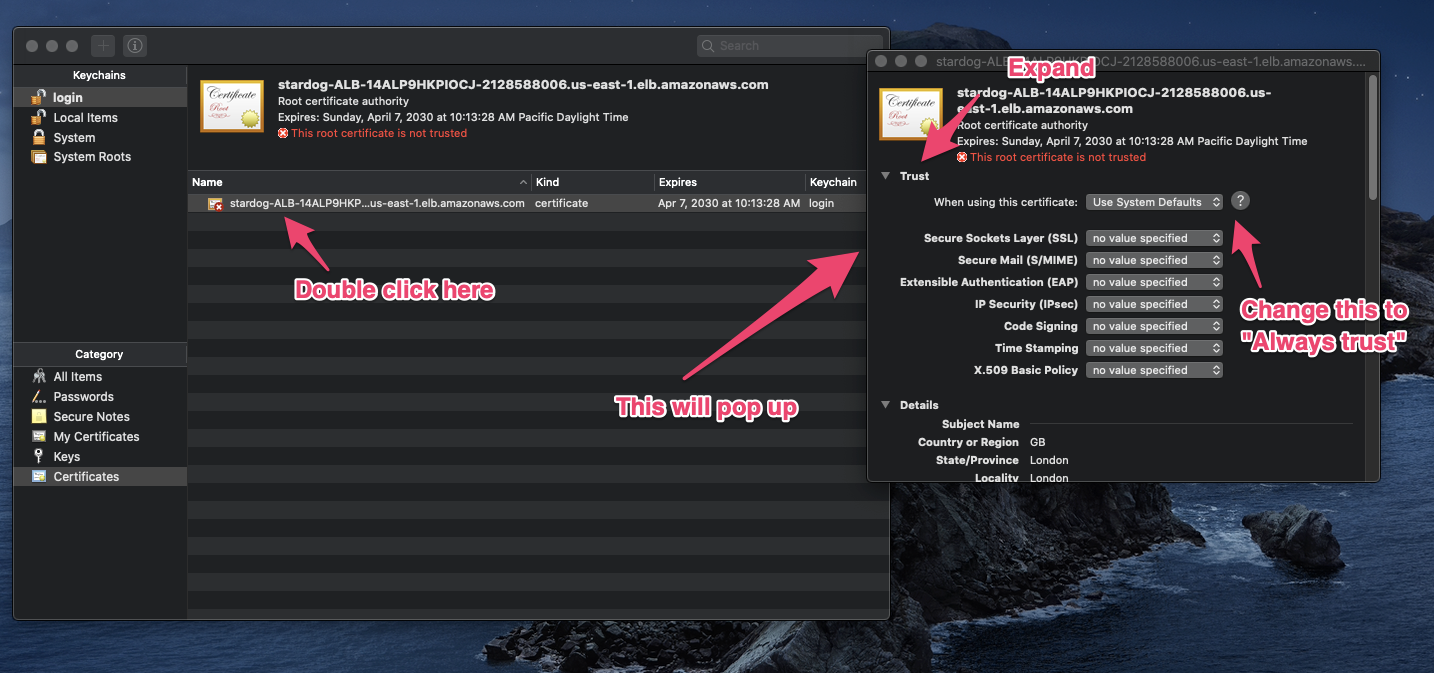
After you close this tab, it will ask for system password, and will save the changes.
Connect to Stardog using your own ACM certificate
To connect to Stardog, go to Stardog Cloud.
After creating an account, select New Connection.

Fill in the fields accordingly whether you did set up your own certificate or not.
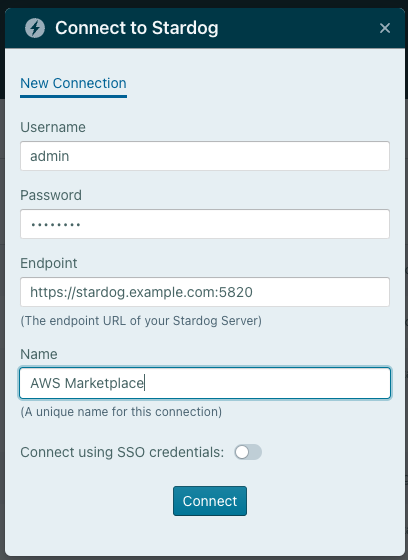
If you are using self signed certificate deployment:
Username: admin
Password: Check the output of Cloudformation
If you did not configure your own SSL certificate in the step 4 of the setup, your hostname should look like this
Hostname: https://stardog-ALB-14ALP9HKPIOCJ-2128588006.us-east-1.elb.amazonaws.com:5820
If you are using your existing ACM certificate:
Username: admin
Password: Check the output of Cloudformation
If you did configure your own SSL cert in the step 4 of the setup, your hostname should look like this
Hostname: https://stardog.example.com:5820
On Stardog usage, refer to the docs
Common Problems
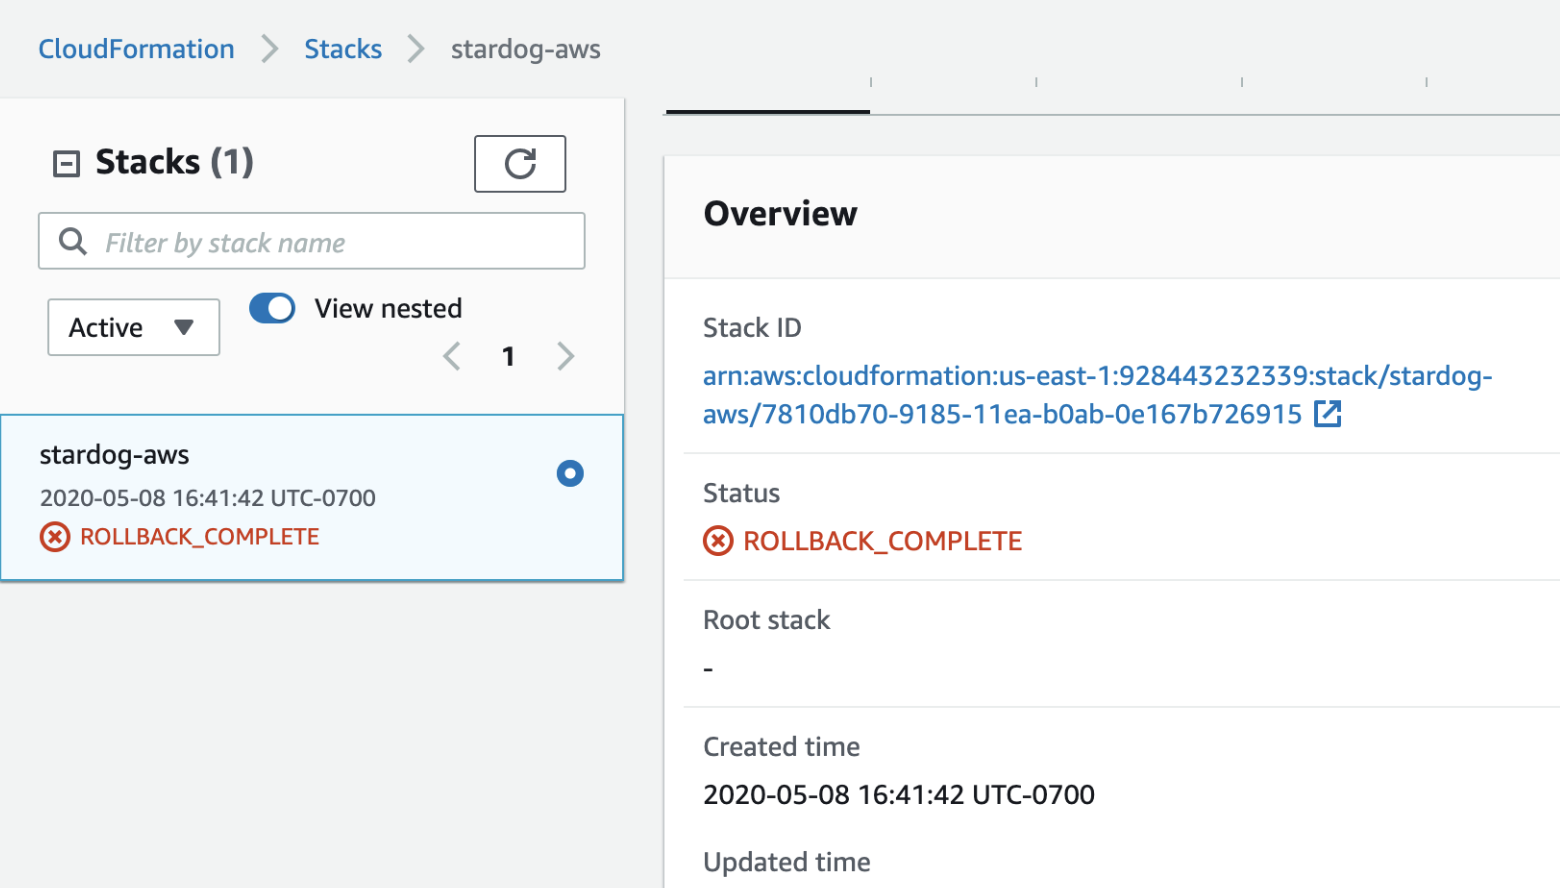
Rollback Complete
If you see this error, check the events tab in Cloudformation console. This is most likely a permission issue. Check with AWS administrator your permissions. The minimum permissions are defined in the requirements section.
Troubleshooting using ssh
To connect to ssh, you need to grab the public ip first.

Go to Services → Instances → select the instance you deployed (the name will match the stack name you defined in the step “Configuring the Stack” of the tutorial)
and run:
ssh ec2-user@<public ip> -i path/to/private-key/stardog-marketplace.pem
Stardog Logs can be found in: /var/opt/stardog/stardog.log
Instance logs can be found in: /var/log/cloud-init-output.log