Build a React App
Learn how to build a front-end app for Stardog using React.
Page Contents
Stardog isn’t only for Java developers, command-line gurus, and database engineers. In this tutorial, we’ll see how easy it is to build a web app – an editable catalog of Star Wars characters – with Stardog, using some of the latest and greatest front-end tools, including React, ES2015+, yarn, Node.js, and stardog.js.
Step 1: Get a Stardog Cloud account
-
Sign up for a free account at cloud.stardog.com. If you have any difficulties with the sign up process, see our Getting Started with Stardog Cloud page.
-
Once you have logged in, click on Manage Endpoints. You will see the new endpoint you just provisioned. Under Endpoint URL, you will see an address of the form
https://sd-1ab23456.stardog.cloud:5820. Save this address, as we will need it in step 3.
Step 2: Set up a React Project
The next thing to do is setup a basic React project that can communicate with Stardog over HTTP.
-
Go here to download and install Node.js >= version 8, if you don’t have it already. As of this writing, v18.16.0 is the current LTS release.
-
Using
npx(which comes with Node.js), install and runcreate-react-app. The final argument to this command should be the directory where you want to put your front-end code. This can be any directory of your choosing, but we’ll use~/stardog-reactfor this example:npx create-react-app ~/stardog-react -
Navigate to the directory for the project you just created, and install
stardog.js, our universal JavaScript library for working with Stardog. In this tutorial, we will useyarnas our package manager, but the correspondingnpmcommands will also work.cd ~/stardog-react yarn add stardog -
After that, you can start your React application:
yarn start
This command should open a browser window or tab and show you a browser-based application running on http://localhost:3000. You’ve now got a React application that can communicate with Stardog!
Step 3: Load Some Data
For the next step, we’ll add some initial data to Stardog that we can use to create our example application. We’ll do this with a Node.js script, using stardog.js (this allows us to easily repeat the action if we need to start over).
-
In a new terminal instance (you should leave the
yarn startcommand running in the other terminal instance), create adatasubdirectory inside of thesrcsubdirectory of your React project:mkdir ~/stardog-react/src/data -
Under this directory, create a file called
data.ttl, with the following contents (this is just some Turtle representing an RDF graph of Star Wars characters – the same Turtle used in our GraphQL documentation)::Character a rdfs:Class . :Human a owl:Class ; rdfs:subClassOf :Character . :Droid a owl:Class ; rdfs:subClassOf :Character . :luke a :Human ; :id 1000 ; :name 'Luke Skywalker' ; :friends :han , :leia , :threepio , :artoo ; :appearsIn :NewHope , :Empire , :Jedi ; :homePlanet :Tatooine . :vader a :Human ; :id 1001 ; :name 'Darth Vader' ; :friends :tarkin ; :appearsIn :NewHope , :Empire , :Jedi ; :homePlanet :Tatooine . :han a :Human ; :id 1002 ; :name 'Han Solo' ; :friends :luke , :leia , :artoo ; :appearsIn :NewHope , :Empire , :Jedi . :leia a :Human ; :id 1003 ; :name 'Leia Organa' ; :friends :luke , :han , :threepio , :artoo ; :appearsIn :NewHope , :Empire , :Jedi ; :homePlanet :Alderaan . :tarkin a :Human ; :id 1004 ; :name 'Wilhuff Tarkin' ; :friends :vader ; :appearsIn :NewHope . :threepio a :Droid ; :id 2000 ; :name 'C-3PO' ; :friends :luke , :han , :leia , :artoo ; :appearsIn :NewHope , :Empire , :Jedi ; :primaryFunction 'Protocol' . :artoo a :Droid ; :id 2001 ; :name 'R2-D2' ; :friends :luke , :han , :leia ; :appearsIn :NewHope , :Empire , :Jedi ; :primaryFunction 'Astromech' . :NewHope a :Episode ; :name "A New Hope" ; :index 4 . :Empire a :Episode ; :name "The Empire Strikes Back" ; :index 5 . :Jedi a :Episode ; :name "Return of the Jedi" ; :index 6 . :Tatooine a :Planet ; :region :OuterRim ; :sector :Arkanis ; :system :Tatoo . :Alderaan a :Planet ; :region :CoreWorlds ; :sector :Alderaan ; :system :Alderaan . -
Loading this data into Stardog will involve a couple of operations and values that we’ll also need in our application’s front-end, so let’s first create a
helpersdirectory inside ofsrcwith a few shareable constants and utilities.- First, create
~/stardog-react/src/helpers:
mkdir ~/stardog-react/src/helpers- Next, add a
constants.jsfile to thehelpersdirectory that looks like this:
The
connobject in this code block requires the Stardog endpoint address we copied in step 1.const { Connection } = require("stardog"); // Table column data, encoding the order, label, and "selector" for grabbing the // data for each column. const columnData = [ { selector: "id", label: "ID" }, { selector: "name", label: "Name" }, { selector: "movie", label: "Movies" }, { selector: "homePlanet", label: "Home Planet" }, { selector: "kind", label: "Kind" }, ]; // For convenience, we'll also produce the array of selectors just once, and // export it for re-use. const columnSelectors = columnData.reduce( (selectors, { selector }) => [...selectors, selector], [] ); // In a typical application, the connection would be changeable. For our // present purposes, though, this is unchanging and hard-coded. const conn = new Connection({ username: "admin", password: "admin", endpoint: "[your-stardog-cloud-endpoint-here]" }); // An "enum" for the status of our request to Stardog for data. const TableDataAvailabilityStatus = { NOT_REQUESTED: 'NOT_REQUESTED', LOADING: "LOADING", LOADED: "LOADED", FAILED: "FAILED" }; module.exports = { dbName: 'StarWarsDB', columnData, columnSelectors, conn, TableDataAvailabilityStatus, };- Now add a
wrapWithResCheck.jsfile in the same directory asconstants.js. This file will export a utility method for checking responses received viastardog.js(just to reduce duplication):
// Given a function, returns a function that accepts a `res` object, // and which only executes the first function if `res.ok` (throws otherwise). const wrapWithResCheck = fn => res => { if (!res.ok) { throw new Error( `Something went wrong. Received response: ${res.status} ${res.statusText}` ); } return fn(res); }; module.exports = { wrapWithResCheck, }; - First, create
-
Finally, we’ll write a Node script that will load this data into a Stardog database named
StarWarsDB. The script will use the helper method and constants we just created. Inside the samedatadirectory as before (see step 2), create a file calledload-data.js, and add these contents:const path = require("path"); const fs = require('fs'); const { query, db } = require('stardog'); const { conn, dbName } = require("../helpers/constants"); const { wrapWithResCheck } = require("../helpers/wrapWithResCheck"); const data = fs.readFileSync(path.join(__dirname, "data.ttl"), "utf8"); const insertQuery = `insert data { ${data} }`; const logSuccess = () => console.log(`Created ${dbName}.\n`); const logFailure = failureReason => console.error(failureReason); // The "main" method for this script. const loadData = () => { console.log(`Creating ${dbName}...\n`); return db .drop(conn, dbName) // Drop the db in case it already exists .then(() => db.create(conn, dbName)) // Ignore response if it didn't exist .then(wrapWithResCheck(() => query.execute(conn, dbName, insertQuery))) .then(logSuccess) .catch(logFailure); }; loadData(); -
Now execute the script you just created:
node ~/stardog-react/src/data/load-data.jsYou should see a success message in the console: “Created StarWarsDB.” Once you see that, the data is loaded.
Step 4: Create a Basic UI
Our application is going to display a table of Star Wars information about characters’ episode appearances, home planets, and types. We’ll enhance (to allow adding and deleting items) in a moment, but, for now, we’re just going to set it up so that it can display this information.
-
First, so that our table looks presentable, we’ll add Material-UI to our project. At the terminal (inside the project directory), run:
yarn add @mui/materialAnd add two dependencies for this library:
yarn add @emotion/react @emotion/styledFinally, open
~/stardog-react/public/index.htmland add the following HTML element (above the<title>element inside of the<head>element):<link rel="stylesheet" href="https://fonts.googleapis.com/css?family=Roboto:300,400,500"> -
Now, open
~/stardog-react/src/App.js, and change it so that it looks like this (this creates a single React component that renders a Material-UI-styled data table):import React, { Component } from "react"; import CssBaseline from "@mui/material/CssBaseline"; import Paper from "@mui/material/Paper"; import Table from "@mui/material/Table"; import TableBody from "@mui/material/TableBody"; import TableCell from "@mui/material/TableCell"; import TableHead from "@mui/material/TableHead"; import TableRow from "@mui/material/TableRow"; import Toolbar from "@mui/material/Toolbar"; import Typography from "@mui/material/Typography"; import CircularProgress from '@mui/material/CircularProgress'; import { TableDataAvailabilityStatus, columnData, columnSelectors, conn, dbName } from "./helpers/constants"; // Let's not take _quite_ the entire browser screen. const styles = { appInnerContainer: { width: "90%", margin: "20px auto 0" }, paper: { overflowX: "auto" }, spinner: { margin: "20px auto", display: "block" } }; const columnHeaders = columnData.map(({ label }) => <TableCell key={label}>{label}</TableCell>); class App extends Component { constructor(props) { super(props); this.state = { dataState: TableDataAvailabilityStatus.NOT_REQUESTED, data: [] }; } getBindingValueForSelector(selector, binding) { const bindingValue = binding[selector === "movie" ? "movies" : selector]; // NOTE: In a production app, we would probably want to do this formatting elsewhere. return Array.isArray(bindingValue) ? bindingValue.join(", ") : bindingValue; } renderRowForBinding(binding, index) { return ( // Use every "selector" to extract table cell data from each binding. <TableRow key={binding.id}> {columnSelectors.map(selector => ( <TableCell key={selector}> {this.getBindingValueForSelector(selector, binding)} </TableCell> ))} </TableRow> ); } render() { const { dataState, data } = this.state; const isLoading = dataState === TableDataAvailabilityStatus.LOADING; return ( <div className="App" style={styles.appInnerContainer}> <CssBaseline /> <Paper style={styles.paper}> <Toolbar> <Typography variant="title"> <i>Star Wars</i> with Stardog </Typography> </Toolbar> {isLoading ? <CircularProgress style={styles.spinner} /> : ( <Table> <TableHead> <TableRow> {columnHeaders} </TableRow> </TableHead> <TableBody> {data.map((binding, index) => this.renderRowForBinding(binding, index))} </TableBody> </Table> )} </Paper> </div> ); } } export default App;As long as you are running the app (if you aren’t, just run
yarn startagain in the project root), you should now see a decently good-looking empty table (i.e., a table consisting of only the column headings) athttp://localhost:3000.
Now let’s make the table do something.
Step 5: Add Some CRUD
At this point, we’re ready for the “meat” of the application. We’ll see how to use Stardog and stardog.js to read our data and make changes to it (creating new items, deleting others, etc.). The focus in this blog post will be on reading, creating, and deleting – the more complicated case of updating (the ‘U’ in CRUD) is covered in the full GitHub repo for this project, which we’ll link to below.
-
Read from Stardog (Executing a
SELECTQuery withstardog.js)When our React component mounts, we’re going to immediately request our Star Wars data from Stardog. What we’re interested in for this example is getting data for every character (so, not the data for the planets and episodes themselves), where the data includes the character’s
id,kind(i.e., Human or Droid),homePlanet(if the character has a home planet - droids do not), and all of themovies the character has appeared in.The following
SELECTquery would get this data out of Stardog1:SELECT ?id ?name ?homePlanet ?kind ?movie { ?subject a ?kind ; :id ?id ; :name ?name ; :appearsIn ?movie . ?kind rdfs:subClassOf :Character . OPTIONAL { ?subject :homePlanet ?homePlanet } }And here’s the GraphQL equivalent, which Stardog is happy to support:
 query getCharacters @config(type:false) {
     id
     kind: rdf_type(rdfs_subClassOf: Character)
     name
     movie: appearsIn
     homePlanet @optional
 }
The data structure returned by the GraphQL and SPARQL versions of this query are not identical. The code below depends on the SPARQL results form. Look for a followup blog post in which we discuss the pure GraphQL version of this React app.
To perform this query when our application mounts, we’ll add some code to
~/stardog-react/src/App.js.At the top of this file, add the following import:
import { query } from "stardog";Now add the query text for the read query right before our
Appcomponent definition:const readQuery = `SELECT ?id ?name ?homePlanet ?kind ?movie { ?subject a ?kind ; :id ?id ; :name ?name ; :appearsIn ?movie . ?kind rdfs:subClassOf :Character . OPTIONAL { ?subject :homePlanet ?homePlanet } }`;Finally, add a
componentDidMountmethod to theAppcomponent, along with two methods that will ultimately be called as a result of executingcomponentDidMount:componentDidMount() { this.refreshData(); } refreshData() { this.setState({ dataState: TableDataAvailabilityStatus.LOADING }); query.execute(conn, dbName, readQuery).then(res => { if (!res.ok) { this.setState({ dataState: TableDataAvailabilityStatus.FAILED }); return; } const { bindings } = res.body.results; const bindingsForTable = this.getBindingsFormattedForTable(bindings); this.setState({ dataState: TableDataAvailabilityStatus.LOADED, data: bindingsForTable }); }); } // Our SPARQL query returns a new "row" (i.e., variable binding) for each // character for each movie in which the character appears. We don't want to // _display_ multiple rows for the same character, though. Instead, we want // to show _one_ row for each character, and, if the character was in several // movies, we want to show them as a group within that character's single row. This // method goes through the bindings, groups them under each individual // character's id, then merges them together, aggregating the movies as an // array of strings. It also cleans up some of the data so that it's more // readable in the UI. getBindingsFormattedForTable(bindings) { // Group the bindings by each character id, in case multiple rows were // returned for a single character. const bindingsById = bindings.reduce((groupedBindings, binding) => { const { value: id } = binding.id; groupedBindings[id] = groupedBindings[id] ? groupedBindings[id].concat(binding) : [binding]; return groupedBindings; }, {}); // Sort the bindings by id (ascending), then, if there are multiple // bindings for a single id, merge them together, aggregating movies as an // array. return Object.keys(bindingsById) .map(id => parseInt(id, 10)) // convert ids from strings to numbers for sorting .sort() // we do this sorting client-side because `Object.keys` ordering is not guaranteed .map(id => { // For each `id`, merge the bindings together as described above. return bindingsById[id].reduce( (bindingForTable, binding) => { // Quick cleanup to remove IRI data that we don't want to display: const bindingValues = Object.keys(binding).reduce((valueBinding, key) => { const { type, value } = binding[key]; valueBinding[key] = type !== "uri" ? value : value.slice(value.lastIndexOf("/") + 1); // data cleanup return valueBinding; }, {}); // Aggregate movies on the `movies` property, deleting `movie`: const movies = bindingValues.movie ? bindingForTable.movies.concat(bindingValues.movie) : bindingForTable.movies; delete bindingValues.movie; return { ...bindingForTable, ...bindingValues, movies }; }, { movies: [] } ); }); }Voila! At
http://localhost:3000, you should now see all of the Star Wars data that we wanted to see, displayed in a nice little table.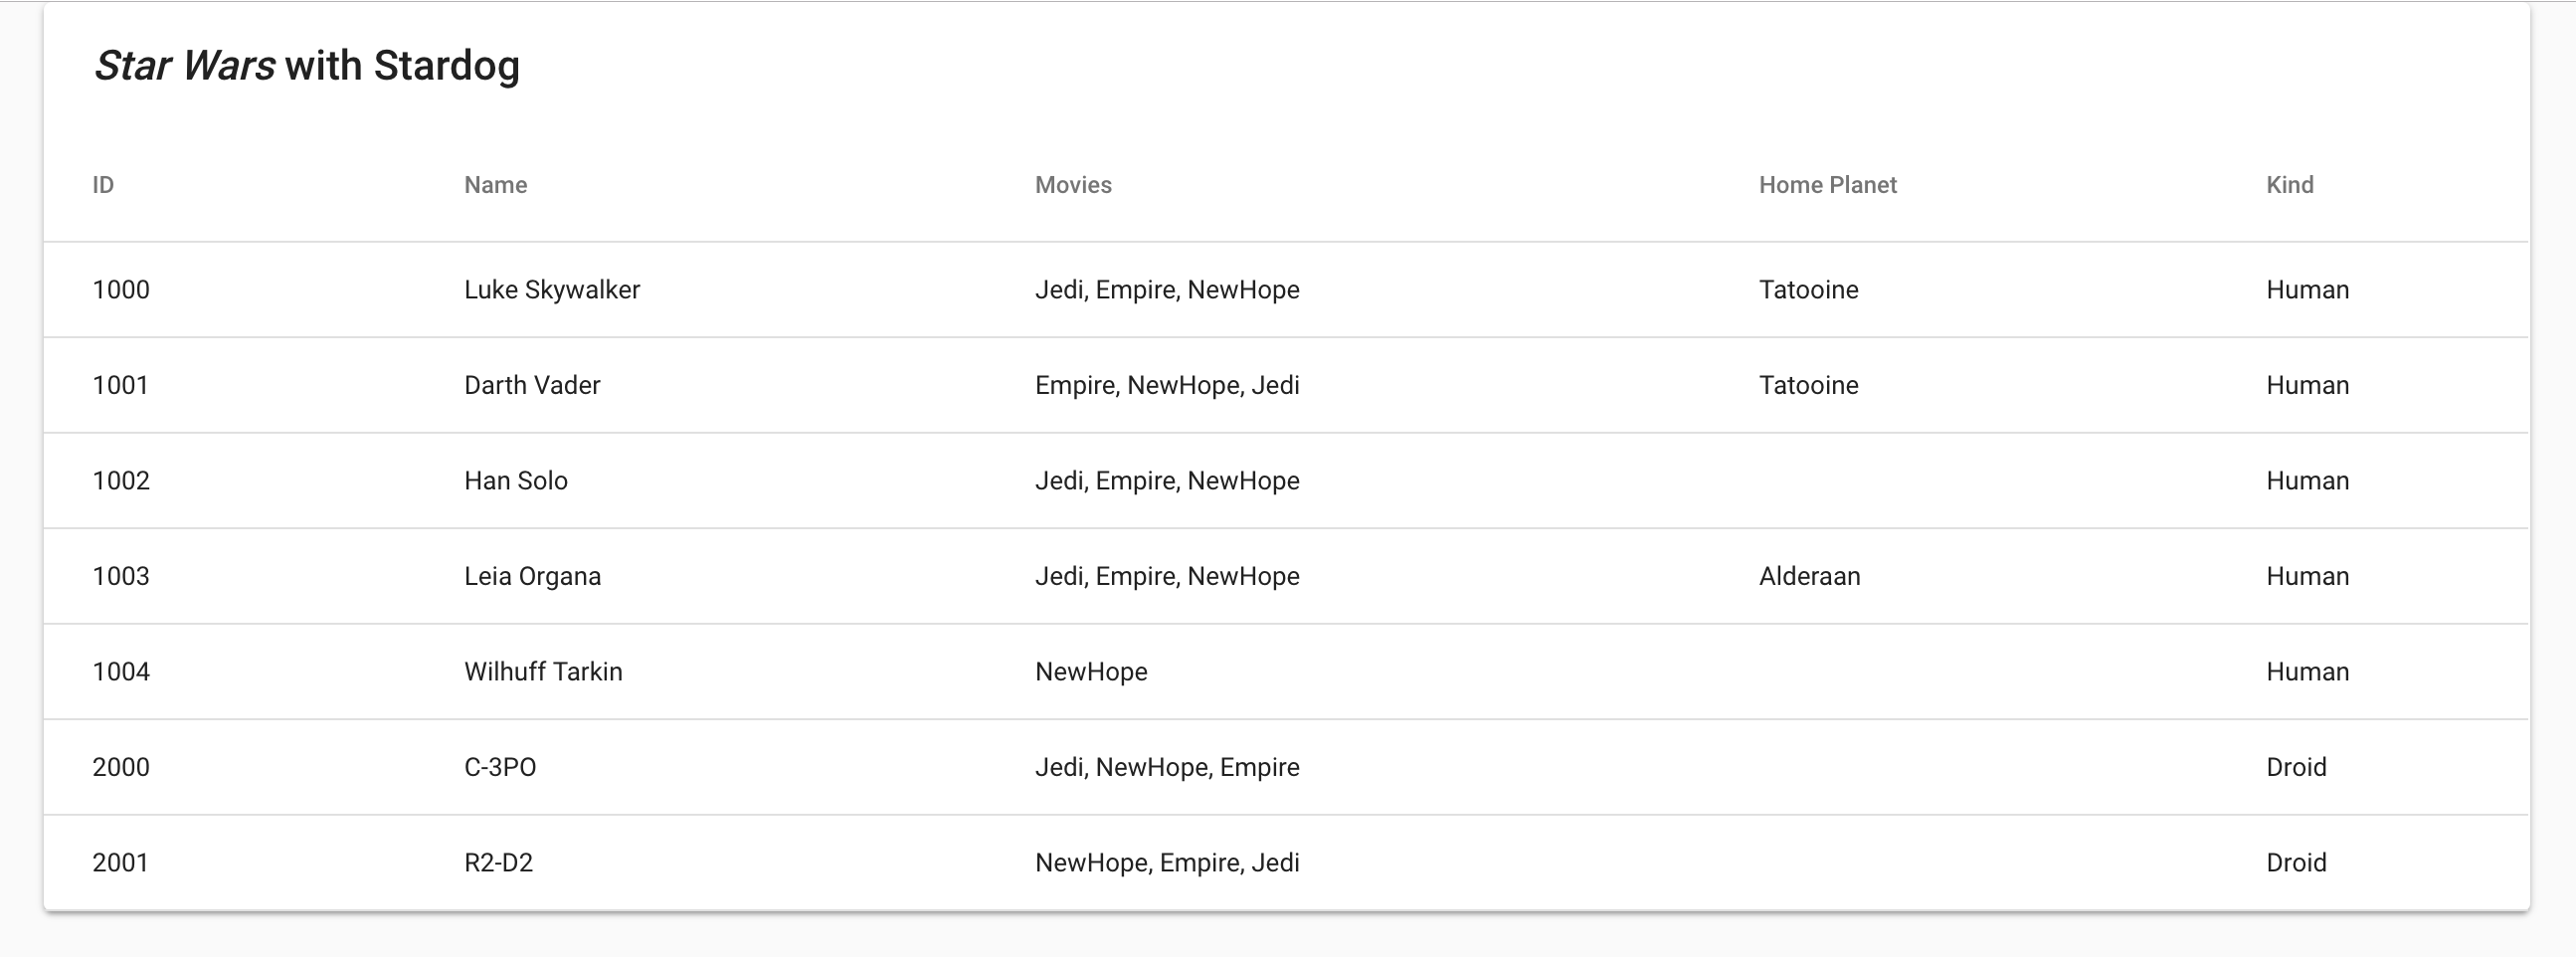
You’ve now created a Star Wars data table backed by Stardog. Congrats!
-
Create New Data
This table is nice for quickly browsing our Star Wars data, but the data is woefully incomplete. What if we want to add things to it?
To do this, let’s first create some UI elements. In
~/stardog-react/src/App.js, modify the styles object to look like this:const styles = { appInnerContainer: { width: "90%", margin: "0 auto" }, paper: { overflowX: "auto" }, spinner: { margin: "20px auto", display: "block" }, actionCell: { textAlign: "center" } };Let’s also add the following
importto the top of the file:import Button from '@mui/material/Button';Next, in the
rendermethods of theAppcomponent, we’ll add a couple of buttons and table cells/rows to our table.First, add an additional table cell to
renderRowForBinding:renderRowForBinding(binding, index) { return ( // Use every "selector" to extract table cell data from each binding. <TableRow key={binding.id}> {columnSelectors.map(selector => ( <TableCell key={selector}> {this.getBindingValueForSelector(selector, binding)} </TableCell> ))} <TableCell key={-1} style={styles.actionCell}> <Button color="secondary">Delete</Button> </TableCell> </TableRow> ); }Second, in
render, let’sconcatan extra row onto the table:render() { const { dataState, data } = this.state; const isLoading = dataState === TableDataAvailabilityStatus.LOADING; return ( <div className="App" style={styles.appInnerContainer}> <CssBaseline /> <Paper style={styles.paper}> <Toolbar> <Typography variant="title"> <i>Star Wars</i> with Stardog </Typography> </Toolbar> {isLoading ? ( <CircularProgress style={styles.spinner} /> ) : ( <Table> <TableHead> <TableRow> {columnHeaders} <TableCell style={styles.actionCell}>Action</TableCell> </TableRow> </TableHead> <TableBody> {data.map((binding, index) => this.renderRowForBinding(binding, index)).concat( // Create an additional row for adding a new entry (by // iterating through our columnData and creating a table // cell for each column). <TableRow key={-1}> {columnData.map(({ label, selector }) => ( <TableCell key={selector}> <label> {label} <input name={selector} /> </label> </TableCell> ))} <TableCell style={styles.actionCell}> <Button color="primary">Add</Button> </TableCell> </TableRow> )} </TableBody> </Table> )} </Paper> </div> ); }This will add a new “Action” column to our table, where the column contains a “DELETE” button for existing rows, and an “ADD” button for new data. Additionally, there will be a row at the end of the table that consists entirely of input fields. We’ll use these fields to create new pieces of data. (As always, this should be viewable on your local machine at
http://localhost:3000.)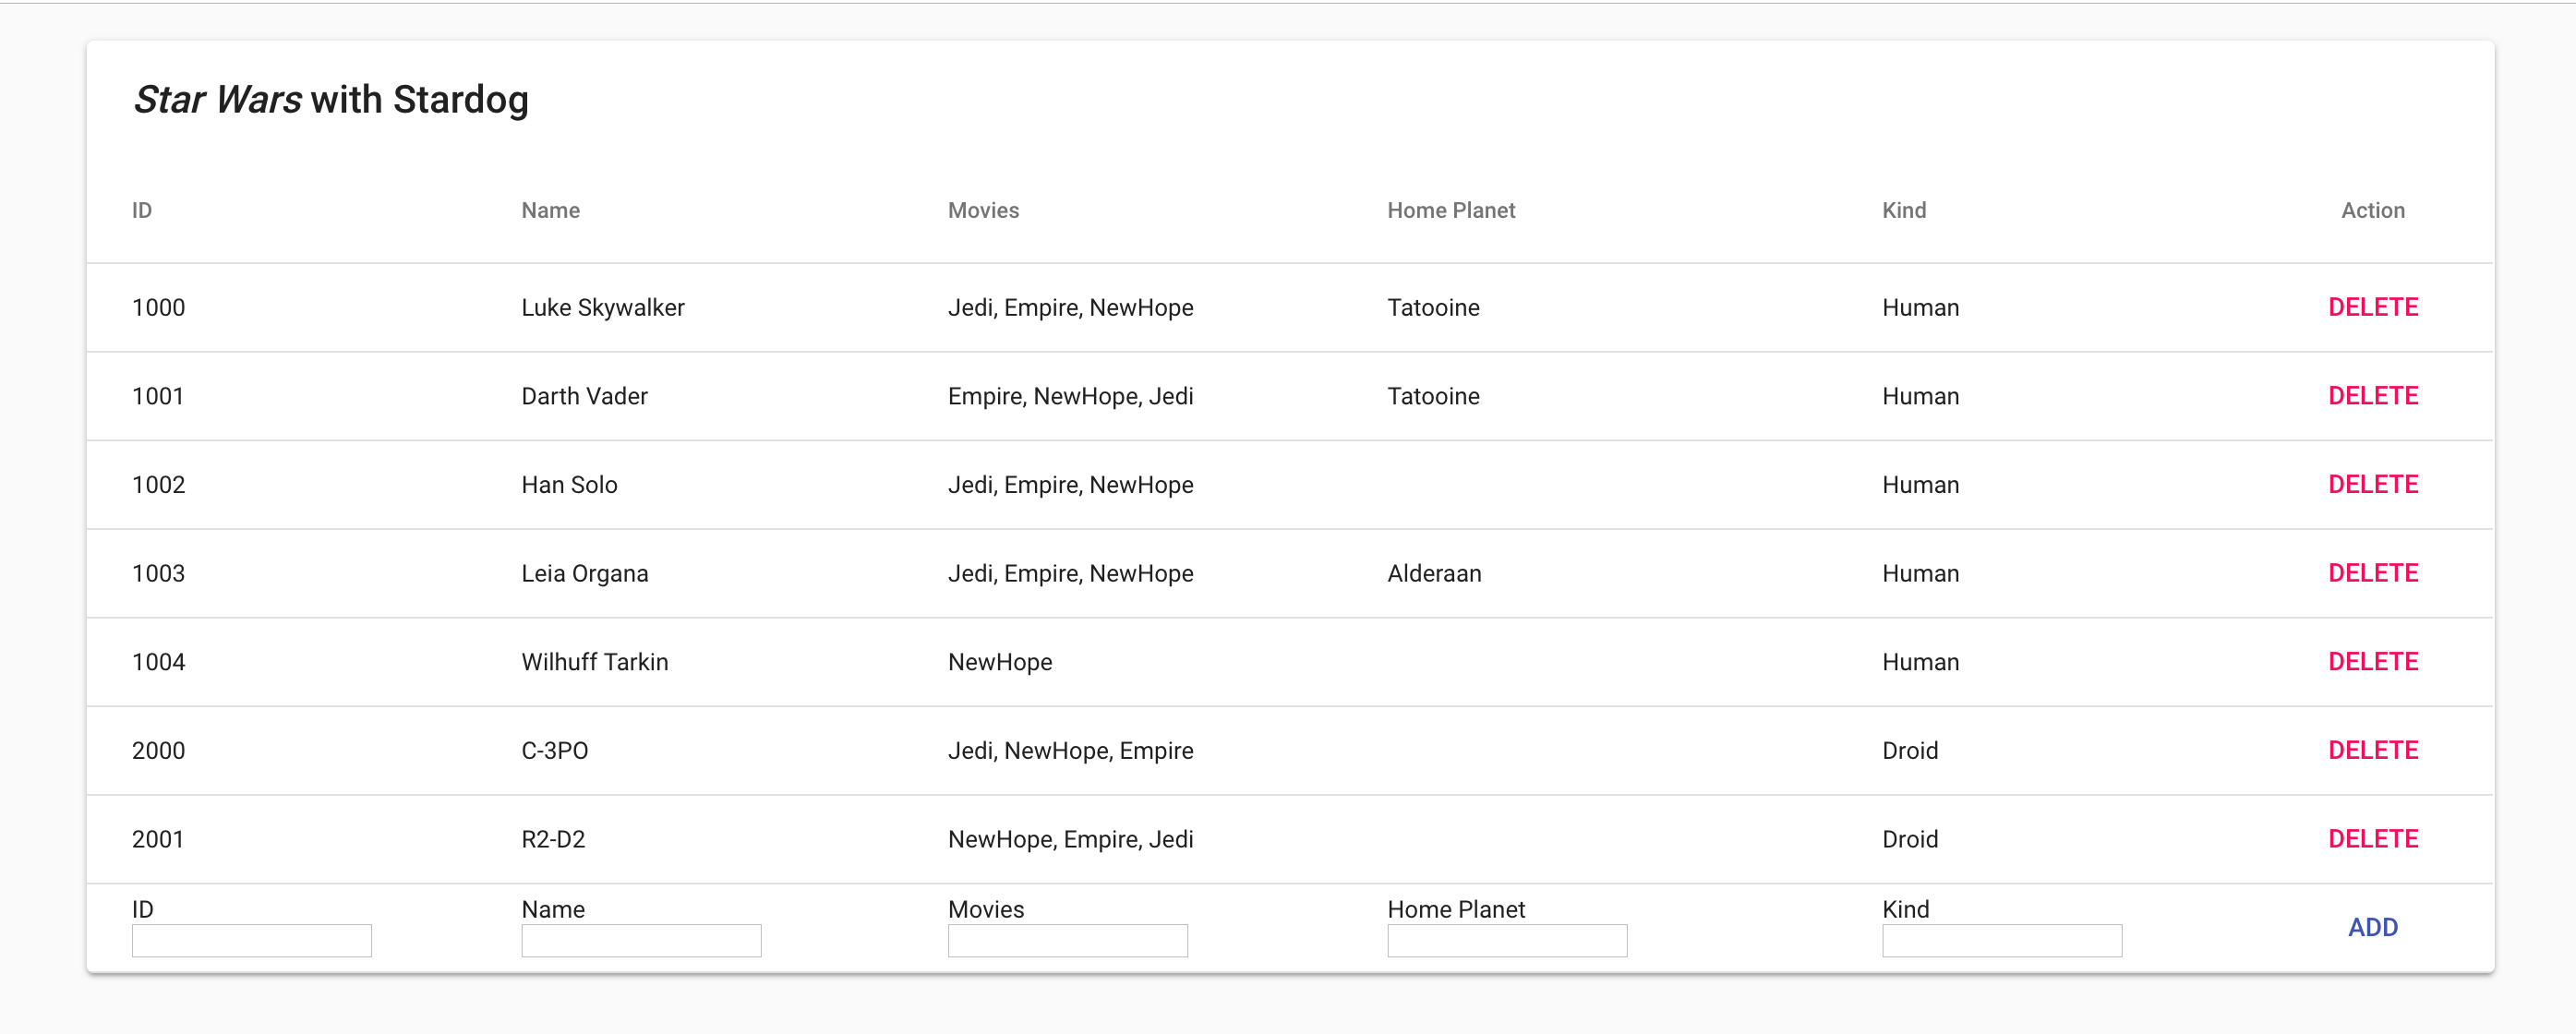
Let’s wire up the “ADD” button. First, add an
onClickhandler to the button, like so:<Button color="primary" onClick={() => this.addItem()}>Add</Button>Finally, inside of the
Appcomponent, let’s add the actualaddItemmethod:// NOTE: Does no validation and assumes certain inputs; not production-ready! addItem() { // Get the input elements and create a map from their names to their // values. const inputs = document.querySelectorAll("input[name]"); const inputsArray = Array.from(inputs); const valueMap = inputsArray.reduce( (accumulator, input) => ({ ...accumulator, [input.name]: input.value }), {} ); // Auto-generate a subject local name by removing all whitespace and // lowercasing the `name` input. This is "good enough" for our purposes. const subject = valueMap.name .trim() .split(/\s/) .join("") .toLowerCase(); // Convert comma-separated movie values into an array of movies. const movies = valueMap.movie .split(",") .map( mov => `:${mov .split(/\s/) .join("") .trim()}` ) .join(", "); const updateTriples = `:${subject} a :${valueMap.kind} ; :id ${valueMap.id} ; :name "${valueMap.name}" ; :appearsIn ${movies} ; ${valueMap.homePlanet ? ":homePlanet :" + valueMap.homePlanet : ""} . `; const updateQuery = `insert data { ${updateTriples} }`; // Add data to DB and clear the inputs when this succeeds. query.execute(conn, dbName, updateQuery).then(() => { inputsArray.forEach(input => (input.value = "")); // A full refresh of the data isn't really optimal here, but it serves our // purposes for this tutorial. this.refreshData(); }); }If you return to the application running in your browser, you should now be able to add data to Stardog via the table. As a test, enter (all without quotes) ‘2002’ in the ‘ID’ field, ‘Anakin Skywalker’ in the ‘Name’ field, ‘NewHope, Empire, Jedi’ in the ‘Movies’ field, ‘Tatooine’ in the ‘Home Planet’ field, and ‘Human’ in the ‘Kind’ field, then click the ‘Add’ button.
You should see the input fields clear, the table refresh, and a new entry appear in the table for Anakin Skywalker. If you’d like to confirm that the database itself (and not just the front-end) was updated, you can refresh the app and see that Anakin Skywalker persists.
-
Delete Data from Stardog
We just added Anakin Skywalker to our Star Wars data. But – spoiler alert! – Anakin Skywalker is Darth Vader, and Darth Vader is already in our table. We should probably delete one of them2. Since our table is focused on the original trilogy, Anakin is the odd one out, so we’ll delete him from the table.
Add an
onClickhandler to the “DELETE” button in the currentAppcomponent. The click handler should pass along theidbinding for the character being deleted, so that we only delete the correct character’s data (we’ll assume the ids are unique here, though we haven’t added validation for that).<Button color="secondary" onClick={() => this.deleteItem(binding.id)} > Delete </Button>Now, create the
deleteItemmethod inside of theAppcomponent. Here’s how that should look (it’s quick and easy):// Again, no validation or optimizations for this example app. deleteItem(itemId) { // Delete all triples where the subject has the given id. const deleteQuery = `delete { ?s ?p ?o } where { ?s :id ${itemId} ; ?p ?o . }`; query.execute(conn, dbName, deleteQuery).then(() => this.refreshData()); }If you return to the browser and click on the “DELETE” button for Anakin, you should see his entry removed from the table. Again, if you’d like to confirm that this operation really changed the data in Stardog, feel free to refresh the application.
You’ve now built a (nearly) complete CRUD application with React and Stardog (elegant weapons for a more civilized age!).3
Summary
We’ve done quite a bit here. We’ve learned how to install Stardog, how to set up a starter React application, how to use stardog.js in both Node and the browser, and, finally, how to bring it all together to produce an app backed by Stardog and the latest technologies in the modern front-end stack.
We hope you’ll use this knowledge to build some awesome front-end applications with Stardog (or, at least, to maintain a really great catalog of your favorite Star Wars characters).
-
If you’re not sure about the parts of this query, or how to come up with queries like it, we strongly recommend that you try out Stardog Studio, our Knowledge Graph IDE, which provides autocompletions, hints, query linting, and more. You can reach Studio by signing in at cloud.stardog.com and clicking on Stardog Studio. ↩
-
We could add aliases to our data model, but that would probably take us too far afield. ↩
-
For details on the “Update” part of CRUD, see the GitHub repository for this project. ↩