Managing Databases
This page discusses managing Stardog databases.
Page Contents
Creating a Database
Stardog databases may be created locally or remotely. All data files, indexes, and server metadata for the new database will be stored in $STARDOG_HOME.
- Stardog will not let you create a database with the same name as an existing database. Stardog database names must start with an alpha character followed by zero or more alphanumeric, hyphen or underscore characters, as is given by the regular expression
[A-Za-z]{1}[A-Za-z0-9_-]*.
There are four reserved words that may not be used for the names of Stardog databases: system, admin,docs and watchdog.
- Minimally, the only thing you must know to create a Stardog database is a database name; additionally, you may customize some other database parameters and options depending on anticipated workloads, data modeling, and other factors.
- Bulk loading data can be done at database creation time
- Bulk loading performance is better if data files don’t have to be transferred over a network during creation and initial loading.
To create an empty database:
-
At a minimum, a database name needs to be passed into the
db createCLI command using the-n/--nameoption.stardog-admin db create -n myDatabase -
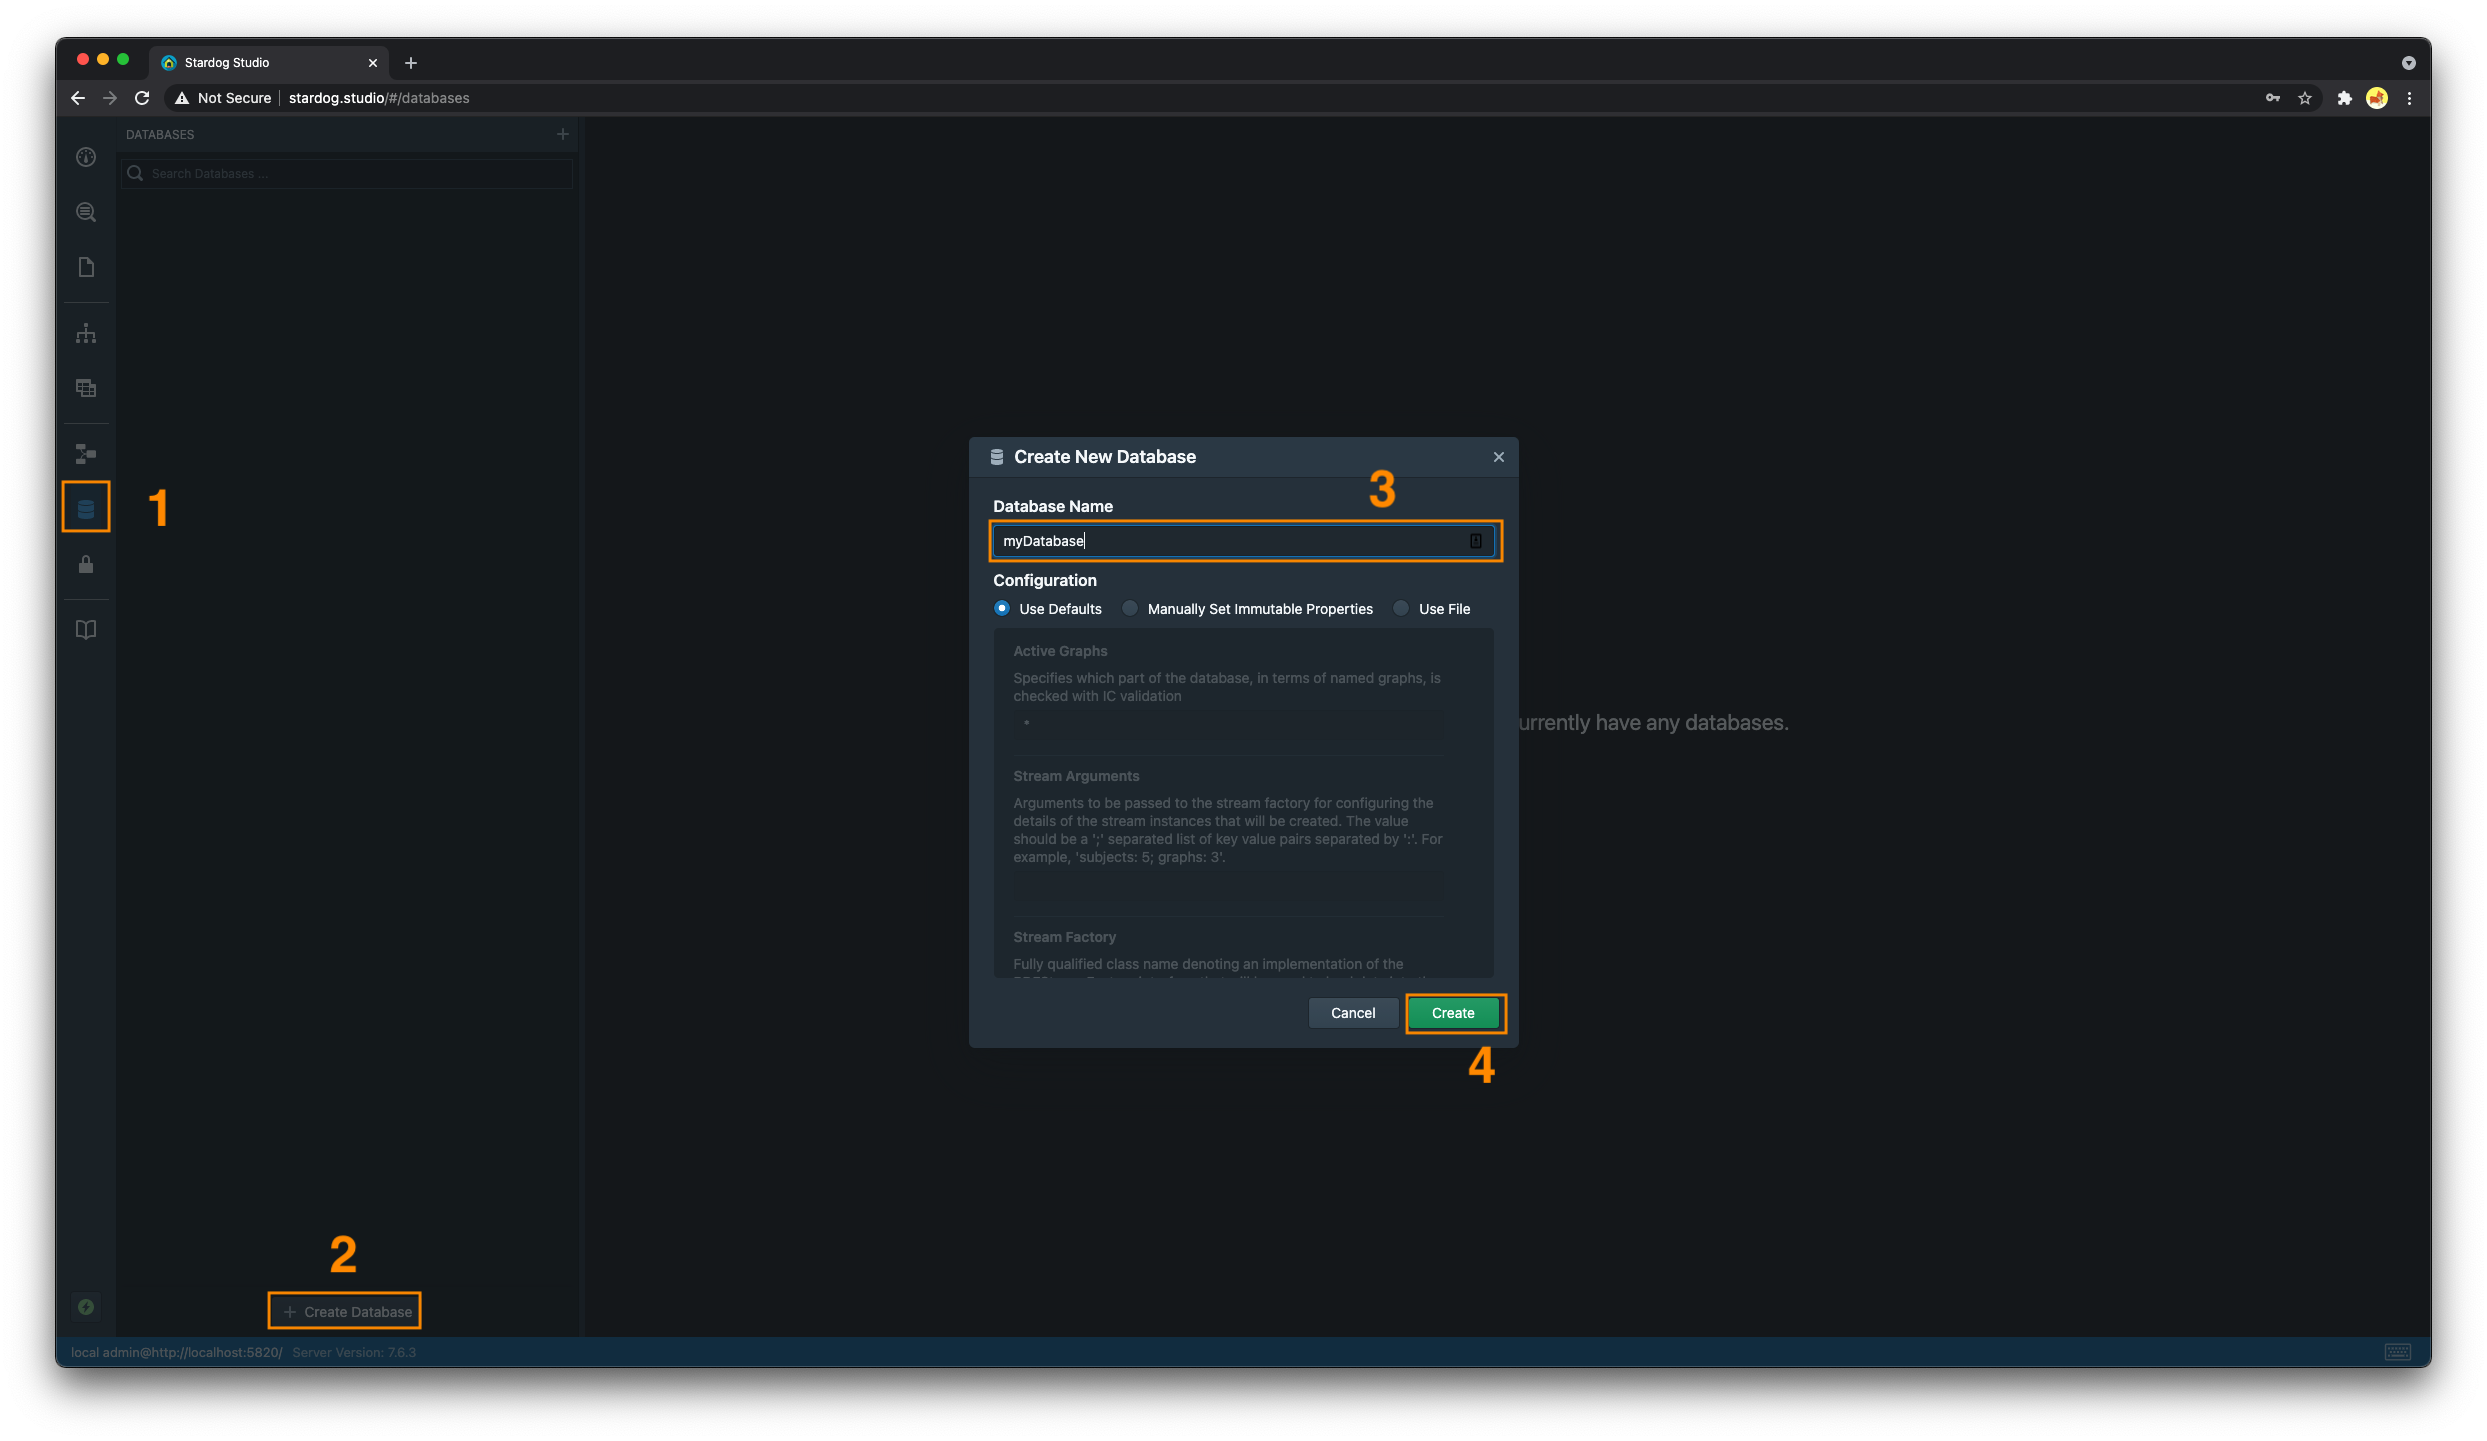
- Navigate to the “Databases” tab
- Click on the “Create Database” button
- Enter a name for the new database
- Click the “Create” button
-
See the HTTP API documentation for more information.
curl -u username:password -X POST \
-F root="{\
"dbname":"myDatabase"\
}" http://localhost:5820/admin/databases
import com.complexible.stardog.api.admin.AdminConnection; import static com.complexible.stardog.api.admin.AdminConnectionConfiguration.toServer; public class CreateDatabaseBasic { public static void main(String[] args){ String serverUrl = "http://localhost:5820"; String username = "username"; String password = "password"; try(AdminConnection adminConnection = toServer(serverUrl).credentials(username, password).connect();){ adminConnection.newDatabase("myDatabase").create(); } } }See
com.complexible.stardog.api.admin.AdminConnection.AdminConnection#newDatabasefor more information.
Configuring a Database at Creation Time
It’s possible to provide configuration options to a database at creation time. While you can provide any type of configuration option at creation time regardless of their mutability, you must declare immutable database configuration options at creation time (e.g. edge.properties).
-
Database configuration options can be passed into the
db createCLI command using the-o/--optionsoption. Each option is akey=valuepair; multiple options are separated by whitespaces, e.g.,-o option1=value1 option2=value2. When used as the last option, values should be followed by--.# enables search and edge properties for the database stardog-admin db create -n myDatabase -o search.enabled=true edge.properties=true -- -
- Navigate to the “Databases” tab
- Click on the “Create Database” button
- Enter a name for the new database
-
Select the “Manually Set Immutable Properties” radio button and select which properties to set
The only way to set mutable database options at database creation time in Studio is by providing a Java properties file containing configuration options.
- Click the “Create” button

-
See the HTTP API documentation for more information.
curl -u username:password -X POST \
-F root="{\
"dbname":"myDatabase",\
"options":{"search.enabled":true, "edge.properties":true}\
}" http://localhost:5820/admin/databases
import com.complexible.stardog.api.admin.AdminConnection; import com.complexible.stardog.db.DatabaseOptions; import com.complexible.stardog.metadata.Metadata; import com.complexible.stardog.search.SearchOptions; import static com.complexible.stardog.api.admin.AdminConnectionConfiguration.toServer; public class CreateDatabaseWithConfigOptions { public static void main(String[] args){ String serverUrl = "http://localhost:5820"; String username = "username"; String password = "password"; Metadata metadata = Metadata.create() .set(SearchOptions.SEARCHABLE, true) .set(DatabaseOptions.EDGE_PROPERTIES, true); try(AdminConnection adminConnection = toServer(serverUrl).credentials(username, password).connect();){ adminConnection.newDatabase("myDatabase").setAll(metadata).create(); } } }
Database Creation Templates
The Stardog CLI and Studio allow you to pass a Java properties file containing database configuration options at database creation time. If the configuration option database.name is provided in the properties file it will override the name passed in at creation time.
-
A properties file can be provided to the
db createcommand using the--config/-coption.$ cat database.properties database.name=myDatabase search.enabled=true edge.properties=true# -n/--name option can be omitted because 'database.name' is contained in database.properties stardog-admin db create -c database.properties Successfully created database 'myDatabase'. -
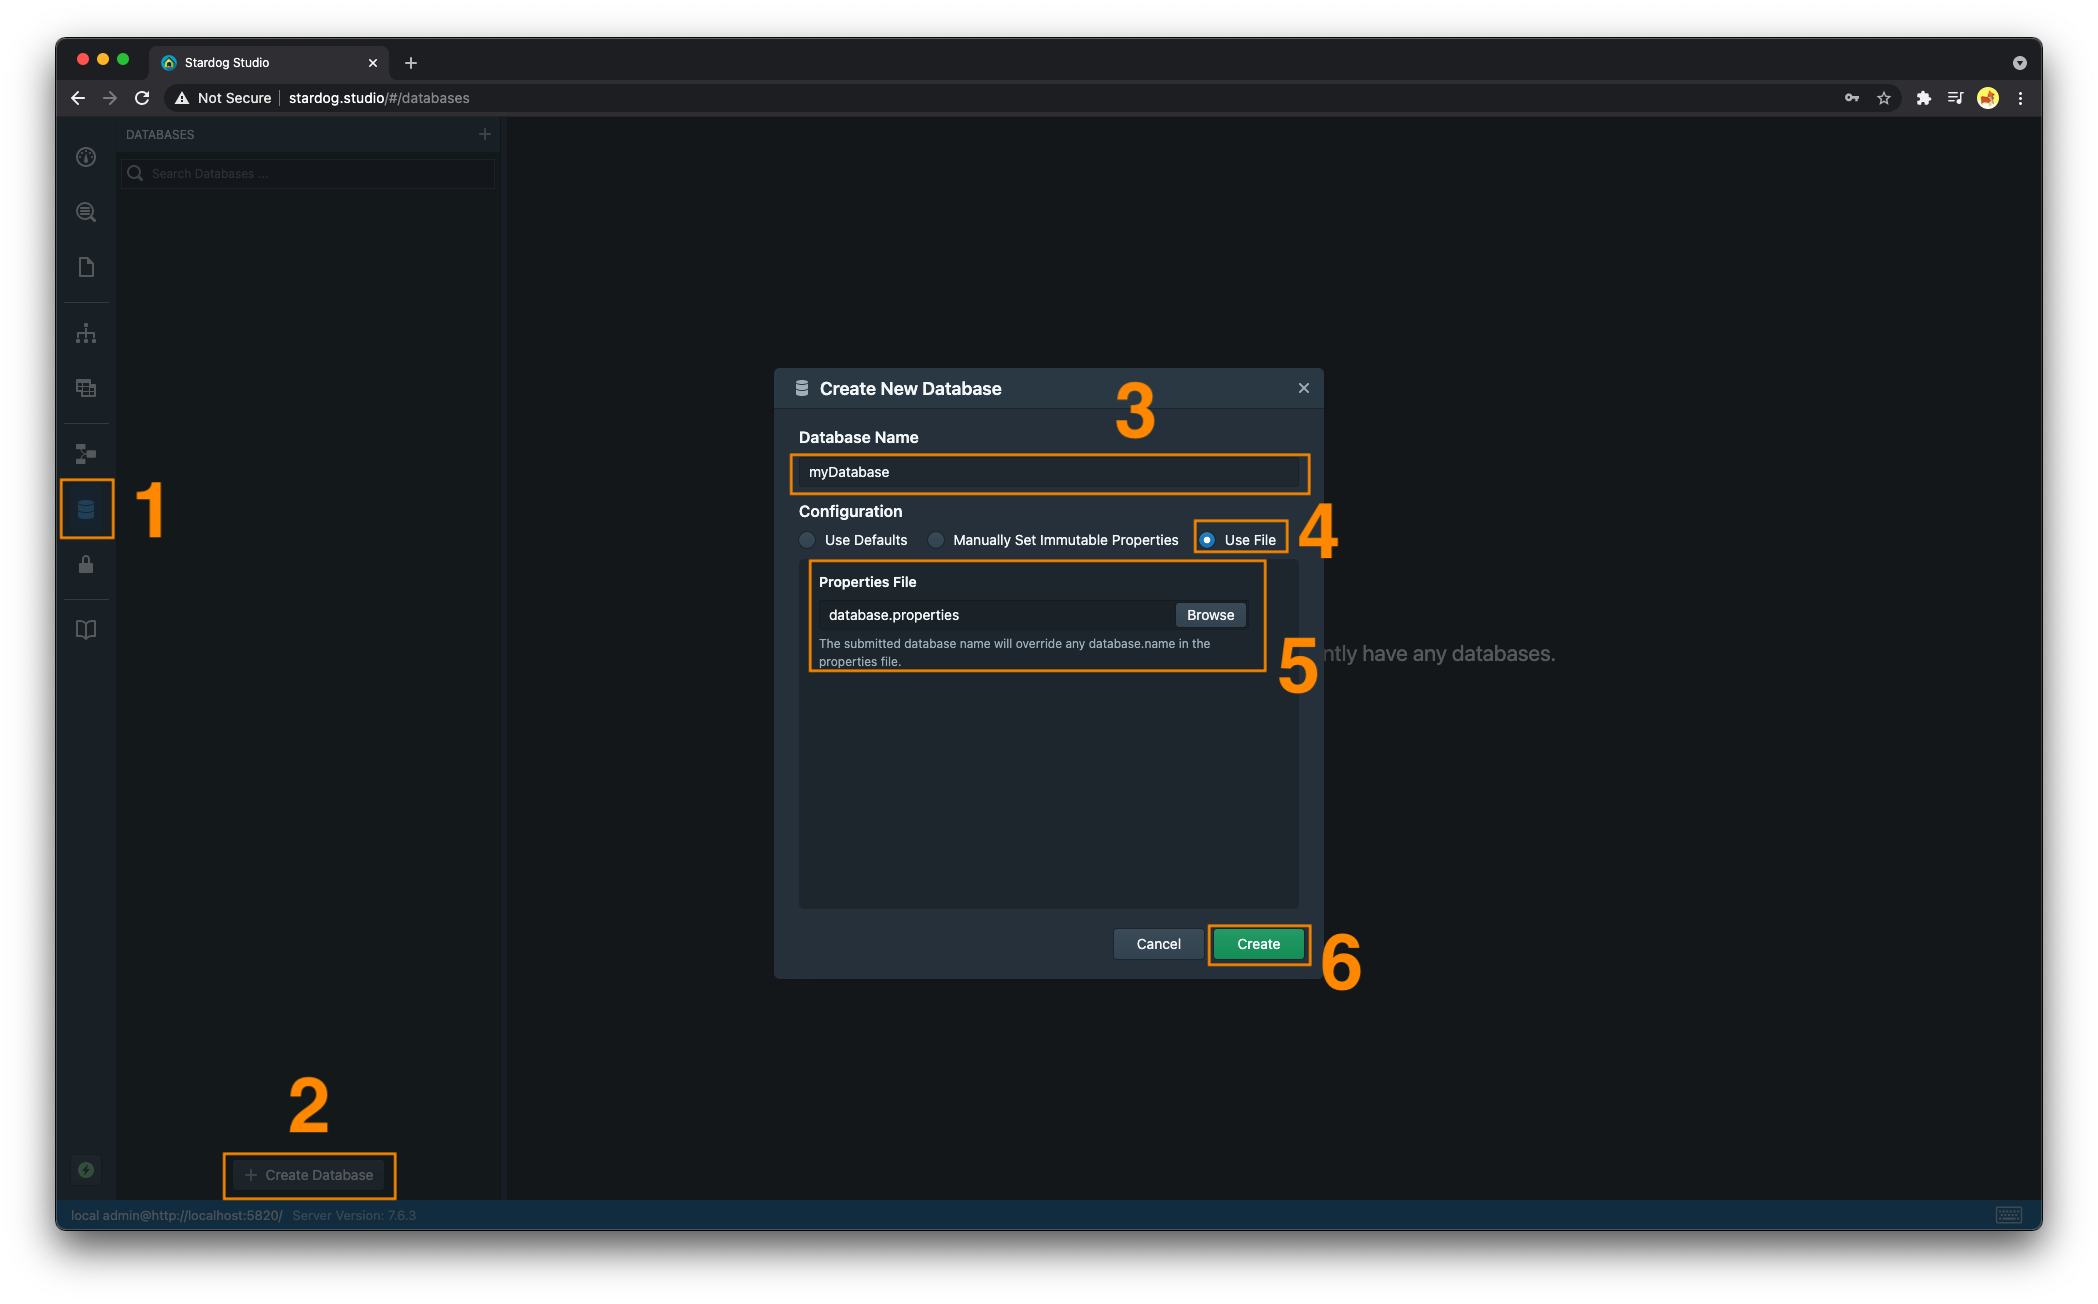
- Navigate to the “Databases” section
- Click on the “Create Database” button
- Enter a name for the database if
database.nameis not defined in the properties file being used to configure the database - Select the “Use File” radio button
- Select the properties file on your filesystem.
- Click the “Create” button
Bulk Loading Data at Creation Time
Stardog tries hard to do bulk loading at database creation time in the most efficient and scalable way possible.
To load data at creation time:
-
Files to be added to the database may be passed as final arguments to the
db createcommand.- If a directory is passed as one of the final arguments, all the files in that directory and its child directories will be recursively loaded to the database.
- Zip files will be uncompressed and the RDF files they contain will be loaded.
- Files with unrecognized extensions, or that produce parse errors, will be (silently) ignored. Named graphs can be specified with an
@sign preceding the graph iri. - All files after that graph will be loaded into that graph until another
@graphis encountered. A single@can be used to switch back to the default graph.
By default, files are not copied to the remote server; only the paths are sent. If the files do not exist on the remote server, the
--copy-server-sideflag should be specified in order to copy them before creating the database and bulk loading the data.# load input01.ttl to the default graph, input1.ttl and input2.ttl to urn:stardog:graph1, switch back to the default graph and load input3.ttl to it stardog-admin db create -n myDatabase input0.ttl @urn:stardog:graph:1 input1.ttl input2.ttl @ input3.ttl -
Create a geospatial enabled database, and bulk load
labels_en.nq.bz2to the named graphsome:graphandgeo_coordinates_en.nq.bz2to the default graph. Both of these files exist on the client machine and will be shipped to the server.curl -u username:password -X POST \ -F root="{\ "dbname":"spatialDB",\ "options":{"spatial.enabled":true},\ "files":[{"filename":"labels_en.nq.bz2", "context":"some:graph"},{"filename":"geo_coordinates_en.nq.bz2"}]\ }"\ -F "geo_coordinates_en.nq.bz2"=@/path/to/geo_coordinates_en.nq.bz2 \ -F "labels_en.nq.bz2"=@/path/to/labels_en.nq.bz2 \ http://remote-server:5820/admin/databasesCreate a search enabled database, and bulk load
/path/to/data1.ttlto the named graphsome:graphand/path/to/data2.ttlto the default graph. Both of these files exist on the same machine Stardog is running on.curl -u admin:admin -X POST \ -F root="{\ "dbname":"myDatabase",\ "options":{"search.enabled":true},\ "files":[{"filename":'/path/to/data1.ttl',"context":'some:graph'}, {"filename":'/path/to/data2.ttl'}]}" \ http://localhost:5820/admin/databasesSee the HTTP API for more information.
import com.complexible.stardog.api.admin.AdminConnection;
import com.google.common.collect.ImmutableMap;
import com.stardog.stark.Resource;
import com.stardog.stark.Values;

import java.nio.file.Path;
import java.nio.file.Paths;

import static com.complexible.stardog.api.admin.AdminConnectionConfiguration.toServer;

public class CreateDatabaseBulkLoad {

    public static void main(String[] args){

        String serverUrl = "http://localhost:5820";
        String username = "username";
        String password = "password";

        try(AdminConnection adminConnection = toServer(serverUrl).credentials(username, password).connect();){

            Resource g1 = Values.iri("urn:g1");
            Resource g2 = Values.iri("urn:g2");
            Path f1 = Paths.get("/path/to/data1.ttl");
            Path f2 = Paths.get("/path/to/data2.ttl");
            Path f3 = Paths.get("/path/to/data3.ttl");

            ImmutableMap<Path, Resource> contexts = ImmutableMap.of(f1, g1, f2, g2);

            // f1 is loaded into g1
            // f2 is loaded into g2
            // f3 is loaded into the default graph
            adminConnection.newDatabase("myDatabase").create(contexts::get, f1, f2, f3);
        }
    }
}
See
com.complexible.stardog.api.admin.DatabaseBuilder#createfor more information.If the files to be bulk loaded do not exist on the same machine as Stardog, use
com.complexible.stardog.api.admin.DatabaseBuilder#copyServerSideto specify that the files should be first copied to the server.
It’s not currently possible to bulk load data at creation time via Stardog Studio.
Tuning Bulk Loading Performance
Data loading time can vary widely, depending on factors in the data to be loaded, including the number of unique resources, etc. Below are some tips to help you achieve the best bulk loading times:
- Copy or move the files to be loaded onto the same machine as Stardog. Copying the files from a client over a network will introduce overhead.
-
In your
stardog.propertiesfile, set thememory.modeconfiguration option to a value ofbulk_load:memory.mode=bulk_loadBe sure to disable this option after bulk loading is complete. See Memory Configuration for more information.
- Load compressed data (GZIP, BZ2, ZIP) since compression minimizes disk access.
- Use a multicore machine since bulk loading is highly parallelized and database indexes are built concurrently.
-
Load many files together at creation time, since different files will be parsed and processed concurrently, improving the load speed. Files using NTriples or NQuads format are parsed in multiple threads automatically without the need to split them into multiple files.
The
file splitCLI utility can be used to split an RDF files into smaller files. - With caution, turn off the database configuration option
strict.parsing.
Archetypes
A database archetype is a simple templating mechanism for bundling a set of namespaces, schemas and constraints to populate a newly created database. Archetypes are an easy way to register the namespaces, schemas and constraints for standardized vocabularies and ontologies with a database. Archetypes are composable, so multiple archetypes can be specified at database creation time to load all the defined namespaces, schemas and constraints into the database. Archetypes are intended to be used alongside your domain data, which may include as many other schemas and constraints as are required.
The only way of using archetypes is via the Stardog Archetype Repository which comes with archetypes for FOAF, SKOS and PROV. Follow the instructions on the GitHub repository for setting up and using archetypes.
Once the archetypes have been setup you can use the following command to create a new database that will load the namespaces, schemas and constraints associated with an archetype:
stardog-admin db create -o database.archetypes="cim" -n myDatabase
Archetypes can be used as a predefined way of loading a schema and a set of constraints to the database just like any RDF data can be loaded to a database. The contents of the archetype will appear in the database under predefined named graphs, as explained next. These named graphs that are automatically created by archetypes can be queried and modified by the user as any other named graph after the database has been created.
Each archetype has a unique IRI identifying it and the schema contents of archetypes will be loaded into a named graph with that IRI. To see an example, follow the setup instructions to download the archetypes to ${STARDOG_HOME}/.archetypes and create a new database with the FOAF archetype:
stardog-admin db create -o database.archetypes="foaf" myDatabase
If you query the database you will see a named graph automatically created:
$ stardog query myDatabase "select distinct ?g { graph ?g { } }"
+----------------------------+
|             g              |
+----------------------------+
| http://xmlns.com/foaf/0.1/ |
+----------------------------+
Listing Databases
To list all of the databases in the Stardog server
stardog-admin db listOutput:
+-------------+
|  Databases  |
+-------------+
| db1         |
| db2         |
+-------------+
See the
db listcommand for more information.-
- Navigate to the “Databases” section. The list of all databases the user has access to will appear in the left pane.

curl -u username:password http://localhost:5820/admin/databasesSee the HTTP API for more information
import com.complexible.stardog.api.admin.AdminConnection;

import static com.complexible.stardog.api.admin.AdminConnectionConfiguration.toServer;

public class ListDatabases {

    public static void main(String[] args) {

        String serverUrl = "http://localhost:5820";
        String username = "admin";
        String password = "admin";

        try (AdminConnection adminConnection = toServer(serverUrl).credentials(username, password).connect();) {
            System.out.println(adminConnection.list());
        }
    }
}
See
com.complexible.stardog.api.admin.AdminConnection#listfor more information.
Database Status
One can obtain a status report for any database in the server. The status report contains the following information:
- Database: name of the database
- Status: whether the database is online/offline
- Approx. Size: the approximate number of triples in the database
- Queries: number of queries currently running
- Open Connections: number of open connections to the database
- Open Transactions: number of open transactions to the database
- Query Avg. Time: average query execution time
- Plans Cached: number of query plans cached for the database
- Plan Cache Hit Ratio: ratio to monitor hits/misses on the plan cache for the database
To obtain a status report for a database:
stardog-admin db status db1Output:
Database             : db1
Status               : Online
Approx. size         : 0 triples
Queries              : None running
Open Connections     : 0
Open Transactions    : 0
Query Avg. Time      : 0.00 s
Query Rate           : 0.00 queries/sec
Plans Cached         : 3
Plan Cache Hit Ratio : 57.14%
See the
db statuscommand for more information.-
- Navigate to the “Databases” section
- Not all information obtainable via the
db statusCLI command is available in Studio. The listing of databases in the left pane shows the approximate amount of triples in each database. If you click on a specific database in the listing and into the “Admin” tab, the number of running queries and the database’s status (offline/online) will be displayed.
- Not all information obtainable via the

- Navigate to the “Databases” section
Offline/Online a Database
Databases are either online or offline; this allows database maintenance to be decoupled from server maintenance.
- Databases are put
onlineorofflinesynchronously: these operations block until other database activity is completed or terminated. - If the Stardog server is shutdown while a database is
offline, the database will beofflinewhen the server restarts. - Some database configuration options (e.g.
search.enabled) require the database to beofflinewhen the configuration option is set. See Getting and Setting Database Options for more information.
To offline a database:
stardog-admin db offline myDatabaseSee the
db offlinecommand for more information.-
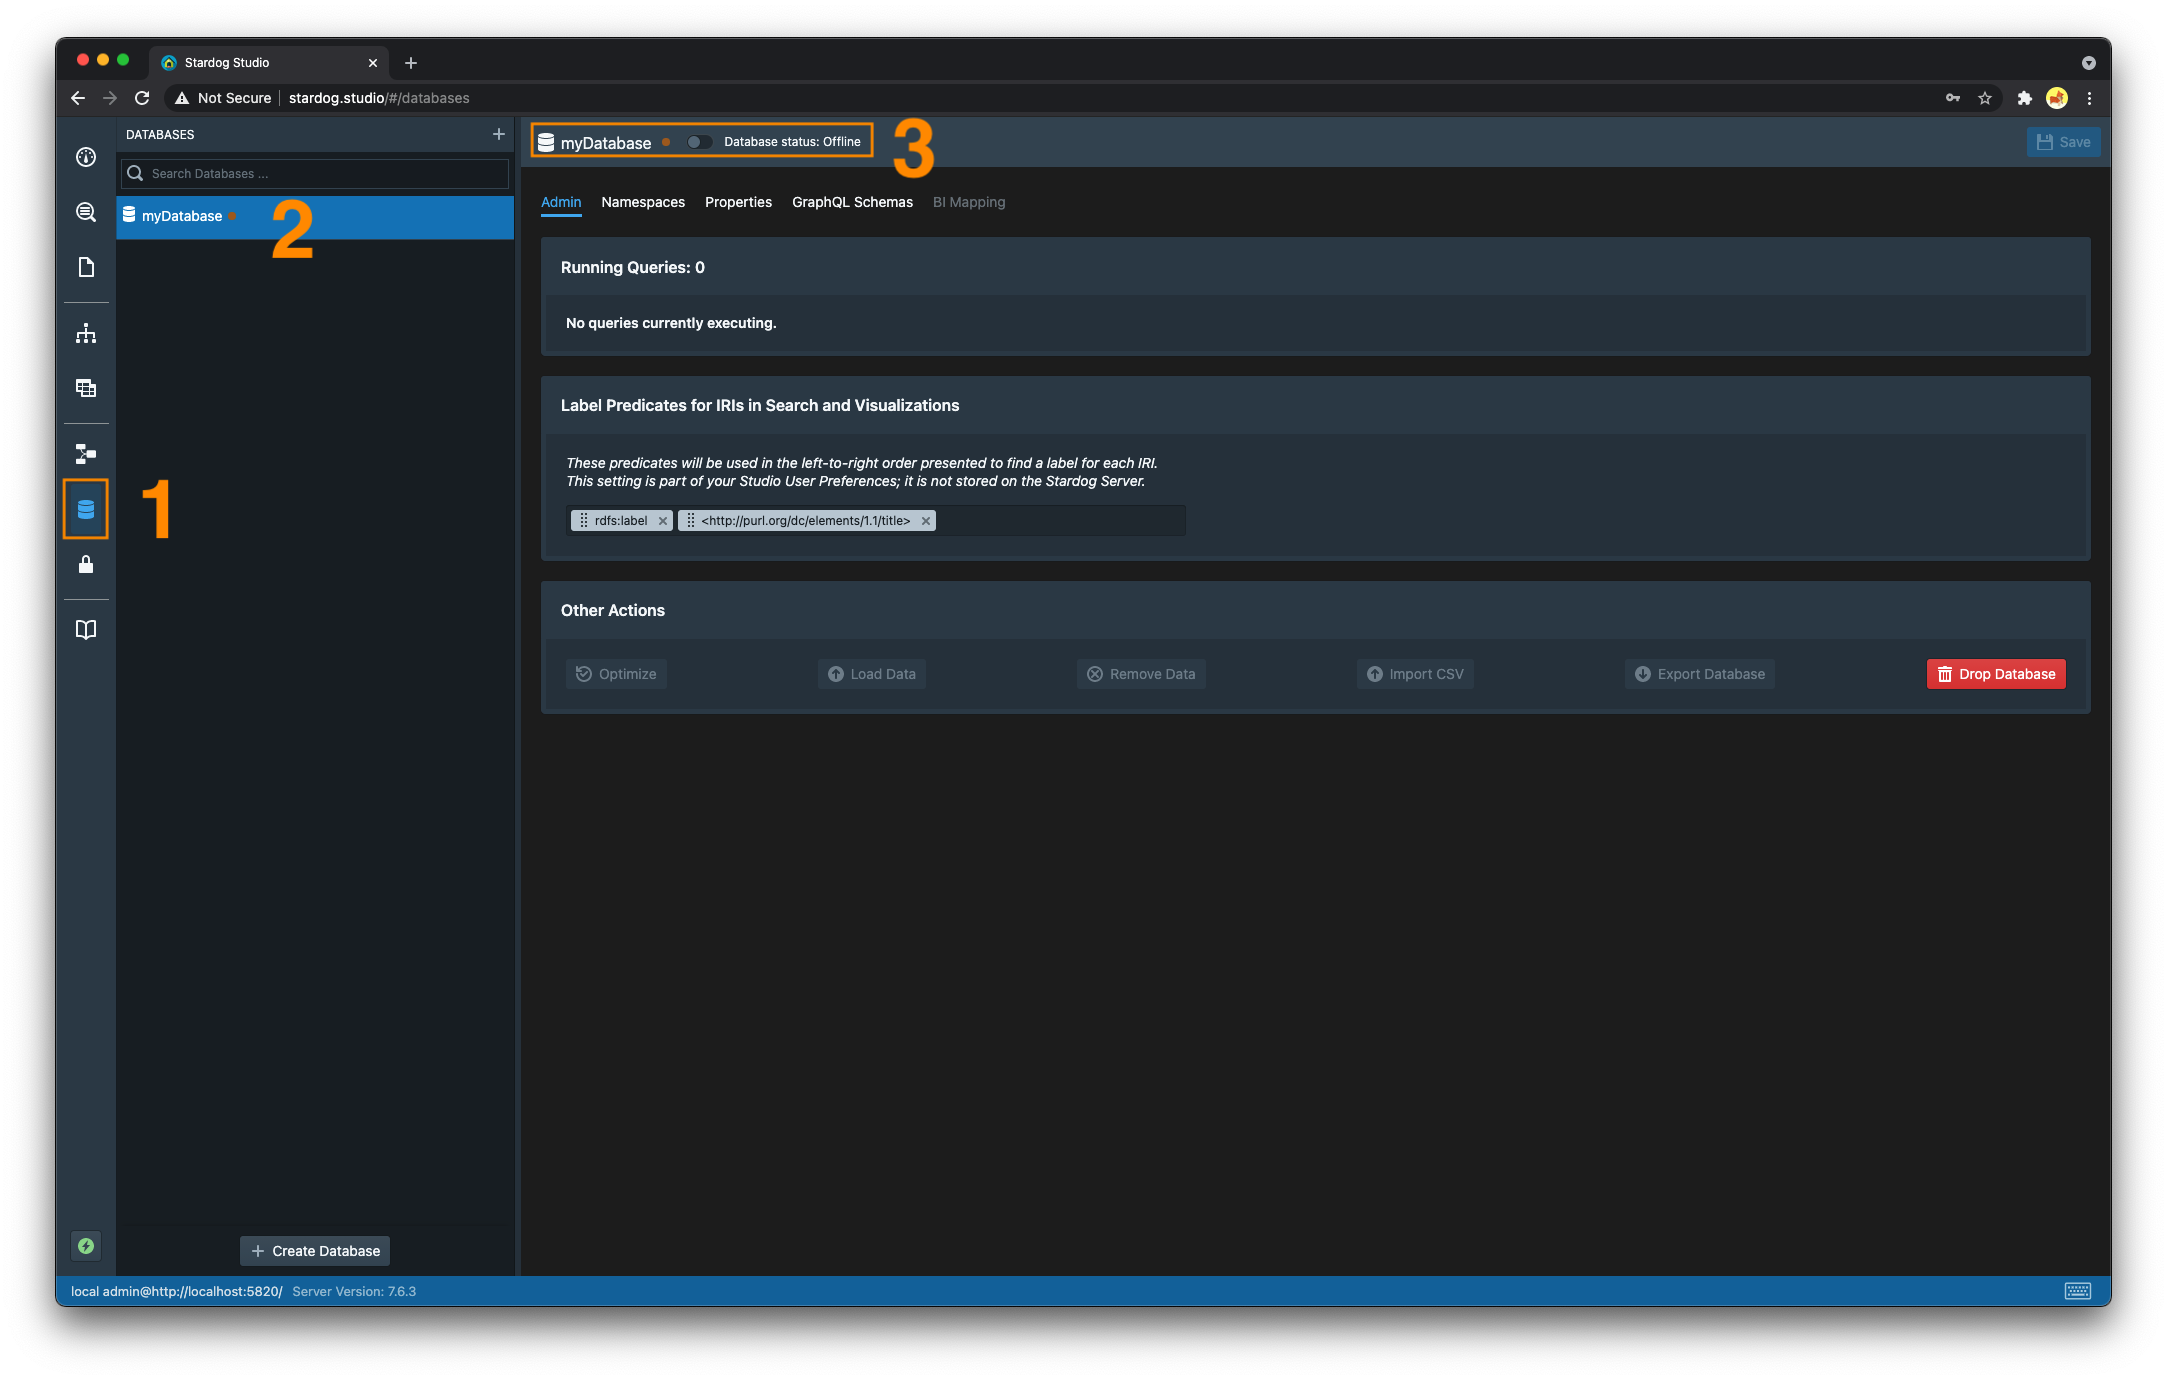
- Navigate to the “Databases” section.
- Select the database you wish to offline
- Toggle the switch from the online position to the offline position. The green dot that was previously displayed to the right of the database name should now be orange.
curl -u username:password -X PUT \
http://localhost:5820/admin/databases/myDatabase/offline
See the HTTP API for more information.
import com.complexible.stardog.api.admin.AdminConnection;

import static com.complexible.stardog.api.admin.AdminConnectionConfiguration.toServer;

public class OfflineDatabase {

    public static void main(String[] args) {

        String serverUrl = "http://localhost:5820";
        String username = "username";
        String password = "password";

        try (AdminConnection adminConnection = toServer(serverUrl).credentials(username, password).connect();) {
            adminConnection.offline("myDatabase");
        }
    }
}
See
com.complexible.stardog.api.admin.AdminConnection#offlinefor more information.
To online a database:
stardog-admin db online myDatabaseSee the
db onlinecommand for more information.-
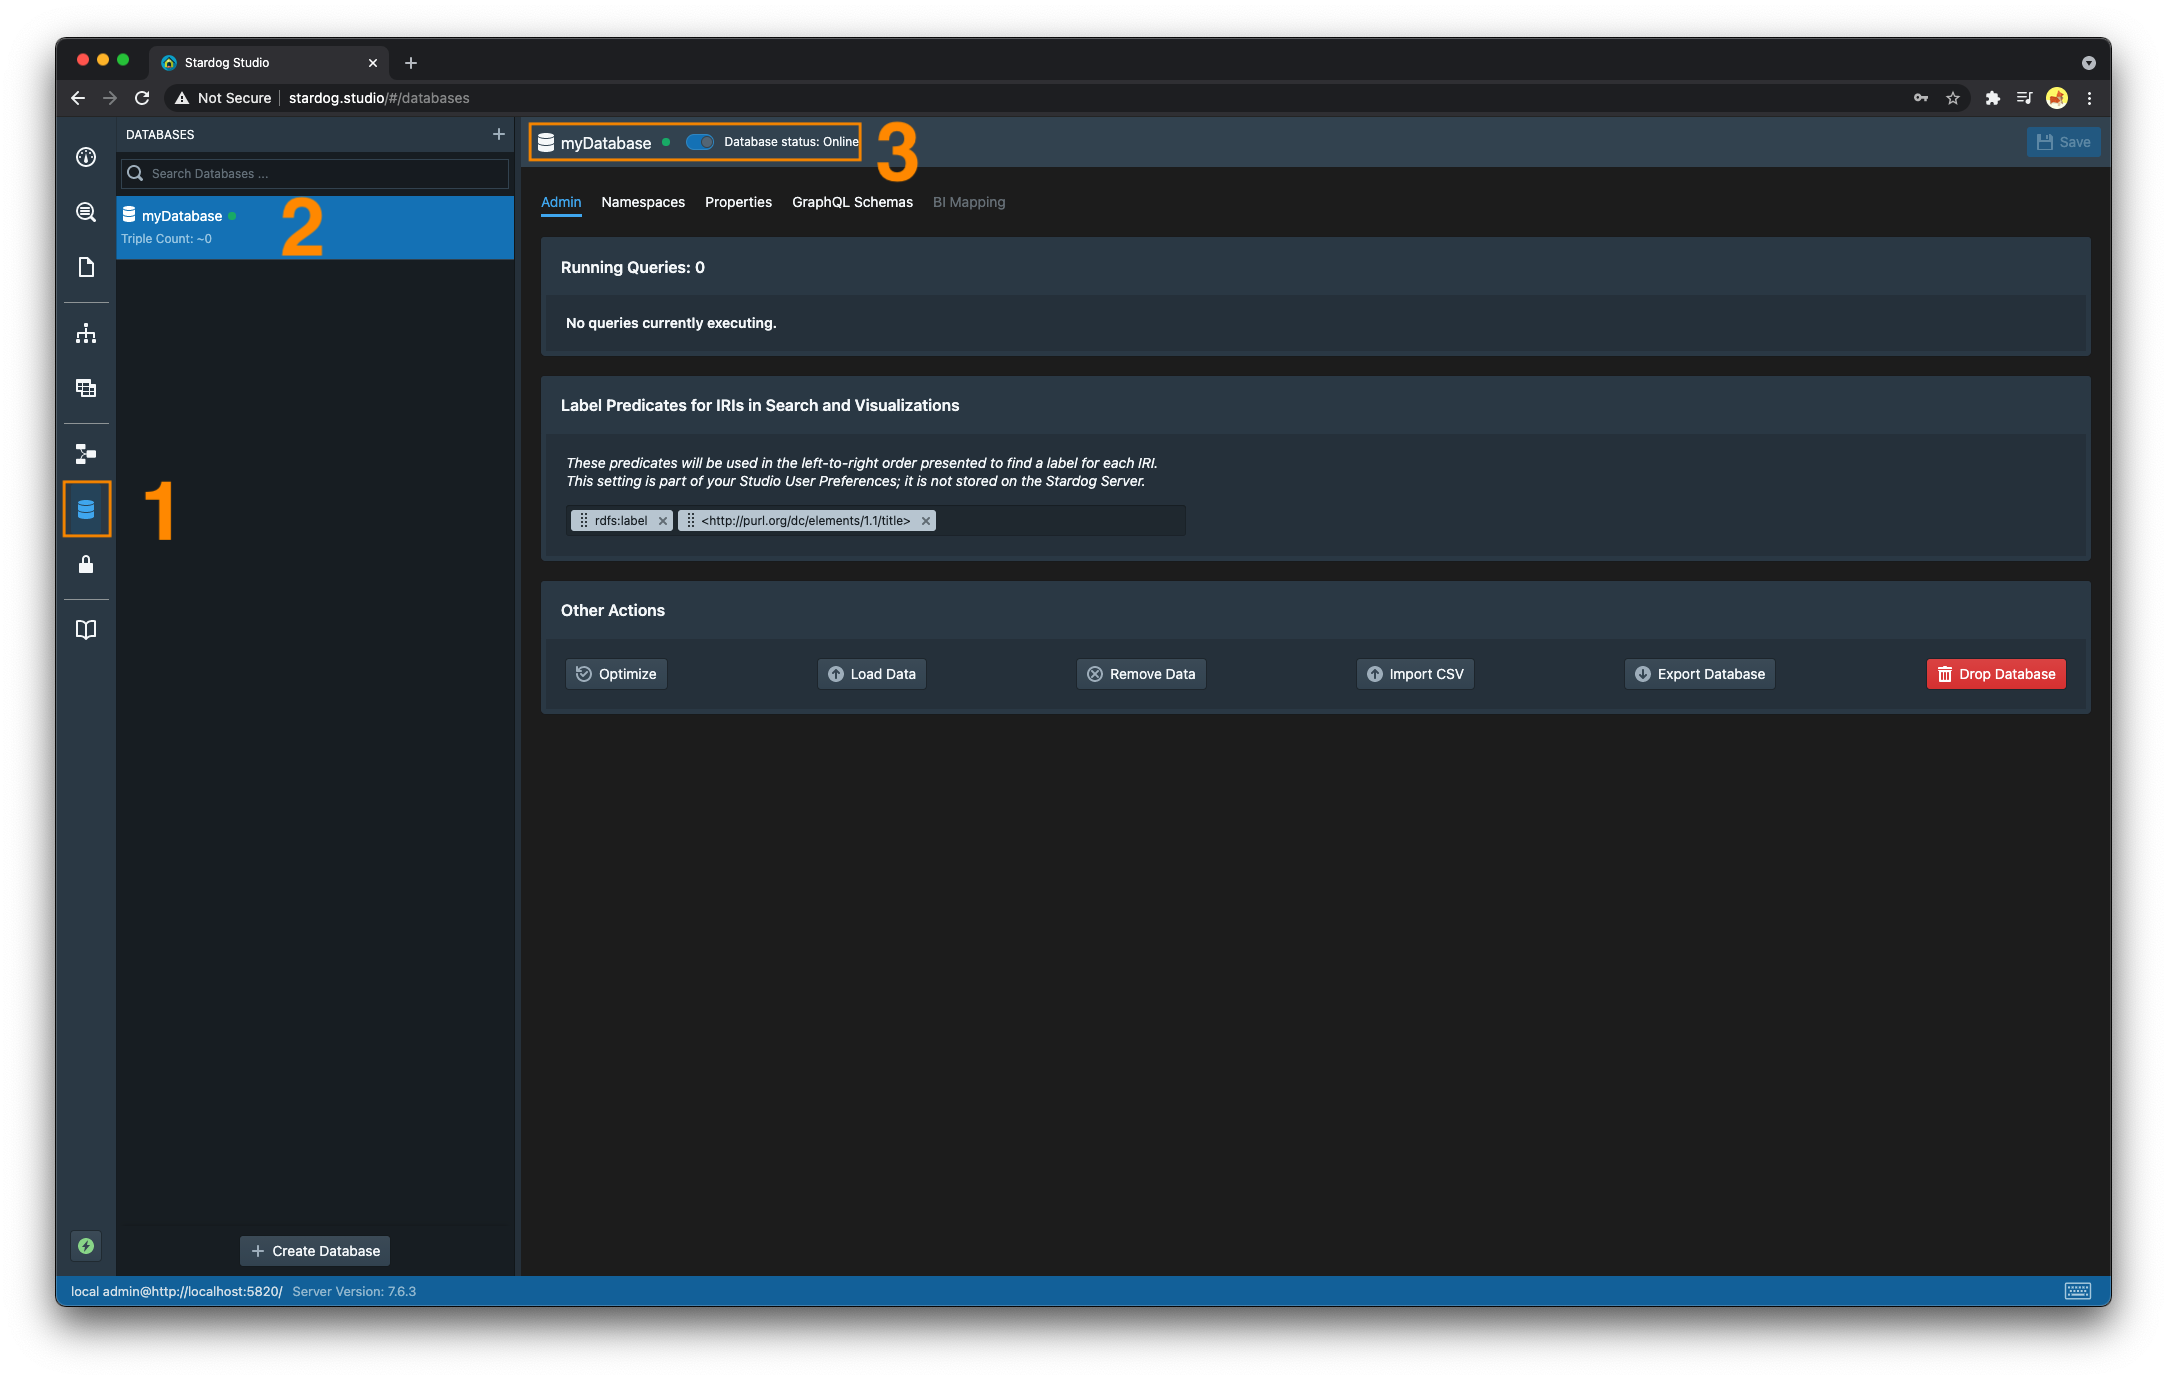
- Navigate to the “Databases” section.
- Select the database you wish to online
- Toggle the switch from the offline position to the online position. The orange dot that was previously displayed to the right of the database name should now be green.
curl -u username:password -X PUT \
http://localhost:5820/admin/databases/myDatabase/online
See the HTTP API for more information.
import com.complexible.stardog.api.admin.AdminConnection;

import static com.complexible.stardog.api.admin.AdminConnectionConfiguration.toServer;

public class OnlineDatabase {

    public static void main(String[] args) {

        String serverUrl = "http://localhost:5820";
        String username = "username";
        String password = "password";

        try (AdminConnection adminConnection = toServer(serverUrl).credentials(username, password).connect();) {
            adminConnection.online("myDatabase");
        }
    }
}
See
com.complexible.stardog.api.admin.AdminConnection#onlinefor more information.
Namespaces
Stardog allows database administrators to persist and manage custom namespace prefix bindings.
At database creation time, if data is loaded to the database that has namespace prefixes, then those are persisted for the life of the database. This includes setting the default namespace to the default that appears in the file. Any subsequent queries to the database may simply omit the PREFIX declarations:
If no files are used during database creation, or if the files do not define any prefixes (e.g. NTriples), then the following prefixes are stored:
| Prefix | IRI |
|---|---|
| (default prefix) | http://api.stardog.com/ |
rdf | http://www.w3.org/1999/02/22-rdf-syntax-ns# |
rdfs | http://www.w3.org/2000/01/rdf-schema# |
xsd | http://www.w3.org/2001/XMLSchema# |
owl | http://www.w3.org/2002/07/owl# |
stardog | tag:stardog:api: |
-
When executing queries in the CLI, the default table format for SPARQL
SELECTresults will use the bindings as qnames. SPARQLCONSTRUCTquery output (including export) will also use the stored prefixes. To reiterate, namespace prefix bindings are per database, not global.Suppose you had a database
moviesand stored the namespace consisting of the prefixncorresponding to the IRIhttp://www.imdb.com/name/$ stardog query execute movies "select * { ?s rdf:type :Person } limit 5" +-------------+ | s | +-------------+ | n:nm0000001 | | n:nm0000002 | | n:nm0000003 | | n:nm0000004 | | n:nm0000005 | +-------------+The result set above uses the binding
nas the qname for each result.
To add new bindings, use the
namespace addcommandstardog namespace add movies --prefix n --uri 'http://www.imdb.com/name/'To change the default binding, use a quote prefix (
"") when adding a new one:stardog namespace add movies --prefix "" --uri 'http://new.default'To change an existing binding, remove the existing one using the
namespace removecommand and then add a new one:stardog namespace remove movies --prefix ex && stardog namespace add movies --prefix "ex" --uri 'http://another.iri'To list all namespace prefix bindings use the
namespace listcommand:$ stardog namespace list movies +---------+---------------------------------------------+ | Prefix | Namespace | +---------+---------------------------------------------+ | | http://schema.org/ | | ex | http://some.iri | | foaf | http://xmlns.com/foaf/0.1/ | | geo | http://www.w3.org/2003/01/geo/wgs84_pos# | | n | http://www.imdb.com/name/ | | owl | http://www.w3.org/2002/07/owl# | | rdf | http://www.w3.org/1999/02/22-rdf-syntax-ns# | | rdfs | http://www.w3.org/2000/01/rdf-schema# | | sfn | tag:stardog:api:functions: | | spf | tag:stardog:api:property: | | stardog | tag:stardog:api: | | t | http://www.imdb.com/title/ | | xml | http://www.w3.org/XML/1998/namespace | | xsd | http://www.w3.org/2001/XMLSchema# | +---------+---------------------------------------------+To export all namespace prefix bindings in the database, use the
namespace exportcommand:# saving the namespaces (exported in Turtle by default) to a file prefixes.ttl stardog namespace export movies > prefixes.ttlTo import namespace prefixes from an RDF file that contains prefix declarations into the database use the
namespace import:stardog namespace import -- newDatabase /path/to/prefixes.ttlAny prefix imported will override any previous mappings for the prefix sharing the same name.
-
- Navigate to the “Databases” section.
- Select the database you wish to see all namespace prefix bindings for
- Select the “Namespaces” tab
- From this view, you can edit, add, or remove any prefix binding. Be sure to click the “Save” button in the top right corner after making any changes you wish to persist.
- There are two buttons to import new prefix bindings and export the existing ones.

-
To retrieve the namespaces stored in the database
curl -u username:password http://localhost:5820/movies/namespacesSee the HTTP API for more information
To import namespaces stored in an RDF file:
curl -u username:password -X POST \
-F name=@path/to/prefixes.ttl \
http://localhost:5820/movies/namespaces
See the HTTP API for more information.
import com.complexible.stardog.api.Connection;
import com.complexible.stardog.api.ConnectionConfiguration;
import com.stardog.stark.Namespace;
import com.stardog.stark.io.turtle.TurtleUtil;

import java.io.PrintStream;
import java.util.Optional;

public class ManagingNamespaces {

    public static void main(String[] args) {

        String serverUrl = "http://localhost:5820";
        String username = "username";
        String password = "password";

        try (Connection connection = ConnectionConfiguration.to("movies").server(serverUrl).credentials(username, password).connect()){

            // Add a namespace
            connection.namespaces().add("somePrefix", "http://some.iri");

            // Given an IRI, get the corresponding prefix
            Optional<String> thePrefix = connection.namespaces().prefix("http://some.iri");
            System.out.println(thePrefix.get());

            // Given a prefix, get the corresponding IRI
            Optional<String> theIRI = connection.namespaces().iri("somePrefix");
            System.out.println(theIRI.get());

            // Remove a namespace
            connection.namespaces().remove("somePrefix");

            // List/export namespaces in Turtle
            try(PrintStream out = System.out){
                for(Namespace ns : connection.namespaces()){
                    out.print(ns.prefix());
                    out.print(": <");
                    out.print(TurtleUtil.encodeURIString(ns.iri()));
                    out.print("> .");
                    out.println();
                }
            }
        }
    }
}
See
com.complexible.stardog.api.Connection#namespacesfor more information.
Namespace bindings do not affect absolute graph IRIs: if prefix ns is bound to namespace http://some.iri/, then ns:g1 is equivalent to http://some.iri/g1, but <ns:g1> refers to a graph with a literal name ns:g1.
Dropping a Database
Dropping a database deletes the database, all associated files, and metadata. This means all files on disk related to the database will be deleted, so please use with caution.
-
Provide the database name as the only argument to the
db dropcommand:stardog-admin db drop myDatabase -
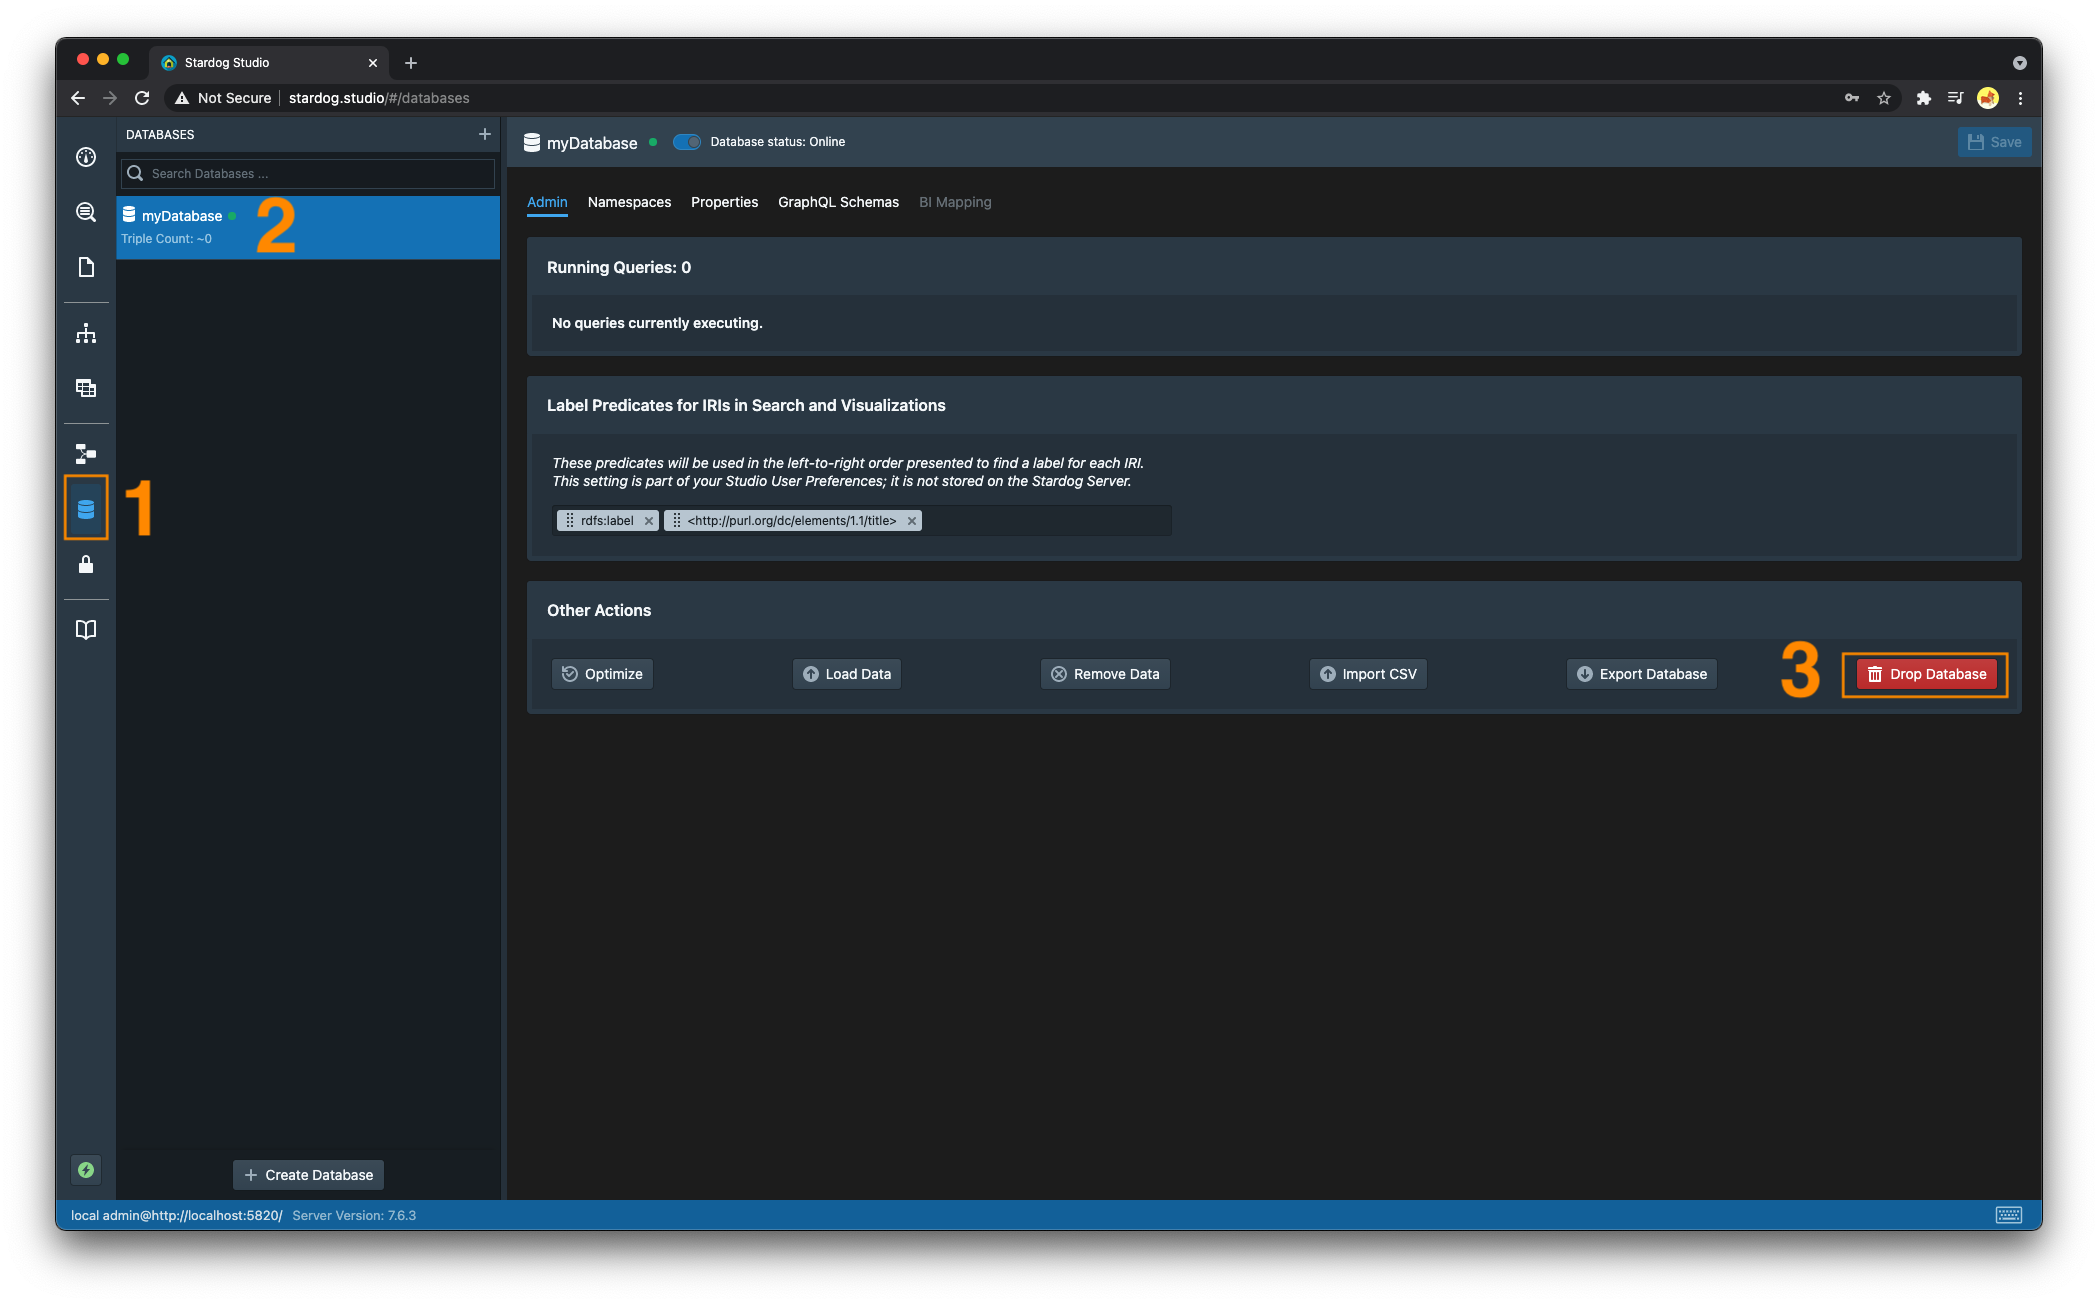
- Navigate to the “Databases” section
- Select the database to be dropped
- Click on “Drop Database”. Confirm you do indeed want to drop this database.
curl -u username:password -X DELETE \
http://localhost:5820/admin/databases/myDatabase
See the HTTP API for more information.
import com.complexible.stardog.api.admin.AdminConnection;

import static com.complexible.stardog.api.admin.AdminConnectionConfiguration.toServer;

public class DropDatabase {

    public static void main(String[] args) {

        String serverUrl = "http://localhost:5820";
        String username = "username";
        String password = "password";
        String db = "myDatabase";

        try (AdminConnection adminConnection = toServer(serverUrl).credentials(username, password).connect();) {
            if(adminConnection.list().contains(db)){
                adminConnection.drop(db);
            }
        }
    }
}
See
com.complexible.stardog.api.admin.AdminConnection#dropfor more information.
Renaming a Database
If you need to rename a database, you can do so with the db rename command. This command will change the name of the database and all associated files and metadata.
The new database name must be unique. If there is an existing database with the new name, the command will fail. The database must be offline to rename it, then the database can be brought back online after the rename operation is complete. This operation is not fully atomic. A failure during the rename operation may leave the database in an inconsistent state. If this happens, you can restore the database from a backup.
stardog-admin db offline oldDatabaseName
stardog-admin db rename --from oldDatabaseName --to newDatabaseName
stardog-admin db online newDatabaseName
See the
db renamecommand for more information.curl -u username:password -X POST \ --data 'newDatabaseName' \ http://localhost:5820/admin/databases/oldDatabaseName/renameReplace
oldDatabaseNamewith the current database name andnewDatabaseNamewith the desired new name.import com.complexible.stardog.api.admin.AdminConnection; import static com.complexible.stardog.api.admin.AdminConnectionConfiguration.toServer; public class RenameDatabase { public static void main(String[] args) { String serverUrl = "http://localhost:5820"; String username = "username"; String password = "password"; String oldDb = "oldDatabaseName"; String newDb = "newDatabaseName"; try (AdminConnection adminConnection = toServer(serverUrl).credentials(username, password).connect();) { adminConnection.offline(oldDb); adminConnection.renameDatabase(oldDb, newDb); adminConnection.online(newDb); } } }See
com.complexible.stardog.api.admin.AdminConnection#renameDatabasefor more information.
Repairing a Database
Stardog data storage has been designed to be resilient to software and hardware failures. If a transaction fails or the server crashes, the integrity of the stored data should not be affected. However, due to unforeseen issues database storage might get into a state that it needs to be repaired manually. In this section we will explain the high-level storage components, the possible corruption issues that might occur and the ways to resolve these issues.
Stardog database storage has two main components: dictionary and index. The dictionary is a bidirectional mapping between the RDF values (IRIs, bnodes, literals) and 64-bit integers that are used as IDs. The index component uses these IDs to store the RDF statements as quads (triple plus the named graph ID). So the dictionary is essential to turn the quads stored in the index to user-visible RDF statements.
There are two categories of database corruption: logical and physical. Physical corruption is the case where files stored on disk for the dictionary or the index have been deleted or damaged in some way. Logical corruption is when the files on disk are valid but the dictionary or the index contents has issues. We will describe these cases in more detail in the following section:
Dictionary corruption
There are two different ways a dictionary might be corrupted:
- Incomplete: If there is an ID in the index that does not exist in the dictionary the dictionary is called incomplete. The quads in the index using those IDs cannot be recovered.
- Inconsistent: Since the dictionary is bidirectional the entries in both directions of the mapping should be exactly the same. For example, if we have
urn:example → 1234mapping in one direction and the2345 → urn:examplemapping on the other direction, the dictionary is inconsistent. Sometimes one side of the mapping might be missing an entry completely. Inconsistent dictionaries can be repaired fully.
If a dictionary is both incomplete and inconsistent it is called invalid.
Symptoms The most common symptom of a dictionary corruption is getting a NullPointerException while trying to do a lookup from the dictionary (this would happen during query execution). The definitive way to check for dictionary corruption is by using the db verify command. Example outputs in the case of dictionary corruption look like this:
    Database test is not valid
    Index: Valid Count=5 Hash=bb5d5605b6b91a20
    Dictionary: Inconsistent
    The database can be repaired fully using the SPO index order.

    Database test is not valid
    Index: Valid Count=5 Hash=38c97a47f0f26ecf
    Dictionary: Incomplete
    The database can be repaired partially using the SPO index order.
Recovery
If you have a recent backup of the database, restoring the database from the backup is the simplest resolution. After the restore is complete, double check the database validity by running db verify again to make sure your backup was created from a valid state. The changes that have happened since the last backup will be lost as a result of this step.
If you do not have a recent backup or you would like to recover the updates that occurred since the last backup, you can try the manual recovery steps as outlined here:
-
Back up the database The
db backuphas a--repairoption that can repair the corruption while creating a backup from an invalid state. If thedb verifyoutput indicates that the dictionary is inconsistent then use the following command to create a new repaired backup:stardog-admin db backup --repair DB-NAMEWhen the
--repairargument is used a special backup process is used to resolve the dictionary inconsistency. If the dictionary is incomplete, the following command would fail with an error message:Error creating the backup, use partial backup option: ...The correct command to use in this case is:
stardog-admin db backup --partial --repair DB-NAMEWhen this command completes it will print output that looks as follows:
Database test backed up X triples (Y errors) to <backup-location>This output means that Y number of triples were not recoverable and only X number of triples are included in the backup. For dictionaries that are inconsistent but complete, Y is expected to be 0, so that part of the message will be omitted.
-
Manual Inspection [Optional - Recommended] After the repaired backup is created it is recommended to restore it under a new name as a dry-run and optionally inspect database contents manually. Restoring a backup under a new name can be done with the following command:
stardog-admin db restore -n NEW-NAME <backup-location>This temporary database can be dropped after manual inspection:
stardog-admin db drop NEW-NAME - Restore the database Backup can now be restored to overwrite the corrupted database:
stardog-admin db restore --overwrite <backup-location>The restore process drops the existing database, after the data is loaded.
Note that data written to the existing database, while restoring takes place, will be lost. Transactions that were started before or during the restore operation, will not be present in the restored database. For a long running restore process, it is possible to read or query the old database. At the end of the restore process, the old database is dropped and replaced with the restored database. During this short period of time, the database will not be available.
Index corruption
Stardog maintains eight different indexes to allow efficient answering of different query patterns. Each index contains the same set of triples (or more correctly quads) sorted in different orders. The indexes are named by their sort order: SPO, PSO, POS, OSP, SPOC, PSOC, OSPC. If these index orders get out of sync with each other for any reason the index is considered to be corrupted.
Symptoms When indexes are out of sync, users would see different results for queries that are supposed to return the same results because the query optimizer might choose a different index order for different queries. Running a clear graph query might not clear a graph because the clear operation would first use one of the indexes to read what triples will be removed.
As with dictionary corruption, the definitive way to confirm index corruption is to use the db verify command. The following is an example output showing index corruption:
Database is not valid
Index:
SPO    : Count=180,145,289 Hash=99ebbce4d2933432
PSO    : Count=180,145,289 Hash=99ebbce4d2933432
POS    : Count=180,145,289 Hash=99ebbce4d2933432
OSP    : Count=180,145,289 Hash=99ebbce4d2933432
SPOC   : Count=180,145,289 Hash=99ebbce4d2933432
PSOC   : Count=180,145,482 Hash=ab2172475f647001
POSC   : Count=180,145,289 Hash=99ebbce4d2933432
OSPC   : Count=180,145,289 Hash=99ebbce4d2933432
Dictionary: Valid
The database can be repaired partially. See the report above to choose an index order.
The command outputs the number of quads found in each index and a hash value (checksum) computed from the index contents. It might be the case that two index orders might have the same number of triples but not the exact same set of quads which would result in a different hash value and would be considered corrupted.
Recovery The process to repair a database with index corruption follows similar steps to fixing the dictionary corruption problem explained above but it is important to choose a correct index for recovery.
-
Choose Index The repair process will completely recover all the triples from an index the user specifies. By definition, index corruption is considered to be a partial repair operation because a user most likely would not be able to tell which index order has the correct set of triples. There are two strategies that can be used in choosing an index order:
- If the majority of the indexes have the same size and hash, it is safe to assume that set of triples is the correct one, and any of those indexes can be used for repair. In the above example, most indexes agree with each other and only
PSOCdiffers so using any other index would be acceptable. - In cases where indexes have wildly different numbers of results and no clear consensus, then it might be preferable to pick the index with the largest number of triples and then use a manual process to get rid of extra triples.
- If the majority of the indexes have the same size and hash, it is safe to assume that set of triples is the correct one, and any of those indexes can be used for repair. In the above example, most indexes agree with each other and only
-
Back up the Database Once the index order for recovery is selected, you need to follow similar steps to what was outlined above to do a backup and restore. The only parameter that needs to be supplied is the
--indexparameter:stardog-admin db backup --index INDEX-NAME DB-NAMEwhere INDEX-NAME is one of SPO, PSO, POS, OSP, SPOC, PSOC, POSC, OSPC and selected based on the instructions from the previous step. If no index order is specified, then SPOC will be used by default.
The command output should look like this:
Database DB-NAME backed up X triples to <backup-location> -
Manual Inspection [Optional - Recommended] Again it is recommended that the backup is first restored under a new name as a dry-run and database contents inspected manually. Restoring a backup under a new name can be done with the following command:
stardog-admin db restore -n NEW-NAME <backup-location> -
This temporary database can be dropped after manual inspection and the backup can be restored to overwrite the corrupted database:
stardog-admin db restore --overwrite <backup-location>The restore process drops the existing database, after the data is loaded.
Note that data written to the existing database, while restoring takes place, will be lost. Transactions that were started before or during the restore operation, will not be present in the restored database. For a long running restore process, it is possible to read or query the old database. At the end of the restore process, the old database is dropped and replaced with the restored database. During this short period of time, the database will not be available.
Physical corruption
This is the case where files stored on disk have been deleted or damaged in some way. Physical corruption can happen due to hardware malfunction or a user manually deleting files by mistake. If two Stardog instances run against the same STARDOG_HOME this might also happen. Stardog uses filesystem-level locks to prevent this, and there are two lock files used for this purpose: STARDOG_HOME/system.lock and STARDOG_HOME/data/LOCK. If the user manually deletes these files while a server is running, the second Stardog instance would be able to start and potentially corrupt the files on disk.
Symptoms The database might be completely missing from the list of available databases. If this is the case, during server start-up one of the following errors will be logged in stardog.log:
Database X will not be present in the system because of an initialization error. The data is not deleted.
X is put offline due to an initialization error
In some cases, the database will be available but trying to read from or write to the database will trigger errors as follows:
Caused by: com.stardog.starrocks.CorruptionException: Corruption: Can't access /007226.sst: IO error: while stat a file for size: /var/opt/stardog/data/007226.sst: No such file or directory
Recovery It is really hard to recover from physical corruption errors. Restoring a recent server backup is typically the best course of action. Reach out to Stardog Support to discuss other possibilities.