REST Connector Configuration
This page covers the configuration options and examples for Data Sources using the REST Connector.
Page Contents
- Overview
- General Configuration Steps
- Advanced Settings
- Examples
- Example 1: Autogenerated Mappings
- Example 2: Customized JSON Mappings
- Example 3: REST APIs
- Example 4: Customizing REST Schemas
- Example 5: REST with Parameters
- Example 6: REST with POST
- Example 7: Multiple REST Calls
- Example 8: Paging
- Example 9: Passing Credentials with Pseudo Columns
- Example 10: Adding Computed Fields
- Example 11: URLs With Multiple Parameters
Overview
The REST Connector allows users to create Virtual Graphs that can query XML and JSON data through a REST endpoint or from a file as RDF triples. It uses the CData JDBC REST driver that maps XML and JSON data to tables and rows so they can be queried with standard SQL statements. The Virtual Graph uses R2RML or SMS2 to then map the tables and rows to RDF.
This page explains how to setup Virtual Graphs with the REST Connector and demonstrates a number of examples of configuring, modeling, and querying XML and JSON data sources.
To run any of the examples below, you will first need to purchase the Virtual Graph REST Connector software. For information about purchasing and licensing, please contact us.
General Configuration Steps
The first step when using the REST Connector to create a Virtual Graph is to establish a connection to your REST data source. This accomplishes two things. First, it confirms your connection settings, which may include security parameters and proxy configuration. Secondly, it will allow the CData driver to analyze your REST resource and build a mapping for it.
The configuration for the CData REST driver works the same way as any JDBC-compliant driver – by loading a properties file with JDBC driver options. The CData driver options can be specified in the data source options file by prefixing them with ext.. A minimal example would look like the following:
jdbc.driver=cdata.jdbc.rest.RESTDriver
jdbc.url=jdbc:rest:
ext.URI=https://<server>/<path>
We’ll cover the minimum required parameters for the examples in this document. If you require additional configuration or support to access your REST endpoints such as proxy, OAuth, firewall, Azure, AWS, etc., refer to the CData REST driver documentation or contact their support team at oemsupport@cdata.com.
Initial Connection
The first time you connect to a REST resource, you may want to have the CData driver generate mapping files for you so you can get an idea of how CData is parsing your data. CData uses a script language called API Script and generates mappings using that script in files with a .rsd suffix.
If you already have .rsd files or you are very familiar with the data and plan on creating your own .rsd from scratch, you can skip this step. Most likely, however, you will want to have CData generate the mapping files initially, as it is much easier to modify a generated file than to start with a blank page.
This document only covers setting up Virtual Graphs using the Stardog CLI. You may find it useful to use a JDBC tool such as SQuirreL or DBeaver to help visualize the XML/JSON table and column mappings, experiment with CData settings, and test your SQL queries for building RDF mappings. You can refer to CData documentation for instructions that explain how to setup a JDBC tool with the REST Driver.
Follow these steps to create an initial connection:
- Create a Virtual Graph properties file called
rest_demo.properties. -
Copy the following contents into the properties file:
jdbc.driver=cdata.jdbc.rest.RESTDriver jdbc.url=jdbc:rest: ext.URI=<the URL or path of your XML or JSON data> ext.DataModel=Relational ext.Format=<JSON or XML> ext.Location=<RSD file path> ext.GenerateSchemaFiles=OnStart ext.Logfile=/<logpath>/log.txt ext.Verbosity=5 - Change
ext.URIto the URL or file path of your data. The CData REST driver only supports JSON or XML data. - Change the Format to either
JSONorXMLbased on the data at your file path or URI. - Add any additional options you may need to connect. Refer to the CData documentation for more details.
- Change
ext.Logfileto an existing folder where the driver can write a log file. -
Create a Virtual Graph with the new properties file (change the file path to where the properties file is located).
stardog-admin virtual add ./rest_demo.properties -
To confirm the connection, query the Virtual Graph. Replace
<db>with the name of a valid database (without the angle brackets).stardog query <db> "select * from <virtual://rest_demo> where { ?s ?p ?o }" - If you cannot connect, review any errors in the driver log and the server log, and change your properties file as needed.
If you can successfully run an SPO query, you can move on to fine tuning your data mapping.
Subsequent Connections
Once you have created your initial .rsd mapping files, you can remove some of the options from your property file. You can remove the log file or turn the Verbosity down if you don’t require detailed logging once your connection is working. You can always turn it back on when debugging an issue.
The GenerateSchema option can be removed. If you choose to leave it, it will not overwrite any .rsd files during the generation process if one with the same name already exists.
The Format, DataModel, and URI options can be removed from the property file since they are included in the generated .rsd files. Note that while it can be convenient to store options in the .rsd file instead of the property file, not all options work that way, and you’ll want to test it first.
jdbc.driver=cdata.jdbc.rest.RESTDriver
jdbc.url=jdbc:rest:
ext.Location=<RSD file path>
If you remove any options or make any changes in your properties file, you will need to remove and re-add the Virtual Graph to pick up the changes.
Mapping
Once you connect to a REST data source, Stardog will attempt to map the XML or JSON to RDF that you can query. There are two separate steps involved in this process, both of which involve mappings that you can configure.
SQL Mapping
The first data mapping occurs in the CData driver, where an XML or JSON document is mapped into a table and row format. CData offers three different ways to model the document data, but Stardog works best with the Relational model, and therefore it will be the model used in the examples.
If you do not have organized collections of objects and arrays in your documents, you may want to switch your data model to the default Document model, which returns all data in a single table. In JSON these will be object and array literals. In XML an object is considered any parent element that does not repeat at the same level, and an array is any element that does repeat at the same level.
CData will read a number of rows from the documents to determine its structure and how to best present it as a collection of tables and rows. If your data contains large objects with many elements, you may need to increase the RowScanDepth beyond the default value of 100 rows.
By default, CData will return nested arrays as a column of JSON strings. You can adjust these columns by flattening the data into separate columns with the FlattenArrays and FlattenObjects options.
As CData reads through your XML or JSON document, it uses internal logic to determine what constitutes a table, rows, and columns. If you need to adjust this process, you can add the XPath option with an XPath or JSONPath that defines the objects to expose for a schema file (.rsd file) at both the row and column level.
We will cover the use of .rsd files and API Script options in more detail in the examples below.
API Script is a feature-rich programming language, and XPath has many options for mapping data. Therefore, the examples below do not cover all the mapping possibilities for the REST driver. See the CData documentation for data modeling for additional details.
RDF Mapping
We have been letting Stardog automatically generate the object mappings for the RDF model. Since the RDF mapping is a standard Stardog feature, we will not go into detail here, except where needed in the examples. It is the same mapping process using R2RML or SMS2 for the CData REST driver as it is for any other JDBC driver.
Advanced Settings
Cache Options
In situations where you do not save an .rsd file for mapping XML or JSON to tables, rows, and columns, the driver will download the URL resource on every call to determine the structure. CData provides caching options CacheDriver and CacheConnection for both caching of the generated schema and of the data itself. These caching options require an external database configuration, or you can use the embedded Derby database.
Examples
Unless the example states otherwise, you will need a file path containing an XML or JSON document or an HTTP REST endpoint that returns an XML or JSON resource.
Although you can reference these examples individually, they do expand on each other, as new CData parameters and API script features are introduced. If you jump to one of the later examples, you may find it useful to review one or more of the examples before it to clarify a parameter or find the steps on how to setup some part of the example.
Example 1: Autogenerated Mappings
Description
This example demonstrates:
- Configuring a Virtual Graph with the REST connector by letting CData generate a mapping
- Querying a Virtual Graph and displaying data from an auto-mapped REST connector
Steps
-
Copy the following into a file called
vehicles.json:{ "vehicles": [ { "id": "1001", "type": "car", "model": "Honda Civic", "insurance": { "company": "ABC Insurance", "policy_num": "12345" }, "features": [ "sunroof", "rims" ], "maintenance": [ { "date": "07-17-2017", "desc": "oil change" }, { "date": "01-03-2018", "desc": "new tires" } ] }, { "id": "1002", "type": "truck", "model": "Dodge Ram", "insurance": { "company": "DEF Insurance", "policy_num": "987654" }, "features": [ "lift kit", "tow package" ], "maintenance": [ { "date": "08-27-2017", "desc": "new tires" }, { "date": "01-08-2018", "desc": "oil change" } ] } ] } -
Copy the following into a file called
vehicles.propertiesand adjust the file path forvehicles.jsonas necessary:jdbc.driver=cdata.jdbc.rest.RESTDriver jdbc.url=jdbc:rest: ext.URI=/change/this/path/vehicles.json ext.DataModel=Relational ext.Format=JSON -
Run the following command to create a Virtual Graph for the JSON document:
stardog-admin virtual add vehicles.properties -
Run the following command to query the Virtual Graph:
stardog query <db> "select * from <virtual://vehicles> where { ?vehicle a <http://api.stardog.com/vehicles> . ?vehicle <http://api.stardog.com/vehicles#features> ?features . }" -
You should have gotten the following results:
+---------------------------------------+----------------------------------+
|                vehicle                |             features             |
+---------------------------------------+----------------------------------+
| http://api.stardog.com/vehicles/_id=1 | "[\"sunroof\",\"rims\"]"         |
| http://api.stardog.com/vehicles/_id=2 | "[\"lift kit\",\"tow package\"]" |
+---------------------------------------+----------------------------------+
Notice how the features column data was returned as a single value containing JSON array literals.
In the next example, we’ll modify some of the options to flatten the features data into separate columns.
Example 2: Customized JSON Mappings
Description
This example uses the data file introduced in example 1. If you haven’t already done so, you’ll need to complete exercise 1 before running this example.
This example demonstrates:
- Customizing a CData mapping
- Customizing the Virtual Graph mapping
Steps
Notice that in the query result for the first example, the features column contains a JSON string representation of the array of vehicle features. This is a default behavior of CData - any nested arrays (arrays within the array that was used to identify a row) are presented as JSON array literals. We’ll use the FlattenArray option to flatten those values into separate columns.
-
Open the
vehicles.propertiesfile, copy the following contents into it, and save:jdbc.driver=cdata.jdbc.rest.RESTDriver jdbc.url=jdbc:rest: ext.URI=vehicles.json ext.DataModel=Relational ext.Format=JSON ext.FlattenArrays=-1 -
Reload the Virtual Graph:
stardog-admin virtual add --overwrite vehicles.properties -
Run the following query:
select * from <virtual://vehicles> where { ?vehicle a <http://api.stardog.com/vehicles> . ?vehicle <http://api.stardog.com/vehicles#features.0> ?features . } -
You should get the following results. Notice that the features array has been flattened and each value has a column appended with its ordinal (highlighted above):
+---------------------------------------+------------+
|                vehicle                |  features  |
+---------------------------------------+------------+
| http://api.stardog.com/vehicles/_id=1 | "sunroof"  |
| http://api.stardog.com/vehicles/_id=2 | "lift kit" |
+---------------------------------------+------------+
Now let us move on to querying REST data over an HTTP connection.
Example 3: REST APIs
Description
This example demonstrates:
- Configuring a Virtual Graph with the REST connector
- Querying a Virtual Graph and displaying data from an auto-mapped REST connector
- Modify the CData schema file to customize the data
Steps
-
Create a new Virtual Graph properties files called
spacex.propertiesand copy the following contents into it:jdbc.driver=cdata.jdbc.rest.RESTDriver jdbc.url=jdbc:rest: ext.URI=https://api.spacexdata.com/v3/launches ext.DataModel=Relational ext.Format=JSON -
Run the following command to create a Virtual Graph for the HTTP URL:
stardog-admin virtual add spacex.properties -
Run the following command to query the Virtual Graph:
stardog query <db> "select * from <virtual://rest_demo> where { ?id <http://api.stardog.com/json#mission_name> ?mission ; <http://api.stardog.com/json#_id> 88 . }" -
You should have gotten the following results:
+------------------------------------+------------------------------------+
|                 id                 |              mission               |
+------------------------------------+------------------------------------+
| http://api.stardog.com/json/_id=88 | "Crew Dragon In Flight Abort Test" |
+------------------------------------+------------------------------------+
In the next example, we’ll modify the schema generated by CData that maps the JSON data into a table and rows.
Example 4: Customizing REST Schemas
Description
This example demonstrates:
- Modifying CData schema files to customize the data mapping from a URL.
Steps
-
Open the
spacex.propertiesfile, copy the following contents into it, and save. Change<rsd file path>to a valid directory where you have permissions to save files:jdbc.driver=cdata.jdbc.rest.RESTDriver jdbc.url=jdbc:rest: ext.URI=https://api.spacexdata.com/v3/launches ext.DataModel=Relational ext.Format=JSON ext.GenerateSchemaFiles=OnStart ext.Location=<rsd file path> -
Run the following commands to create a Virtual Graph for the HTTP URL:
stardog-admin virtual remove spacex stardog-admin virtual add spacex.properties -
Run the following command to query the Virtual Graph:
stardog query <db> "select * from <virtual://spacex> where { ?s <http://api.stardog.com/payloads#_id> ?o ; <http://api.stardog.com/payloads#JSONData_id> 88 . }" -
You should have gotten the following results:
+-----------------------------------------+-------+ | s | o | +-----------------------------------------+-------+ | http://api.stardog.com/payloads/_id=112 | "112" | +-----------------------------------------+-------+ -
Stardog will connect to the URL during the process of adding the Virtual Graph in order to download metadata. During this process, CData will generate schemas. Since we are using
GenerateSchemaFilesto save those schema to disk on start, you should now see the following files in the directory you specified forLocation.
- If you look at the generated
.rsdfiles, you will see one forjson. Because the SpaceX data comes back with an unnamed top-level JSON object, it is given a default name. -
Let’s modify some of the schema by altering the way CData is parsing our JSON data. Open the
spacex.propertiesfile and add the following property:ext.XPath=$.;$.rocket;$.rocket.first_stage.cores;$.rocket.second_stage.payloads -
Now when you add the Virtual Graph, you should see the following files in the
Locationdirectory:
- You can now query the payloads directly.
Example 5: REST with Parameters
Description
For this example, we will be using the https://api.spacexdata.com/v3/launches REST api from SpaceX to demonstrate how to set up a REST Virtual Graph that maps the query clause to the URL of the endpoint.
Steps
-
Start by creating a properties file called
spacex.propertieswith the following properties:jdbc.driver=cdata.jdbc.rest.RESTDriver jdbc.url=jdbc:rest: ext.URI=https://api.spacexdata.com/v3/launches ext.DataModel=Relational ext.Format=JSON ext.Location=<rsd file path> -
Then create a file called
Launches.rsdin the<rsd file path>location you specified in the properties file with the following content:<api:script xmlns:xs="http://www.w3.org/2001/XMLSchema" xmlns:api="http://apiscript.com/ns?v1" > <api:info title="Launches" desc="List all Launches." > <attr name="FlightNumber" xs:type="integer" key="true" other:xPath="flight_number" desc="" /> <attr name="MissionName" xs:type="string" other:xPath="mission_name" desc="" /> <attr name="LaunchYear" xs:type="integer" other:xPath="launch_year" other:filter="launch_year" desc="" /> <attr name="LaunchDate" xs:type="datetime" other:xPath="launch_date_utc" other:filter="launch_date_utc" desc="" /> <attr name="RocketName" xs:type="string" other:xPath="rocket/rocket_name" other:filter="rocket_name" desc="" /> </api:info> <api:set attr="ContentType" value="application/json" /> <api:set attr="RepeatElement" value="/" /> <api:script method="GET" > <api:set attr="method" value="GET" /> <api:check attr="_input.FlightNumber" > <api:set attr="uri" value="https://api.spacexdata.com/v3/launches/[_input.FlightNumber]" /> <api:set attr="SuppressFilter" value="true" /> <api:else > <api:set attr="uri" value="https://api.spacexdata.com/v3/launches" /> </api:else> </api:check> <api:call op="jsonproviderGet"> <api:push/> </api:call> </api:script> </api:script> - Notice that the
FlightNumberis mapped to the SpaceX URL as a part of the path. The_input.FlightNumberis any value in the WHERE clause of a query for that column. -
And then issue the following comand:
stardog-admin virtual add ../vgprops/spacex.properties -
You will now have a Virtual Graph called
spacexthat you can query for a specific FlightNumber and have that query pass the value into the mapped URL.stardog query testdb "select * from <virtual://example5> where { ?s <http://api.stardog.com/Launches#FlightNumber> 110 }"+--------------------------------------------------+ | s | +--------------------------------------------------+ | http://api.stardog.com/Launches/FlightNumber=110 | +--------------------------------------------------+2021-03-01T13:34:04.956-0500 3 [7|Q-Id] [EXEC|Normlz] Executing query: [SELECT [json].[flight_number] FROM [REST].[json] AS [json] WHERE [flight_number] = 110] 2021-03-01T13:34:04.966-0500 2 [JSON] Reading JSON file at https://api.spacexdata.com/v3/launches 2021-03-01T13:34:05.038-0500 2 [7|Q-Id] [HTTP|Req: 17] GET https://api.spacexdata.com/v3/launches 2021-03-01T13:34:05.038-0500 5 [7|Q-Id] [HTTP|Req: 17\] [New]
Example 6: REST with POST
Description
Some REST APIs require HTTP POST requests. This example demonstrates how to set up a Virtual Graph to use a POST.
This example uses a test website that returns fake weather data. When called using GET, it will return five cities, and when called with POST, it expects a city in the body and returns a fake forecast for that city. Since the GET and POST return the same data structure, you can still use CData to generate the mapping file.
Steps
The first thing to do is to generate the default .rsd files. By adding the GenerateSchemaFiles=OnUse, the driver will download the XML or JSON and try to model the data as tables and columns when a query is made. You can set the value to OnStart to generate the files when the connection is first made. In these examples, either mode will be fine.
The target URL must provide a GET interface for map generation, or you will get an HTTP error, and CData will not be able to generate any .rsd files. In such a case, your only alternative will be to create them manually.
jdbc.driver=cdata.jdbc.rest.RESTDriver
jdbc.url=jdbc:rest:

ext.URI=https://localhost:8081/WeatherForecast
ext.DataModel=Relational
ext.Location=/Users/someuser/stardog/rsd/weather
ext.GenerateSchemaFiles=OnUse
ext.SSLServerCert=71 2C D1 9F 30 AF 7F BB 7D 2B 95 B9 2E 71 BB 7B 64 3A 23 7E

ext.Logfile=/Users/someuser/stardog/log.txt
ext.Verbosity=5
After creating the virtual graph, we can query it, which forces the driver to download the resource and create a default .rsd file.

When we look in the folder we specified for Location, we will now see a file named json.rsd with the following contents (comments and unneeded HTTP method handlers were removed for compactness):
<api:script xmlns:api="http://apiscript.com/ns?v1" xmlns:xs="http://www.w3.org/2001/XMLSchema">
  <api:info title="weather" desc="Fake Weather Service" xmlns:other="http://apiscript.com/ns?v1">
    <attr name="_id"          xs:type="string"   readonly="false"  key="true"  other:xPath="/json/_id"          />
    <attr name="city"         xs:type="string"   readonly="false"              other:xPath="/json/city"         />
    <attr name="date"         xs:type="datetime" readonly="false"              other:xPath="/json/date"         />
    <attr name="summary"      xs:type="string"   readonly="false"              other:xPath="/json/summary"      />
    <attr name="temperatureC" xs:type="integer"  readonly="false"              other:xPath="/json/temperatureC" />
    <attr name="temperatureF" xs:type="integer"  readonly="false"              other:xPath="/json/temperatureF" />
  </api:info>

  <api:set attr="DataModel" value="RELATIONAL" />
  <api:set attr="URI" value="https://localhost:8081/WeatherForecast" />
  <api:set attr="JSONPath" value="$." />

  <api:script method="GET">
    <api:call op="jsonproviderGet">
      <api:push/>
    </api:call>
  </api:script>
</api:script>
Note that the DataModel, URI, and JSONPath options are included in the file. You can now remove them from the properties file, and they will be read from the .rsd file instead. Also note that the file is named json.rsd, and the value for the title in the api:info element is json. The reason for that is the JSON object that was returned was an unnamed top level object. Since there isn’t a name for CData to use, it defaults it to json.
If you look at the log, you will see that the URL was sent a GET request.
2021-03-16T10:59:38.860-0400 ... [HTTP|Req: 8] GET https://localhost:8081/WeatherForecast
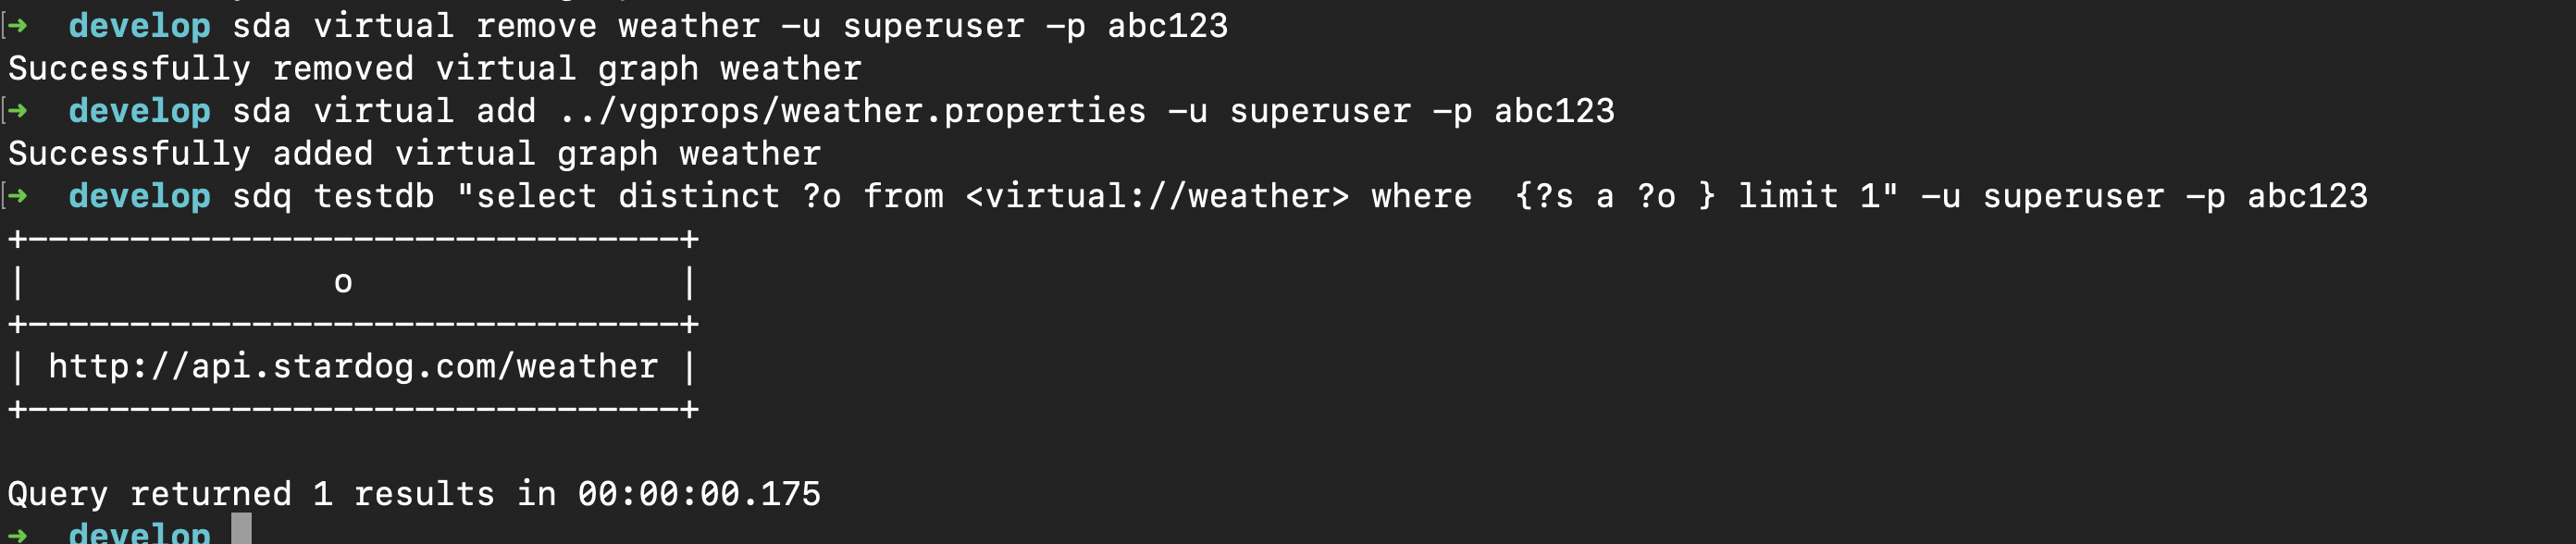
Since the .rsd file name becomes the table name, let’s rename json.rsd and change the title to weather.rsd. Now after we re-add the Virtual Graph and query it, we can see we have a weather type, which makes more sense.
Now let’s switch the HTTP action to a POST by adding the following line to the .rsd file:
<api:script xmlns:api="http://apiscript.com/ns?v1" xmlns:xs="http://www.w3.org/2001/XMLSchema">
  <api:info title="weather" desc="Fake Weather Service" xmlns:other="http://apiscript.com/ns?v1">
    <attr name="_id"          xs:type="string"   readonly="false"  key="true"  other:xPath="/json/_id"          />
    <attr name="city"         xs:type="string"   readonly="false"              other:xPath="/json/city"         />
    <attr name="date"         xs:type="datetime" readonly="false"              other:xPath="/json/date"         />
    <attr name="summary"      xs:type="string"   readonly="false"              other:xPath="/json/summary"      />
    <attr name="temperatureC" xs:type="integer"  readonly="false"              other:xPath="/json/temperatureC" />
    <attr name="temperatureF" xs:type="integer"  readonly="false"              other:xPath="/json/temperatureF" />
  </api:info>

  <api:set attr="DataModel" value="RELATIONAL" />
  <api:set attr="URI" value="https://localhost:8081/WeatherForecast" />
  <api:set attr="JSONPath" value="$." />

  <api:script method="GET">
    <api:set attr="method" value="POST"/>
    <api:call op="jsonproviderGet">
      <api:push/>
    </api:call>
  </api:script>
</api:script>
By default, the GET method handler will issue a GET command, so we force it to issue a POST by explicitly setting the method value. Now when we query the Virtual Graph, we’ll see in the log that we are sending a POST request to the server.
2021-03-16T11:04:24.929-0400 ... [HTTP|Req: 9] POST https://localhost:8081/WeatherForecast
Most POST requests require some parameters or a data structure as a payload to be POSTed. In our test website, we need to pass a city name as a JSON string in the request body. To pass the city data along with the POST, we add the following lines to the .rsd file:
<api:script method="GET">
  <api:set attr="method" value="POST"/>
  <api:set attr="contenttype" value="application/json"/>
  <api:validate attr="_input.city" desc="City is required." />
  <api:set attr="data">"[_input.city]"</api:set>
  <api:call op="jsonproviderGet">
    <api:push/>
  </api:call>
</api:script>
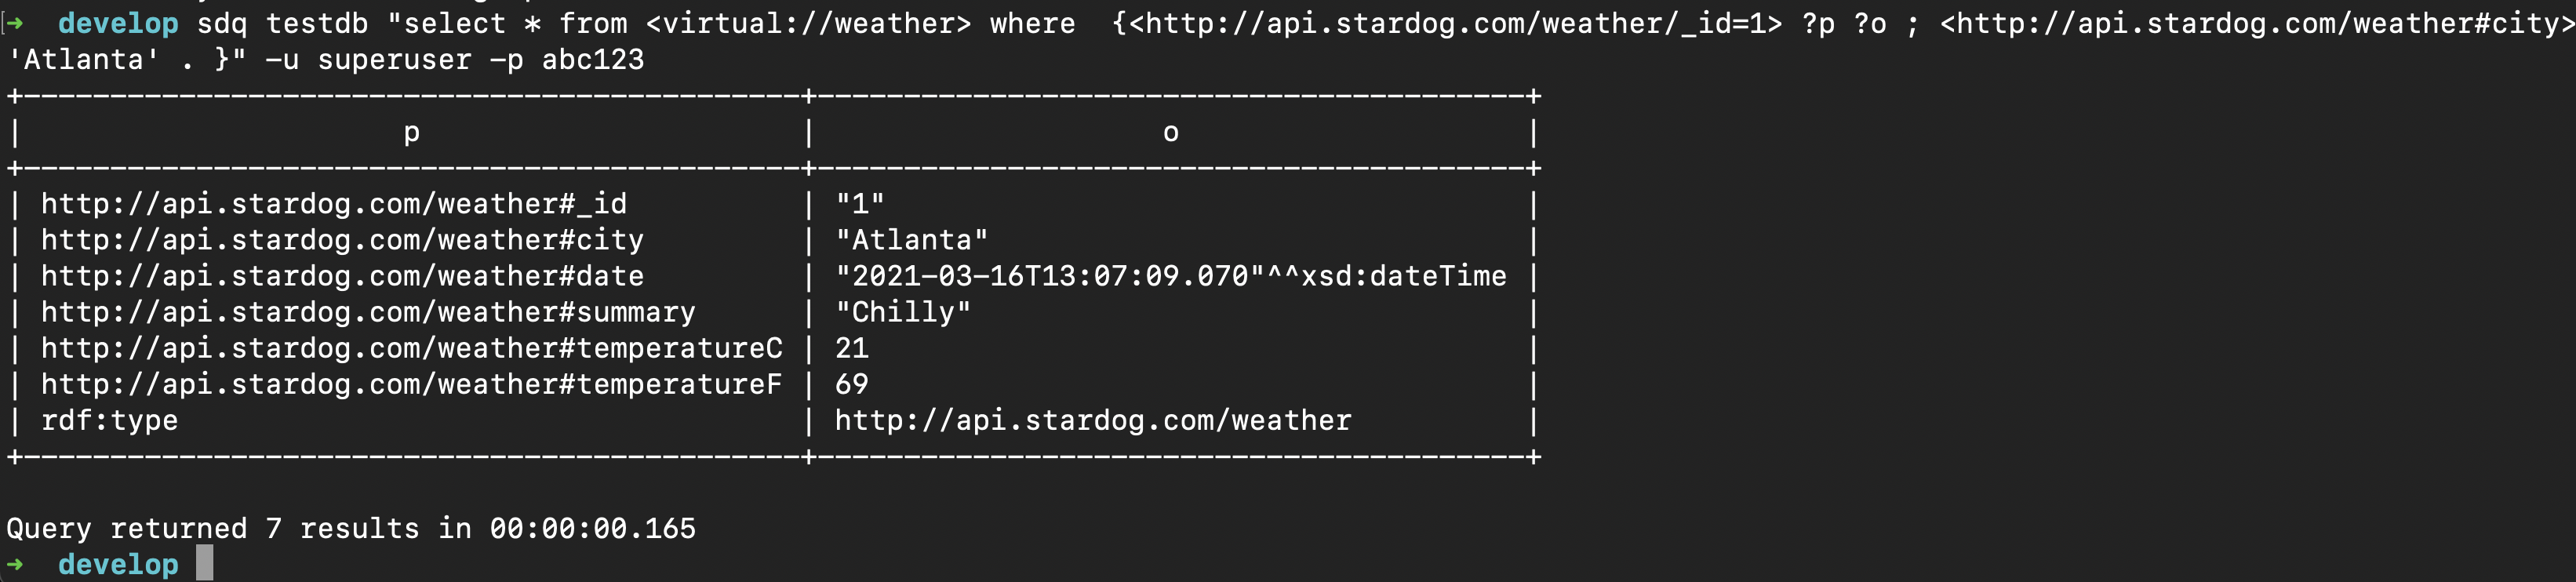
The city value is parsed from the WHERE clause of the query. Notice the api:validate added to make the city required. Now when we submit a SPARQL query for the weather Virtual Graph, we get the following result:
We can confirm that everything worked the way we wanted by checking the log. Here we can see the HTTP request was a POST and the request body contained our city name.
2021-03-16T13:07:09.007-0400  ... [HTTP|Req: 36] POST https://localhost:8081/WeatherForecast
...
[HTTP Headers]
...
POST /WeatherForecast HTTP/1.1
...
Content-Type: application/json
Content-Length: 9
2021-03-16T13:07:09.007-0400    ...      [HTTP|Req: 36] "Atlanta"
Example 7: Multiple REST Calls
Description
Sometimes a REST API may require you to make multiple REST calls to access the data you need to satisfy a query. One example is a REST API that needs an API key from an authentication server or separate URL.
Another case is when the REST data is nested and there is no aggregated method to access it. For example, a situation where you want to access all the records for staff and the URL API looks like /staff/<staffid>/record. In this case, you would need to GET /staff/ to access the staff IDs and then iterate the IDs to access each record.
This example will demonstrate how to configure a REST connector to make multiple calls for such scenarios.
This example uses a test website that is not publicly available.
Steps
To make multiple HTTP calls, you must first turn on the Paging feature by adding EnablePaging to the options. This feature is a bit of a misnomer, as what it really does is tell the query engine to repeatedly make requests, not just for paging, which we’ll cover later, but also for iteration and multiple api:call statements.
Next, edit the .rsd file that was generated for the test weather site and add an api:set to set EnablePaging to true. The EnablePaging option only needs to be specified once in a script and can be added to either the default item or any other named item in the script.
In API Script an item is an object that you create for attaching one or more attributes. Attributes are analogous to name/value pairs. Items are created automatically when you assign an attribute to one. The API Script maintains default items on the stack for input and output and uses them anytime an attribute assignment does not use an item name.
Create two new items in the script, each with a set of attributes for one of the two URLs to be called. The first item is called login and contains attributes for the first URL, which will return a logon token; the second item is called weather and contains attributes for the weather URL.
<api:script xmlns:api="http://apiscript.com/ns?v1" xmlns:xs="http://www.w3.org/2001/XMLSchema">

  <api:info title="weather" desc="Fake Weather Service" xmlns:other="http://apiscript.com/ns?v1">
    <attr name="_id"          xs:type="string"   readonly="false"  key="true"  other:xPath="/json/_id"          />
    <attr name="city"         xs:type="string"   readonly="false"              other:xPath="/json/city"         />
    <attr name="date"         xs:type="datetime" readonly="false"              other:xPath="/json/date"         />
    <attr name="summary"      xs:type="string"   readonly="false"              other:xPath="/json/summary"      />
    <attr name="temperatureC" xs:type="integer"  readonly="false"              other:xPath="/json/temperatureC" />
    <attr name="temperatureF" xs:type="integer"  readonly="false"              other:xPath="/json/temperatureF" />
  </api:info>

  <api:set attr="login.DataModel" value="RELATIONAL" />
  <api:set attr="login.URI" value="https://localhost:8081/WeatherForecast/token" />
  <api:set attr="login.JSONPath" value="$." />
  <api:set attr="login.ElementMapPath#" value="/json/value"/>
  <api:set attr="login.ElementMapName#" value="token"/>
  <api:set attr="login.EnablePaging" value="true" />

  <api:set attr="weather.DataModel" value="RELATIONAL" />
  <api:set attr="weather.URI" value="https://localhost:8081/WeatherForecast/ByCity" />
  <api:set attr="weather.JSONPath" value="$." />
  <api:set attr="weather.method" value="POST"/>
  <api:set attr="weather.contenttype" value="application/json"/>
  <api:set attr="weather.data" value="[_input.city | jsonescape()]"/>

  <api:validate attr="_input.city" desc="City is required." />

  <api:script method="GET">

    <api:call op="jsonproviderGet" in="login">
      <api:set attr="weather.Header:Name#"  value="AuthKey" />
      <api:set attr="weather.Header:Value#" value="[_out1.token]" />
    </api:call>

    <api:call op="jsonproviderGet" in="weather">
      <api:push />
    </api:call>

  </api:script>
</api:script>
This example uses some other API Script features worth pointing out. Along with the default item, there are other items that are placed on the script stack during execution. There are two such items below.
One is the input item, _input, that contains each column from the input query along with its value. We’re using it to get the city specified in the WHERE clause of the query. The other is the output items that each api:call adds to the stack. We are also using the output item, _out1, to get the authentication token back from the first call.
Two other features worth pointing out are the use of named attributes and the overriding of the default item for api:call input.
You can see named attributes being used here:
<api:set attr="weather.Header:Name#"  value="AuthKey" />
<api:set attr="weather.Header:Value#" value="[_out1.token]" />
The attributes Header:Name# and Header:Value# are named attributes known to the CData driver engine. When it finds these attached to the item passed to a api:call, it uses them to populate the HTTP headers used to call the URL. In this case, we are adding a header with the name AuthKey and the value set to the attribute token from the output item _out1. Notice that these named attributes are attached to a custom item named weather.
The named item weather is a custom item that we use to set attributes to control how the second api:call executes. Each api:call gets its input from an item. By default, it uses the default item. Here we tell the second call to use our custom weather item:
<api:call op="jsonproviderGet" in="weather">
With the custom URL and now the headers added with the authentication key, the second URL is ready to be called.
Once the .rsd file is set up, add a new Virtual Graph with a Location option pointing to the folder containing the .rsd file. Now if you query the Virtual Graph, you can see in the CData log that both URLs were called, the authentication token was received and stored in the weather item, the weather URL called with the authentication token, and the weather data returned successfully.
Example 8: Paging
Description
Some REST API collections are iterated using a paged approach. Some of the common examples would be APIs that have:
- Next Page URL
- Paging Token
- Page Number/Record Offset
- Custom Paging API
In this example, we’ll look at interfacing with a REST API that uses a page number URL parameter. Read the CData paging documentation to find the appropriate paging attributes you will need to set for your URLs paging mechanism.
This example uses a test website that is not publicly available.
Steps
- Setup a Virtual Graph to generate default
.rsdfiles. See example 4 for the steps describing how to do that. - Edit the
.rsdfile by adding the input elementrows@next. -
Depending on the paging mechanism, add the appropriate paging attributes. In this example, we set the page number attributes.
<api:script xmlns:api="http://apiscript.com/ns?v1" xmlns:xs="http://www.w3.org/2001/XMLSchema"> <api:info title="paging" desc="Paging" xmlns:other="http://apiscript.com/ns?v1"> <attr name="letter" xs:type="string" readonly="false" other:xPath="/json" /> </api:info> <input name="rows@next" desc="Identifier for the next page of results. Do not set this value manually." /> <api:set attr="DataModel" value="RELATIONAL" /> <api:set attr="URI" value="https://localhost:8081/WeatherForecast/Pages" /> <api:set attr="JSONPath" value="$." /> <api:set attr="EnablePaging" value="true" /> <api:set attr="pagenumberparam" value="page" /> <api:set attr="pagesize" value="1" /> <api:script method="GET"> <api:call op="jsonproviderGet"> <api:push /> </api:call> </api:script> </api:script> - Create a Virtual Graph.
-
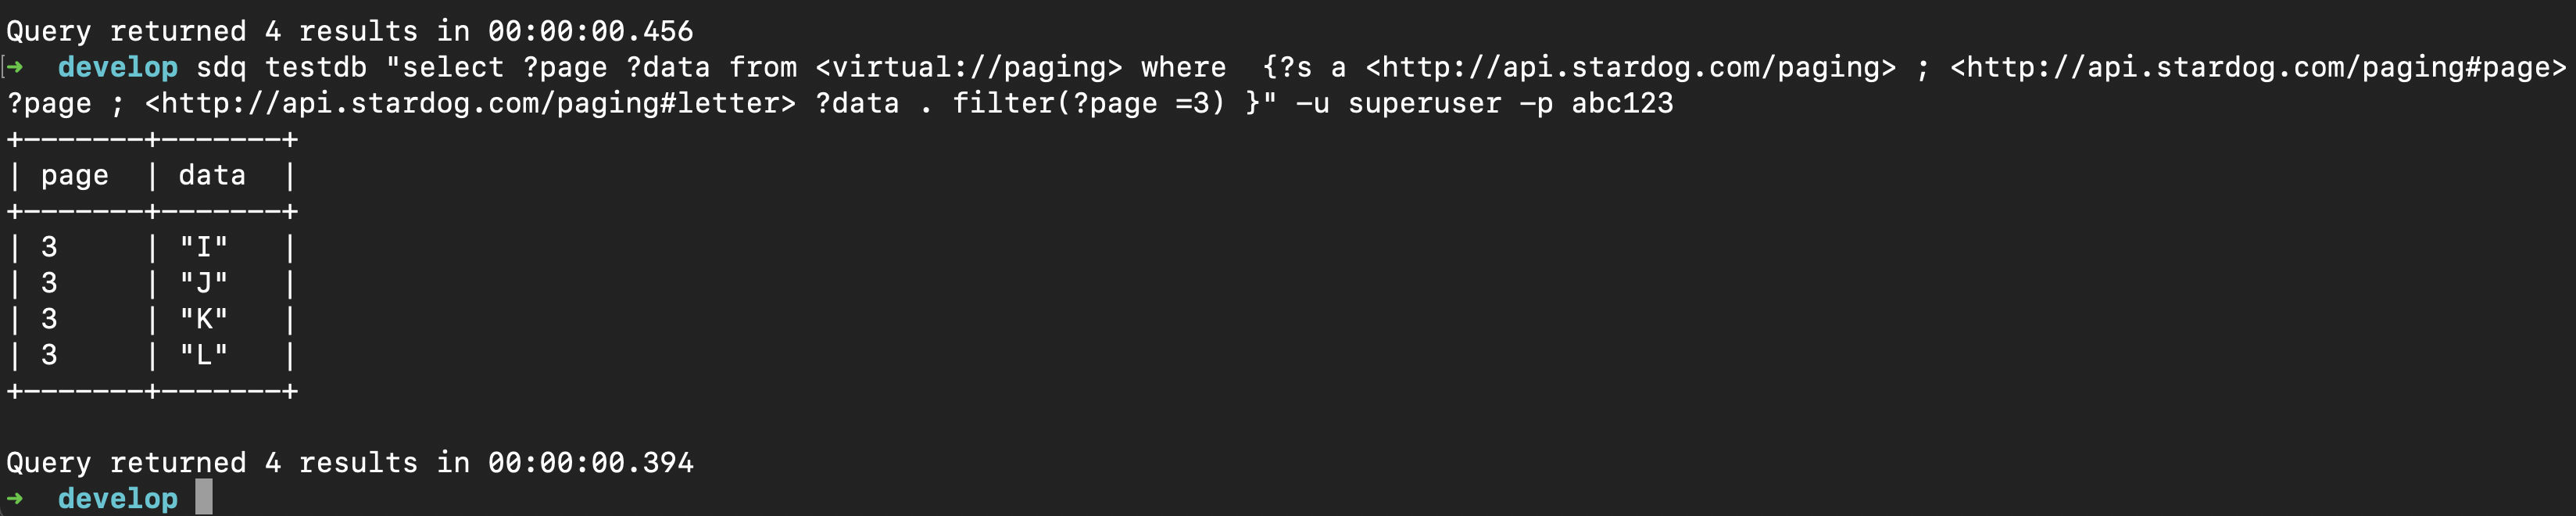
Query the graph and confirm that you can access multiple pages of output. Here we query for data from page 3.
Example 9: Passing Credentials with Pseudo Columns
Description
The columns you define in an API Script using attr elements in the api:info element are a mapping used by the CData driver to associate a virtual table column with an element of the XML or JSON data. Here we see an Id column being mapped to an XPath:
<attr name="_id" xs:type="string" readonly="false" key="true" other:xPath="/json/virtual_graphs/_id" />
These column names can then be parsed out of SQL statements and their values used to define a URL or dynamically set another parameter.
But what happens when you need a column value only for filtering or passing to another part of the script? In these cases, you can define a pseudo column that can be used in a SQL query but does not map back to any field in the original data or a column in the virtual table.
Pseudo columns can only be used in predicates. They are not returned by the column metadata, and therefore SPARQL queries cannot see them.
Using the CData option PseudoColumns allows you to map all pseudo columns or choose which ones to map. If you set it to PseudoColumns=*=*, then all the pseudo columns will be mapped to the column names in a WHERE clause, which will allow you to access the values in the script.
In this example, we tackle the case where we need to pass in a username and password to the underlying HTTP server hosting a REST API. The username and password are passed to the server using HTTP Basic Authentication.
This example uses the Stardog server API to query Virtual Graphs.
Steps
- The first thing we should do is set up a Virtual Graph to generate default
.rsdfiles. See example 4 for the steps describing how to do that. - Add
PseudoColumns=*=*to the properties file. This option will be ignored if added in the.rsdfile. -
Next modify the
virtual_graphs.rsdfile that you should now have in yourLocationfolder by adding the following highlighted lines:<api:script xmlns:api="http://apiscript.com/ns?v1" xmlns:xs="http://www.w3.org/2001/XMLSchema"> <api:info title="virtual_graphs" desc="Generated schema file." xmlns:other="http://apiscript.com/ns?v1"> <attr name="_id" xs:type="string" readonly="false" key="true" other:xPath="/json/virtual_graphs/_id" /> <attr name="virtual_graphs" xs:type="string" readonly="false" other:xPath="/json/virtual_graphs" /> <input name="Logon" required="true" /> <input name="Password" required="true" /> </api:info> <api:set attr="DataModel" value="RELATIONAL" /> <api:set attr="URI" value="http://localhost:5820/admin/virtual_graphs" /> <api:set attr="JSONPath" value="$.virtual_graphs" /> <api:set attr="User" value="[_input.Logon]" /> <api:set attr="Password" value="[_input.Password]" /> <api:set attr="AuthScheme" value="Basic" /> <api:script method="GET"> <api:call op="jsonproviderGet"> <api:push/> </api:call> </api:script> </api:script>Since the credentials are required to access the API, we set the pseudo columns to be required as well. Now if they are missing we will get the following error:
Caused by: com.complexible.stardog.StardogException: Unable to execute virtual graph query. SQL string: SELECT * FROM [REST].[virtual_graphs] at com.complexible.stardog.virtual.vega.rdbms.RdbmsRelExecutor.lambda$execute$0(RdbmsRelExecutor.java:56) ~[stardog-virtual-core-7.6.1-SNAPSHOT-20210310.jar:?] at com.complexible.stardog.virtual.vega.rdbms.RdbmsRelExecutor$1.getResult(RdbmsRelExecutor.java:99) ~[stardog-virtual-core-7.6.1-SNAPSHOT-20210310.jar:?] at com.complexible.stardog.virtual.vega.VirtualServiceQuery.execute(VirtualServiceQuery.java:232) ~[stardog-virtual-core-7.6.1-SNAPSHOT-20210310.jar:?] at com.complexible.stardog.virtual.vega.VirtualServiceQuery.evaluate(VirtualServiceQuery.java:255) ~[stardog-virtual-core-7.6.1-SNAPSHOT-20210310.jar:?] at com.complexible.stardog.plan.eval.operator.impl.ServiceOperatorImpl.computeNext(ServiceOperatorImpl.java:96) ~[stardog-7.6.1-SNAPSHOT-20210310.jar:?] ... 46 more Caused by: java.sql.SQLException: The attribute Logon is required by virtual_graphs.rsd. -
Create a new Virtual Graph and query it:
select * from <virtual://stardog> where { ?s <http://api.stardog.com/virtual_graphs#Logon> 'superuser'; <http://api.stardog.com/virtual_graphs#Password> 'abc123' ; <http://api.stardog.com/virtual_graphs#virtual_graphs> ?g . } -
We are passing the credentials to the server, and the query is successful.

Example 10: Adding Computed Fields
Description
If you need to format a value before it is returned, you can use Value Formatters. These are functions that perform string, date, and math operations on values.
In this example, a column is processed by the md5hash() function to generate a hash of the MissionName column.
Steps
- In your
.rsdfile where you want to create a computed field, add a custom field that will return the value. In the example below, we added<attr name="hashed_code" xs:type="string" desc="" />to expose a queryable fieldhashed_code. -
Add the value formatter you want passing in an attribute as input. The attribute will then be available as a field that can be queried. In this example we added
<api:set attr="hashed_code" value="[MissionName | md5hash()]" /><api:script xmlns:xs="http://www.w3.org/2001/XMLSchema" xmlns:api="http://apiscript.com/ns?v1" > <api:info title="Launches" desc="List all Launches." > <attr name="FlightNumber" xs:type="integer" key="true" other:xPath="flight_number" desc="" /> <attr name="MissionName" xs:type="string" other:xPath="mission_name" desc="" /> <attr name="MissionId" xs:type="string" other:xPath="mission_id" other:valueFormat="aggregate" references="Missions.MissionId" desc="" /> ..... DATA REMOVED ..... <attr name="TimelineWebcastLiftoff" xs:type="integer" other:xPath="timeline/webcast_liftoff" desc="" /> <attr name="hashed_code" xs:type="string" desc="" /> </api:info> <!-- Setting global parameters --> <api:set attr="ContentType" value="application/json" /> <api:set attr="RepeatElement" value="/" /> <api:script method="GET" > <api:set attr="method" value="GET" /> <api:check attr="_input.FlightNumber" > <api:set attr="uri" value="https://api.spacexdata.com/v3/launches/[_input.FlightNumber]" /> <api:set attr="SuppressFilter" value="true" /> <api:else > <api:set attr="uri" value="https://api.spacexdata.com/v3/launches" /> <api:set attr="EnablePaging" value="true" /> <api:set attr="pageoffsetparam" value="offset" /> <api:set attr="pagesize" value="100" /> <api:set attr="pagesizeparam" value="limit" /> </api:else> </api:check> <api:call op="jsonproviderGet"> <api:set attr="hashed_code" value="[MissionName | md5hash()]" /> <api:push/> </api:call> </api:script> </api:script>
Example 11: URLs With Multiple Parameters
Description
If you have a URL that uses parameters, you want to expose them as pseudo columns, and you want to allow the user to use any number of them in any order, the solution is to assemble the URL based on the presence or absence of pseudo column values coming from the SPARQL query.
This example also handles outputting the proper URL parameter concatenation symbol.
Steps
- Add
PseudoColumns=*=*to the properties file. This option will be ignored if added in the.rsdfile. - Add pseudo columns for each URL parameter value that you want to expose to SPARQL.
- Add a check block that determines if the parameter value exists and set a variable with the formatted URL parameter.
-
Assemble the full URL with the values from each check block.
<api:script xmlns:api="http://apiscript.com/ns?v1" xmlns:xs="http://www.w3.org/2001/XMLSchema">
  <api:info title="fuel_stations" desc="Generated schema file." xmlns:other="http://apiscript.com/ns?v1">
    <attr name="_id"                        xs:type="string"   readonly="false"  key="true"  other:xPath="/json/fuel_stations/_id"                        />
    <attr name="access_code"                xs:type="string"   readonly="false"              other:xPath="/json/fuel_stations/access_code"                />
    <attr name="access_days_time"           xs:type="string"   readonly="false"              other:xPath="/json/fuel_stations/access_days_time"           />
  ...
  DATA REMOVED
  ...
    <attr name="updated_at"                 xs:type="datetime" readonly="false"              other:xPath="/json/fuel_stations/updated_at"                 />
    <attr name="zip"                        xs:type="string"   readonly="false"              other:xPath="/json/fuel_stations/zip"                        />

    <input name="limit" />
    <input name="key" />
  </api:info>

  <api:set attr="DataModel" value="RELATIONAL" />
  <api:set attr="JSONPath" value="$.fuel_stations" />

  <api:set attr="URI_PATH" value="https://developer.nrel.gov/api/alt-fuel-stations/v1.json" />
  <api:set attr="URL_PARM1" value="" />
  <api:set attr="URL_PARM2" value="" />
  <api:set attr="PARM_CNT" value="0" />

  <api:check attr="_input.limit" >
    <api:if exp="[PARM_CNT] > 0" >
      <api:set attr="URL_PARM1" value="&limit=[_input.limit]" />
      <api:else>
        <api:set attr="URL_PARM1" value="?limit=[_input.limit]" />
        <api:set attr="PARM_CNT" value="1" />
      </api:else>
    </api:if>
  </api:check>

  <api:check attr="_input.key" >
    <api:if exp="[PARM_CNT] > 0" >
      <api:set attr="URL_PARM2" value="&api_key=[_input.key]" />
      <api:else>
        <api:set attr="URL_PARM2" value="?api_key=[_input.key]" />
        <api:set attr="PARM_CNT" value="1" />
      </api:else>
    </api:if>
  </api:check>

  <api:set attr="URI" value="\[URI_PATH\][URL_PARM1][URL_PARM2]" />

  <api:script method="GET">
    <api:call op="jsonproviderGet">
      <api:push/>
    </api:call>
  </api:script>
</api:script>
-
Example of a query with both parameters:
 SELECT *
 FROM <virtual://rest7> {
   ?s <http://api.stardog.com/fuel_stations#_id> ?o ;
    <http://api.stardog.com/fuel_stations#limit> '5' ;
    <http://api.stardog.com/fuel_stations#key> 'PDhNBzW9jYhLyaxg9T4aHk5BHa9HTSklDjg14FDu' .
 }
Resulting HTTP request:
GET /api/alt-fuel-stations/v1.json?limit=5&api_key=PDhNBzW9jYhLyaxg9T4aHk5BHa9HTSklDjg14FDu HTTP/1.1 -
Example of a query with only one parameter:
 SELECT *
 FROM <virtual://rest7> {
   ?s <http://api.stardog.com/fuel_stations#_id> ?o ;
    <http://api.stardog.com/fuel_stations#key> 'PDhNBzW9jYhLyaxg9T4aHk5BHa9HTSklDjg14FDu' .
 }
Resulting HTTP request:
GET /api/alt-fuel-stations/v1.json?api_key=PDhNBzW9jYhLyaxg9T4aHk5BHa9HTSklDjg14FDu HTTP/1.1