Stardog Organizations
This page discusses Stardog Organizations which let teams manage endpoints, users, and Stardog Unit consumption from a single shared workspace.
Page Contents
Organization Overview
Currently, Organizations are initially provisioned by the Stardog team. To create an organization, reach out to support@stardog.com. Information such as org name, owner, domain, and relevant endpoints will be needed in order for the organization to be set up and transferred over to an organization owner of your choosing. The owner can then invite admins and members, manage endpoints, and configure SSO without further Stardog assistance.
You can access your organization from the user menu in the left navigation menu:
- Click your avatar in the bottom left corner to open the user menu.
- Select your organization from the list. Your “personal workspace” is where you can find your private endpoint along with those shared with you from others.
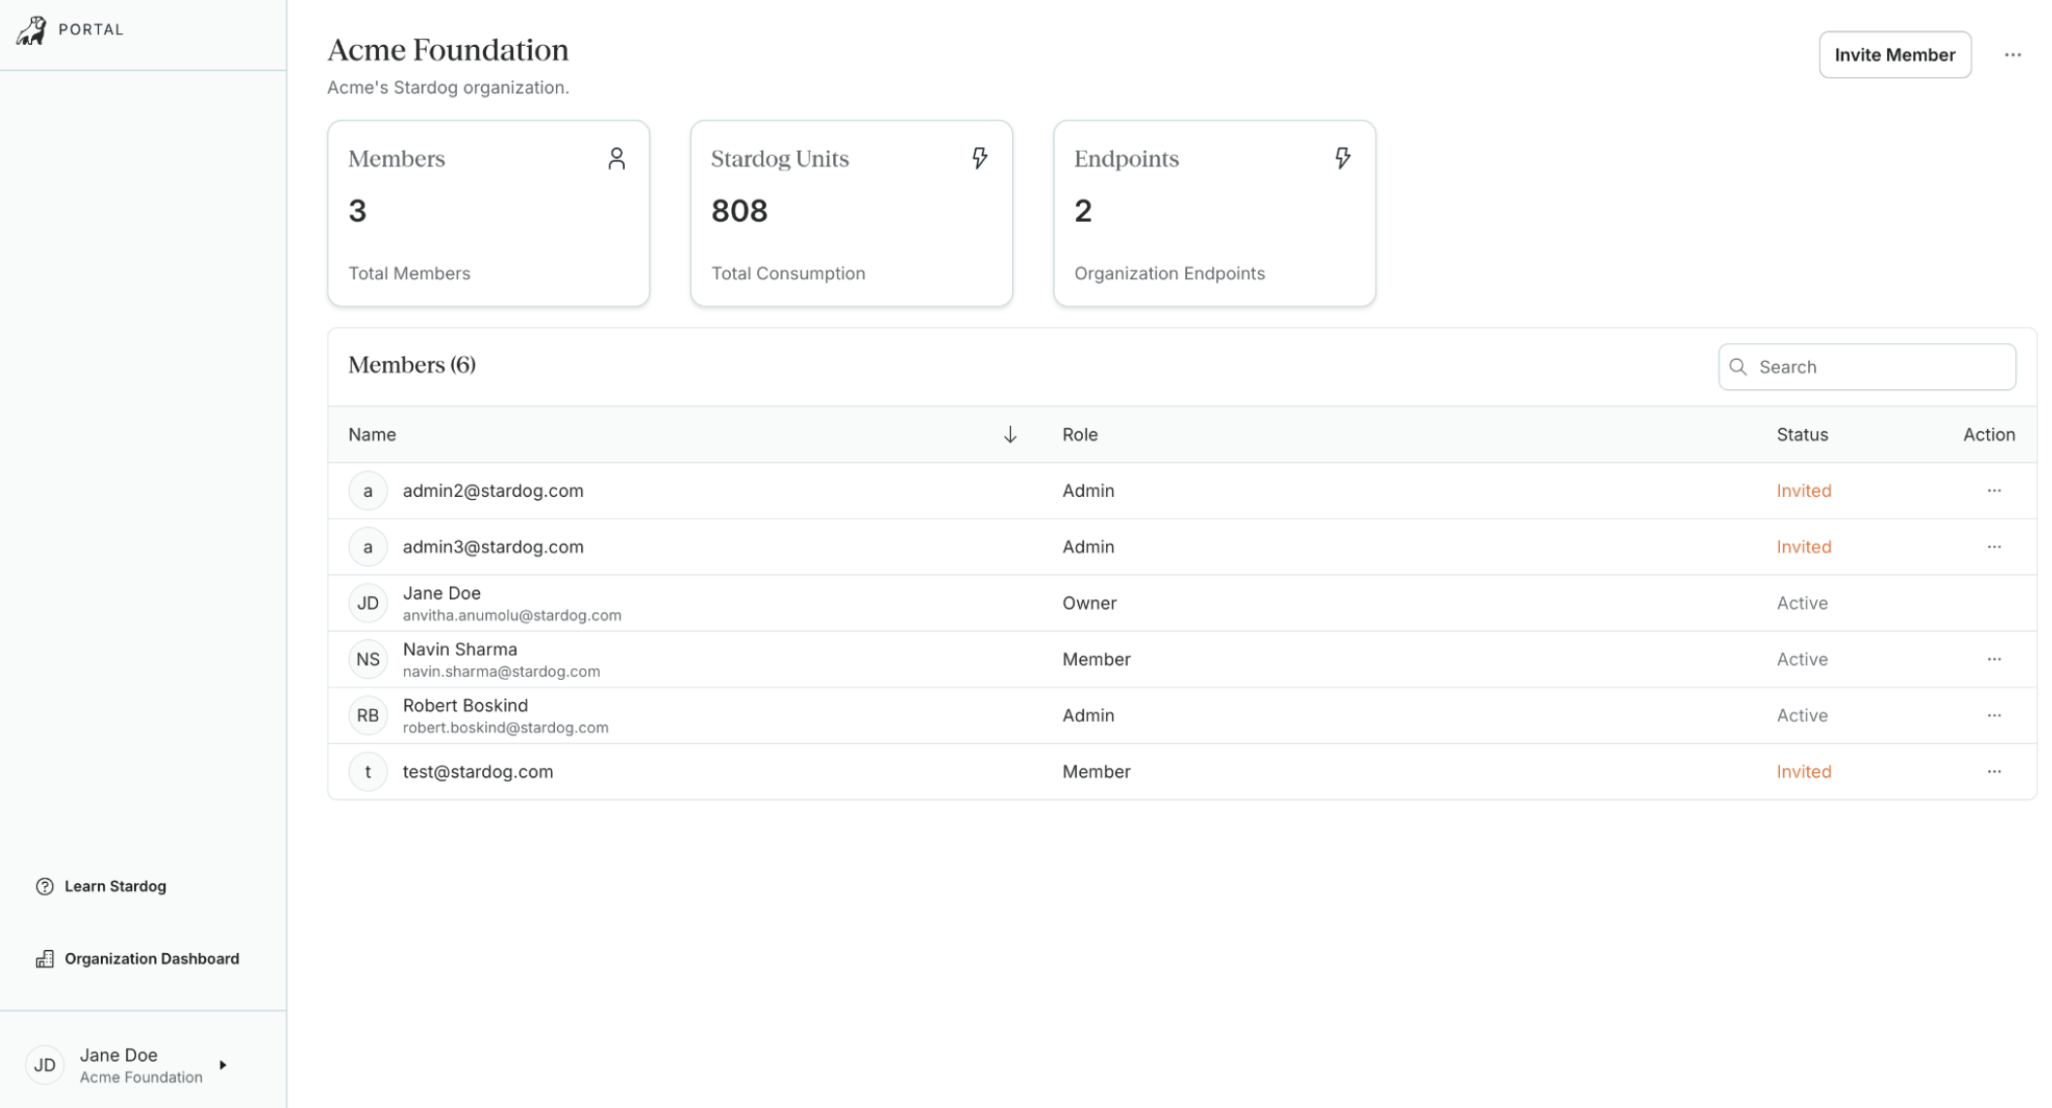
The organization home page displays three summary cards:
- Members: Total number of active members.
- Stardog Units: Total unit consumption across all connected endpoints. Once clicked, you can navigate to view your Stardog Unit dashboard.
- Endpoints: Number of endpoints owned by the organization.
Below the summary cards, the Members table lists all organization members with their name, role, status, and available actions which include resending or removing a user’s invitation.
Roles and Capabilities
Each member is assigned one of three roles. There is exactly one Owner per organization; all other roles may have multiple members.
Members can leave the organization and access org-level endpoints along with those configured for them by an admin.
Admins have all member capabilities, plus the ability to edit organization details, invite and remove members, manage endpoints, configure SSO, and add or remove other admins.
Owners have all admin capabilities, plus the ability to transfer ownership and delete the organization. Owners must transfer ownership to another member before they can leave the organization.
Managing Members
Inviting Members
Owners and admins can invite new members at any time.
- From the organization home page, click Invite Member.
- In the Emails field, enter one or more email addresses. Press Enter or the + icon after each address to add multiple.
- Under Access Level, select either Organization Admin or Organization Member. Click Next.
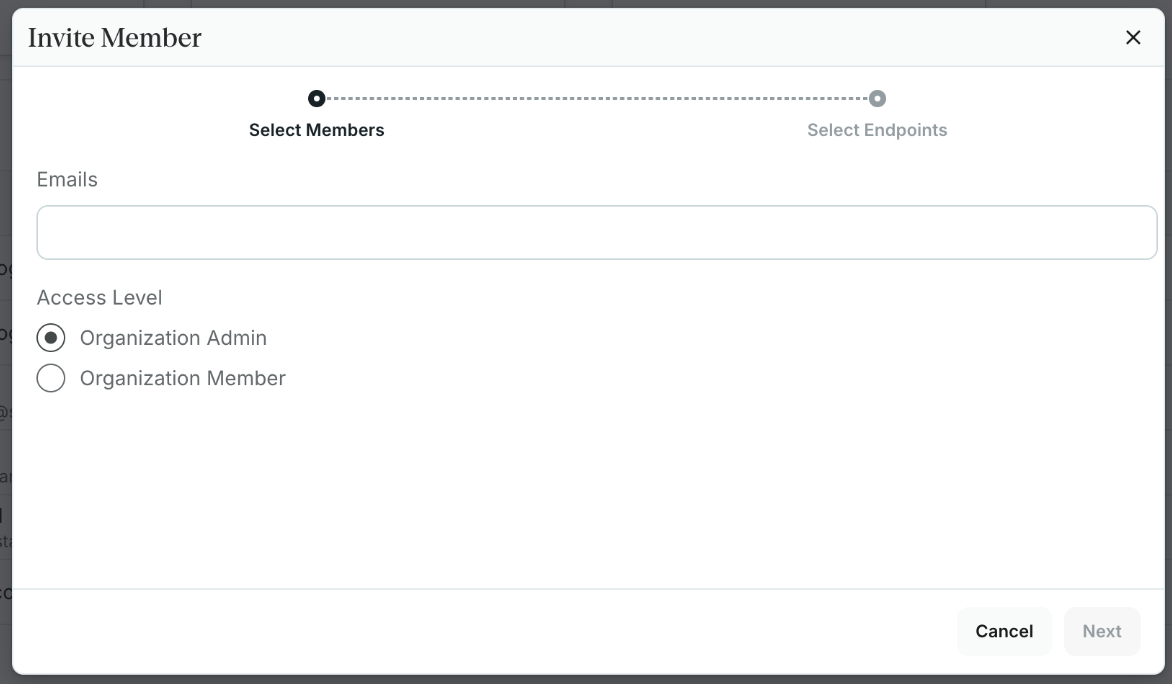
- On the Select Endpoints step, choose which endpoints the new member can access:
- Default Endpoints: Pre-selected by default. These are the endpoints accessible by all org members and are always included.
- Select Endpoints: Admins may optionally grant access to additional endpoints beyond the defaults. Select any endpoints from the list that this member should also be able to access.
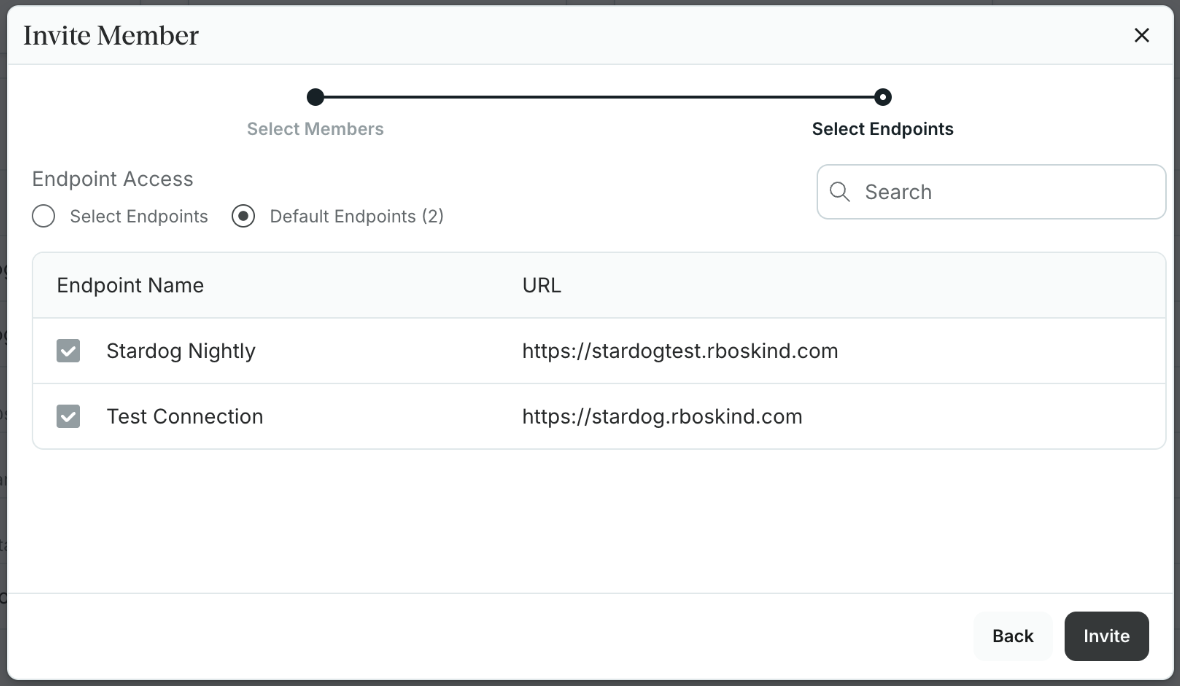
- Click Invite. Each invitee receives an email with a link to accept.
New users who do not yet have a Stardog Cloud account will have one created automatically when they accept the invitation. They will land directly in the organization home page on first login.
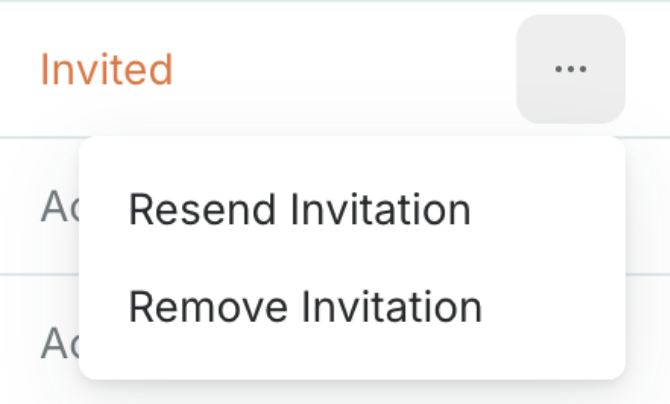
Managing Pending Invitations
Invited members appear in the Members table with a status of Invited until they accept. To manage a pending invitation, click the … (Actions) menu next to the member’s row:
- Resend Invitation: Sends the invitation email again.
- Remove Invitation: Cancels the invitation and removes the user from the table.
Managing Endpoints
To view and manage endpoints owned by your organization, navigate to the Endpoints section from the organization home page. 
Updating an Endpoint
To edit an existing endpoint, click the … (Actions) menu next to the endpoint row. The available actions differ by authentication type.
For username/password endpoints, the organization-related Actions includes:
- Edit Endpoint — Update the endpoint name, URL, credentials, or toggle Grant access to all members to share the endpoint with all organization members.
- Manage Users — View and manage which organization members have access to this endpoint.
- Delete Endpoint — Remove the endpoint from the organization.
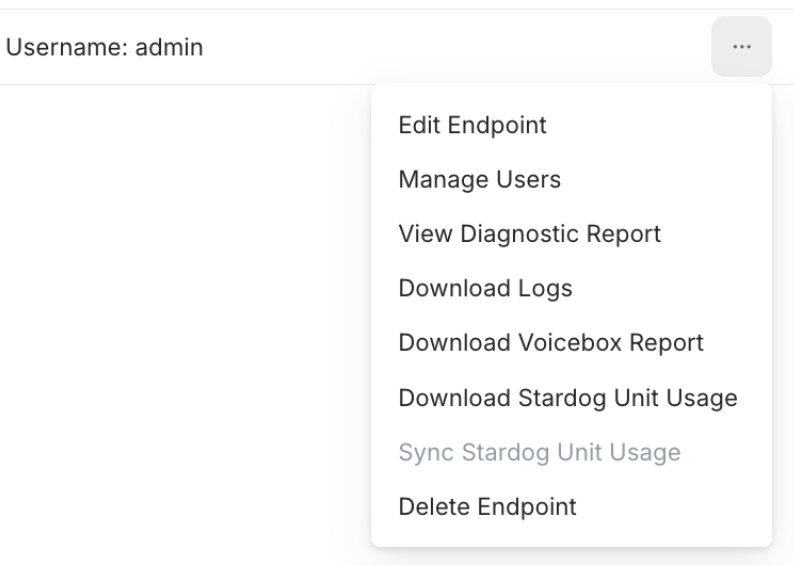
For SSO-authenticated endpoints, the Actions menu includes Edit Endpoint, View Diagnostic Report, and Delete Endpoint. The Edit Endpoint dialog for SSO endpoints includes an Authorization scope field, which is the scope registered at your identity provider that the Stardog Cloud Portal requests during token exchange to authenticate users. 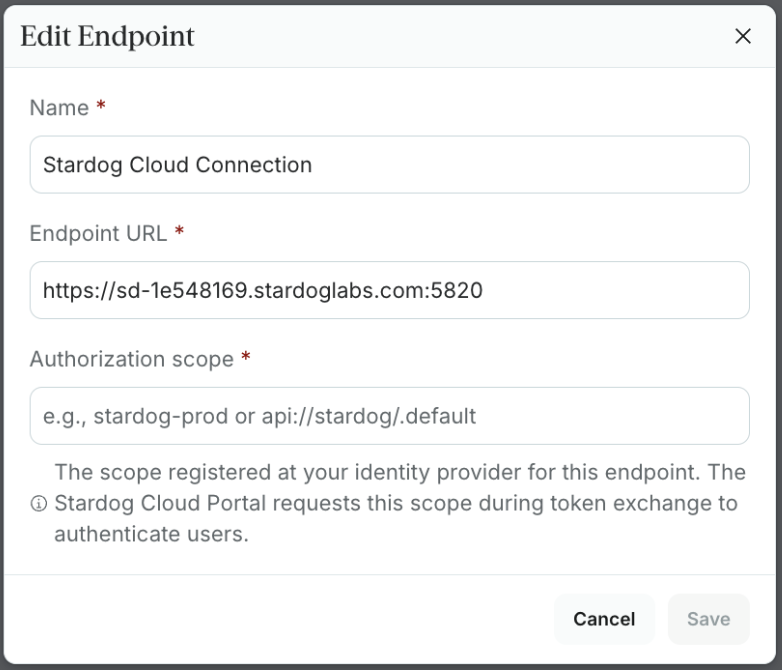
Connecting an Endpoint
- From the organization home page, click on the Endpoints summary card.
- Click Connect to an Existing Endpoint.
- Provide a unique name, the endpoint URL, and username/password details.
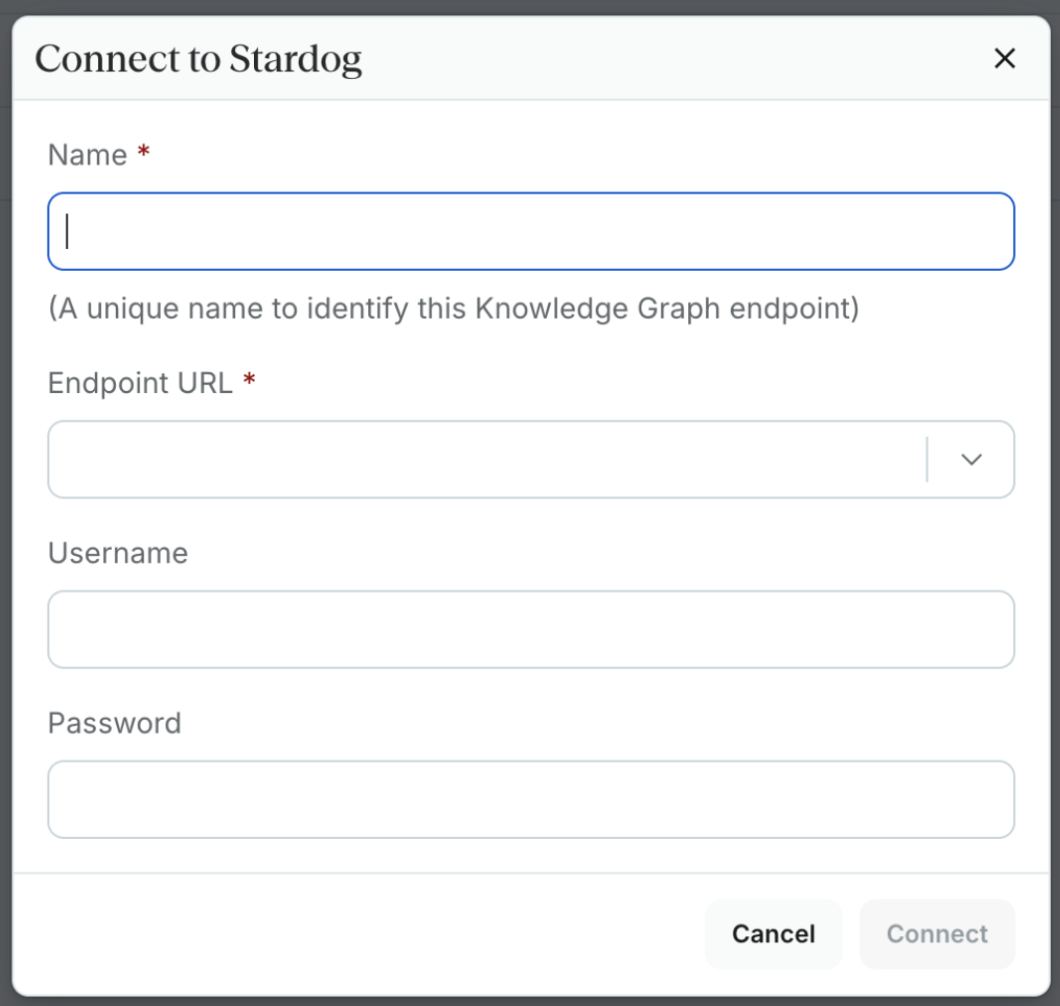
Once connected, the endpoint appears in the Endpoints table showing its name, URL, authentication method, and available actions.
Configuring SSO
Owners and admins can configure Single Sign-On (SSO) directly from the organization settings. Supported identity providers are Microsoft Entra ID and Okta. SSO is optional; organizations without SSO use standard Stardog Cloud credentials.
Microsoft Entra ID
Before configuring SSO in Stardog Cloud, create an App Registration in the Azure portal.
Step 1: Create the App Registration
- In the Azure portal, navigate to Microsoft Entra ID → App registrations → New registration.
- Enter a name for the application (e.g., Stardog Cloud).
- Under Supported account types, select the option appropriate for your organization (typically Accounts in this organizational directory only).
- Under Redirect URI, select Web and enter your Stardog Cloud redirect URI in the format
https://cloud.stardog.com/oauth/o/{your-org-domain}/callback. You can also find this value in the SSO Configuration summary after saving your configuration in Stardog Cloud. - Click Register.
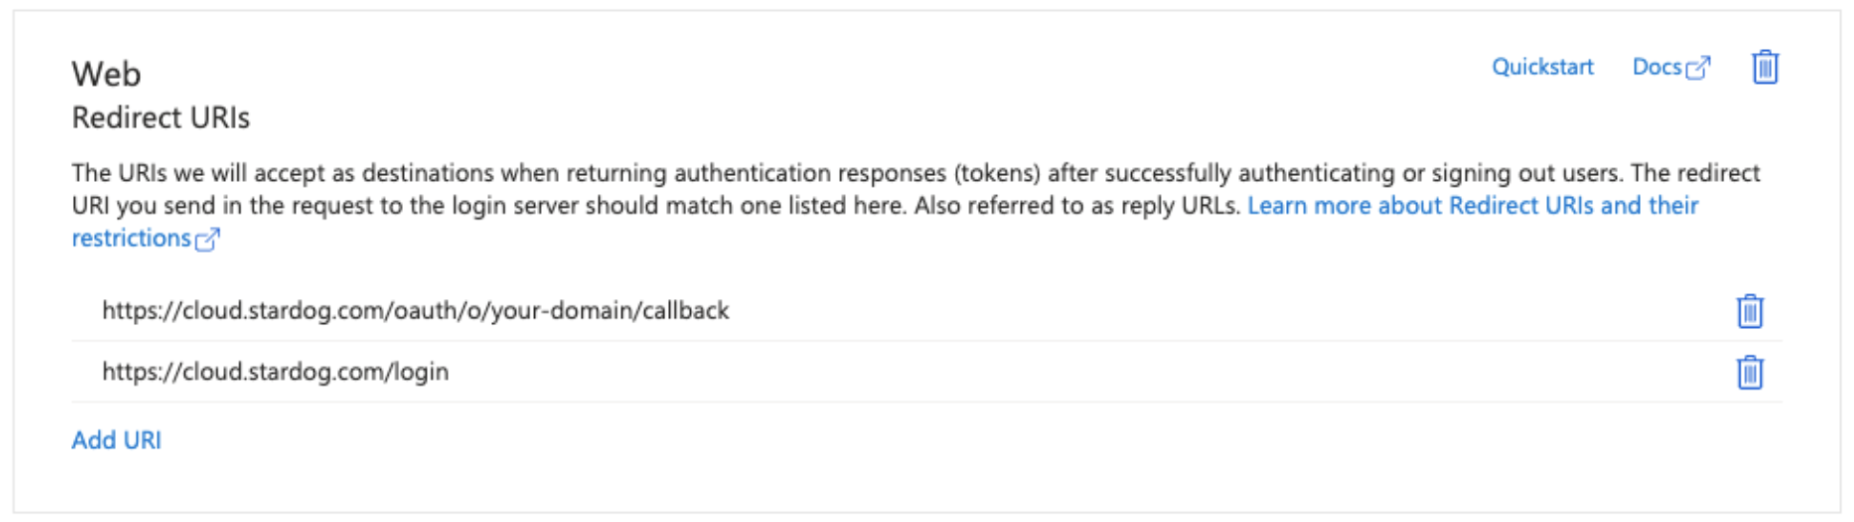
You should add both https://cloud.stardog.com/oauth/o/your-domain/callback and https://cloud.stardog.com/login to your Redirect URIs.
Step 2: Collect the Required Values
Once the app is registered, collect the following from the Azure portal:
- Discovery URL: go to Overview → Endpoints and copy the OpenID Connect metadata document URL.
- Client ID: shown on the Overview page as Application (client) ID.
- Client Secret: go to Certificates & secrets → Client secrets → New client secret. Set a description and expiry, then click Add. Copy the secret Value immediately — it will not be shown again.
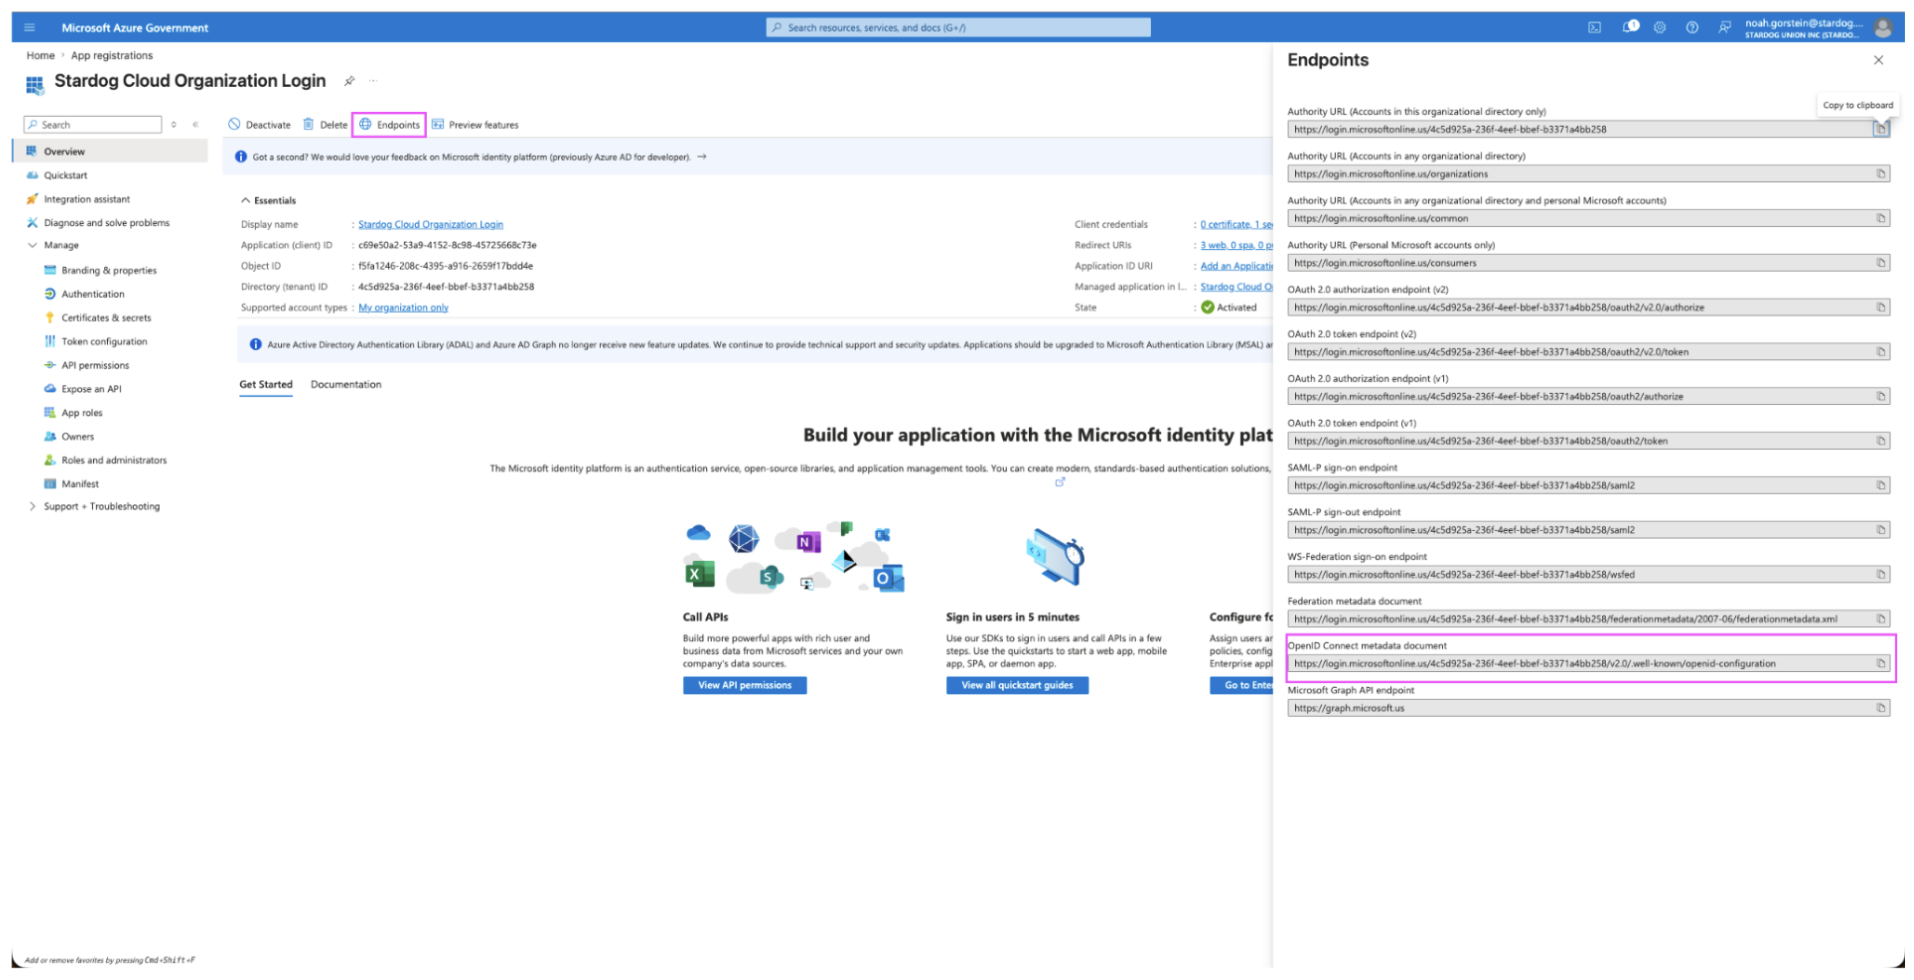
To get the Discovery URL, go to Overview → Endpoints and copy the OpenID Connect metadata document URL.
Step 3: Configure SSO in Stardog Cloud
- From the organization home page, click the … (Actions) menu in the top-right corner.
- Select Configure SSO.
- In the Configure SSO dialog, select Microsoft Entra ID and click Continue.
Complete the following fields:
- Discovery URL: your OpenID Connect discovery endpoint in the format
https://login.microsoftonline.com/{tenant-id}/v2.0/.well-known/openid-configuration, found in your App Registration under Endpoints in the Azure portal. - Client ID: found on the Overview page of your App Registration in the Azure portal.
- Client Secret: a client secret generated in your App Registration.
- Enable IDP Logout (optional): when checked, logging out of Stardog Cloud also logs the user out of Entra ID.
Click Save Configuration. 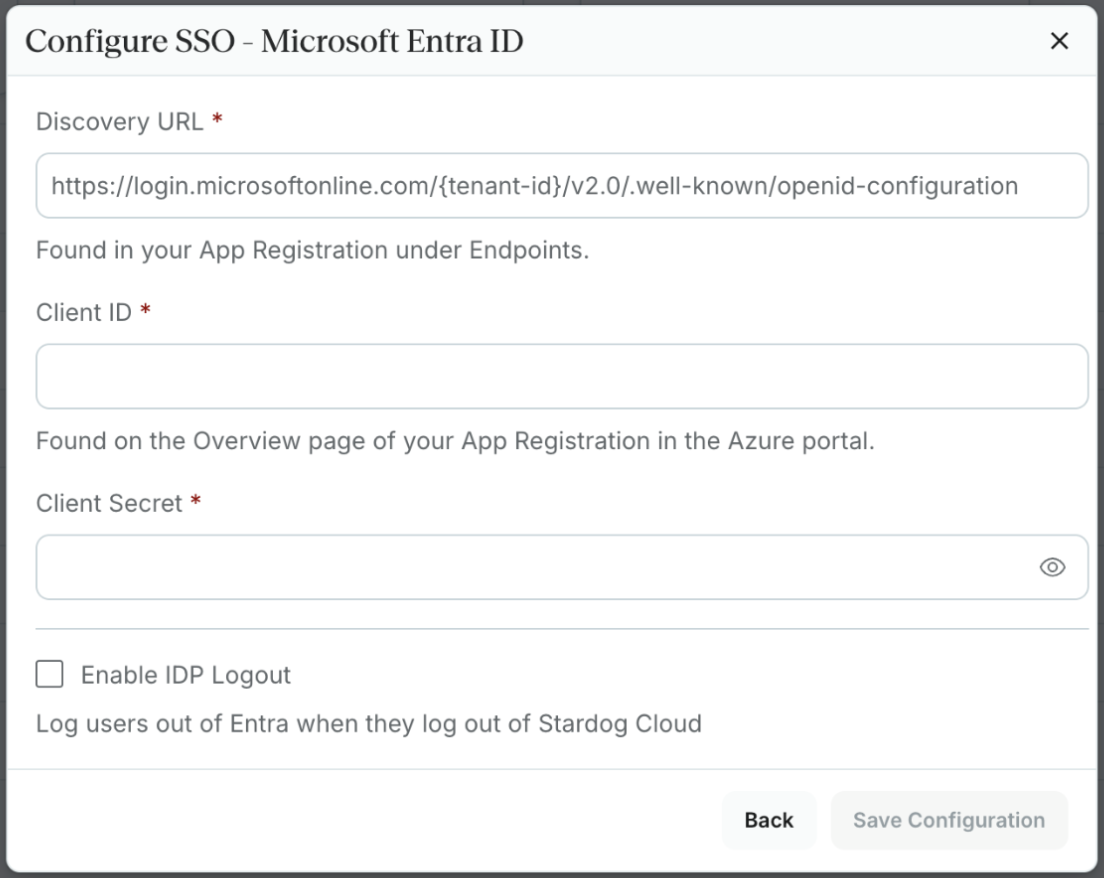
Step 4: Add the Post-Logout Redirect URI
After saving your SSO configuration in Stardog Cloud, return to your App Registration and add the Post-Logout Redirect URI:
- Go to Authentication in your App Registration.
- Under Web → Redirect URI, add the post-logout redirect URI shown in the Stardog Cloud SSO Configuration summary.
- Click Save.
Step 5 (Optional): Enable IDP Logout Claim
If you checked Enable IDP Logout to log users out of Entra ID in addition to Stardog Cloud, you must ensure the optional claim login_hint is included in your ID token claims.
- Go to Token Configuration in your App Registration.
- Click Add optional claim.
- When given the selection of token type, select ID Token.
- Check
login_hintand click Add.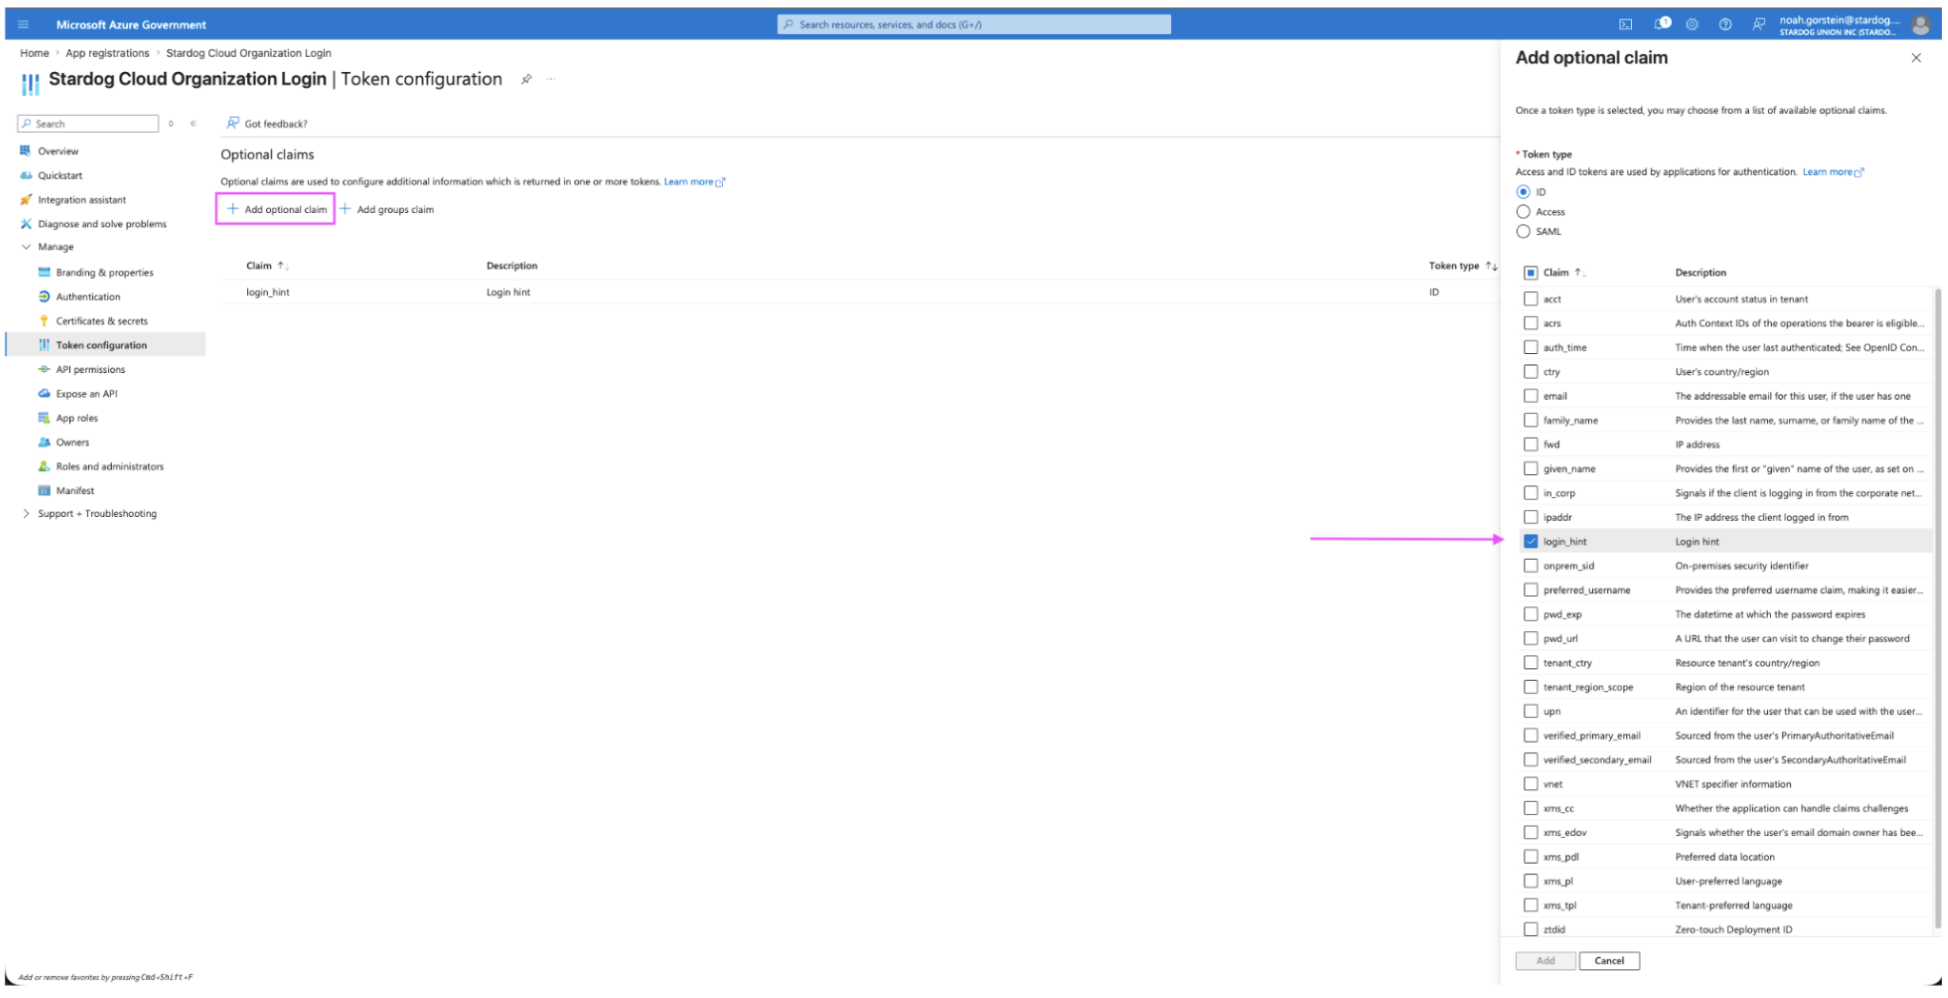
Okta
Okta SSO requires two separate Okta app integrations: a Web Application for user login, and an API Services Application for secure token exchange.
Step 1: Create the Web Application
- In the Okta Admin Console, navigate to Applications → Create App Integration.
- Select OIDC - OpenID Connect as the sign-in method, then Web Application as the application type. Click Next.
- Enter a name for the app (e.g., Stardog Cloud Login).
- Under Grant type, ensure both Authorization Code and Refresh Token are selected. Refresh Token is required; Stardog Cloud requests the
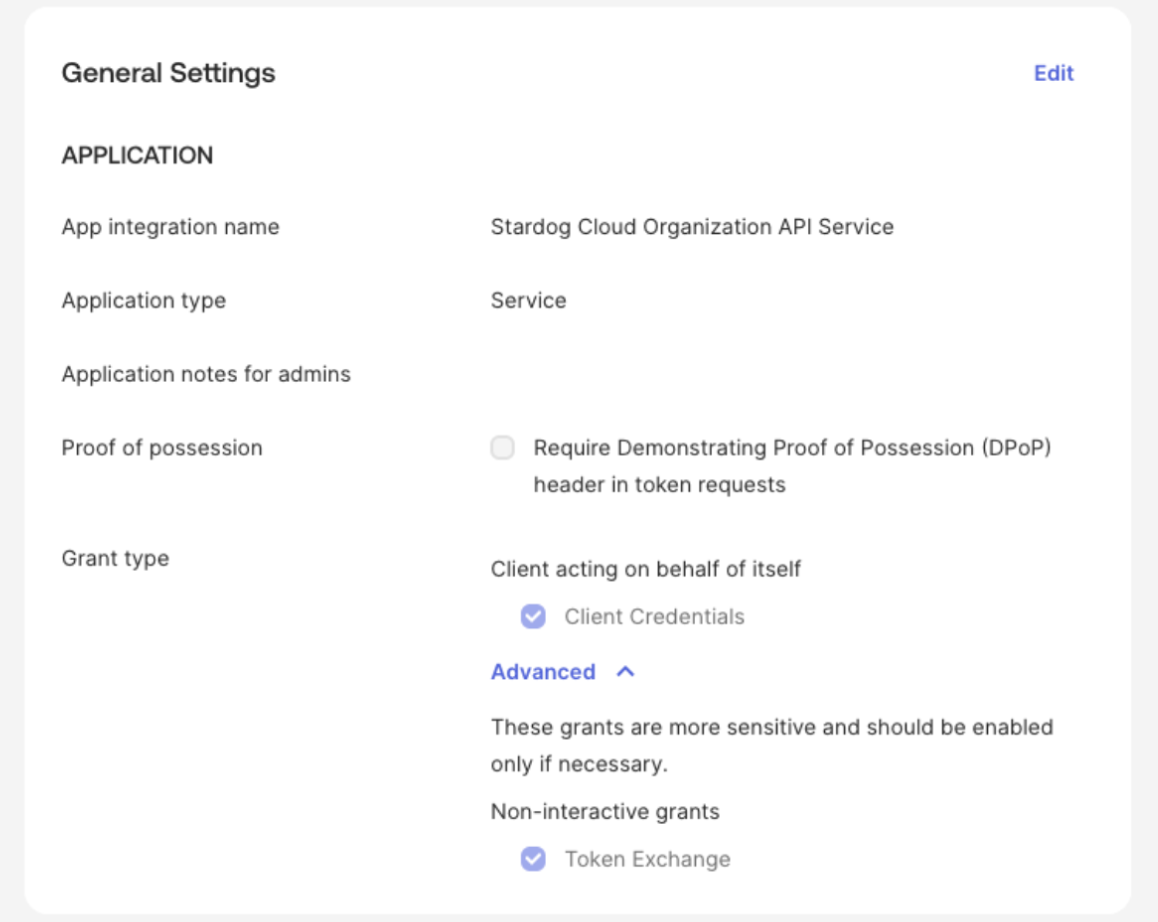
offline_accessscope. - Under General Settings → Proof of Possession, ensure the Require Demonstrating Proof of Possession (DPoP) header in token requests is unchecked. Stardog Cloud authenticates with a client secret and does not send a DPoP proof, so token requests fail if DPoP is required.
- Under Sign-in redirect URIs, add
https://cloud.stardog.com/oauth/o/{your-org-domain}/callback. - Under Sign-out redirect URIs, add the post-logout redirect URI from your Stardog Cloud SSO Configuration summary.
- Click Save.
- From the app’s General tab, copy the Client ID and Client Secret.

Step 2: Get the Discovery URL and Audience
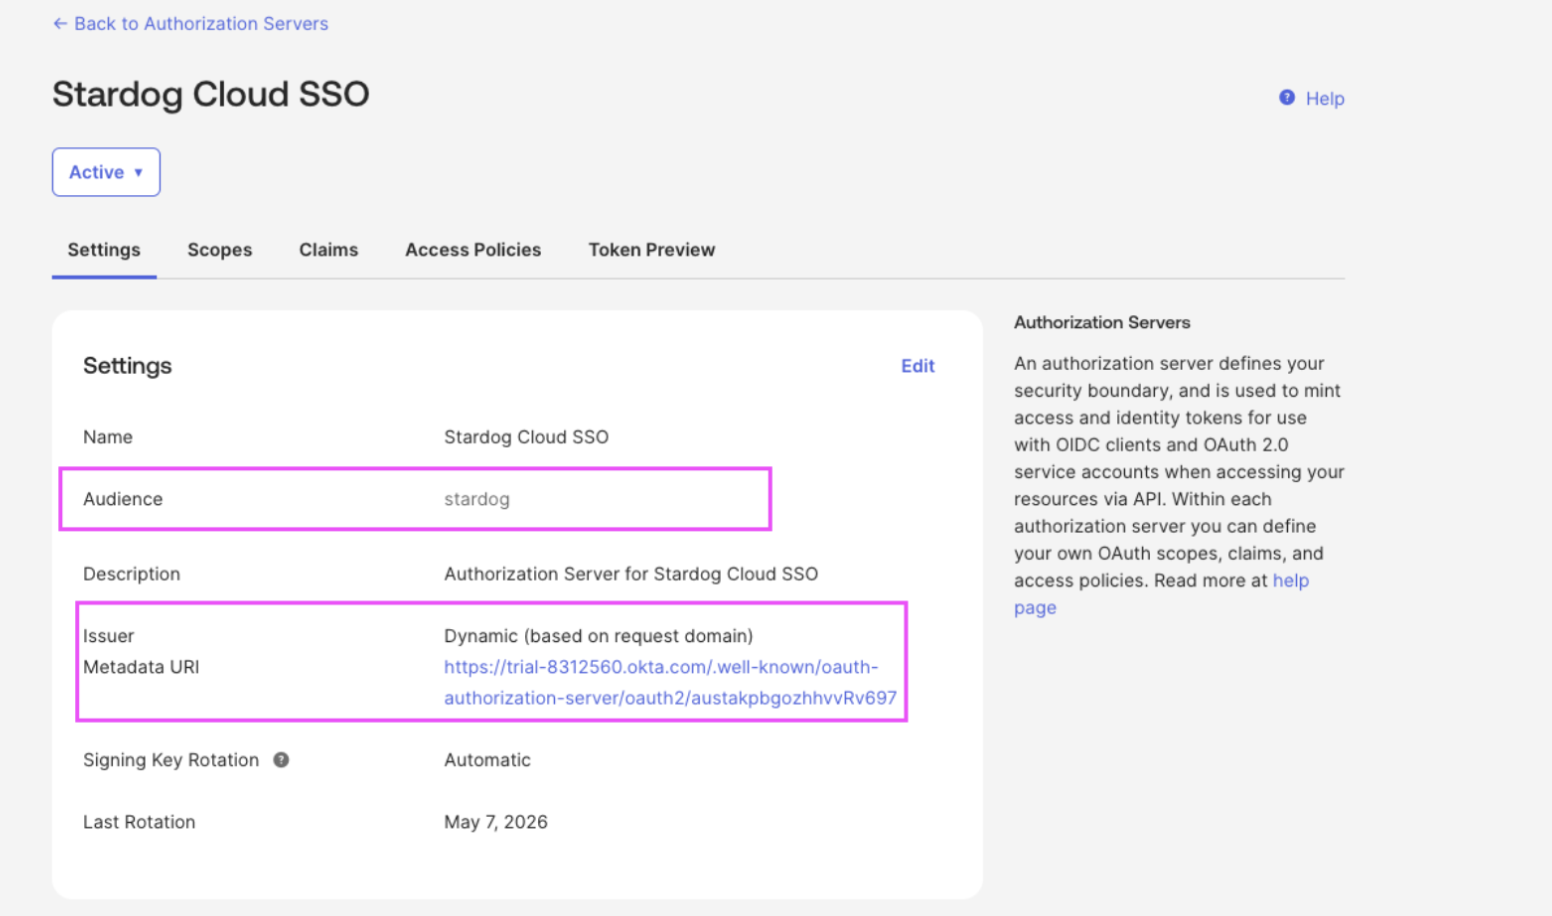
- In the Okta Admin Console, go to Security → API → Authorization Servers.
- Select the custom authorization server your organization uses.
- Copy the Metadata URI — this is your Discovery URL.
- Copy the Audience value shown in the authorization server settings.
Step 3: Create the API Services Application
- Go to Applications → Create App Integration.
- Select OIDC - OpenID Connect, then API Services. Click Next.
- Enter a name (e.g., Stardog Cloud API Services).
- Click Save.
- From the app’s General tab, copy the Client ID and Client Secret.
- The Token Exchange grant type must also be explicitly enabled on the API Services Application. Go to the app’s General tab, click Edit under General Settings, and under Grant type → Advanced ensure Token Exchange is selected. Click Save.
Step 4: Configure the Authorization Server Access Policy
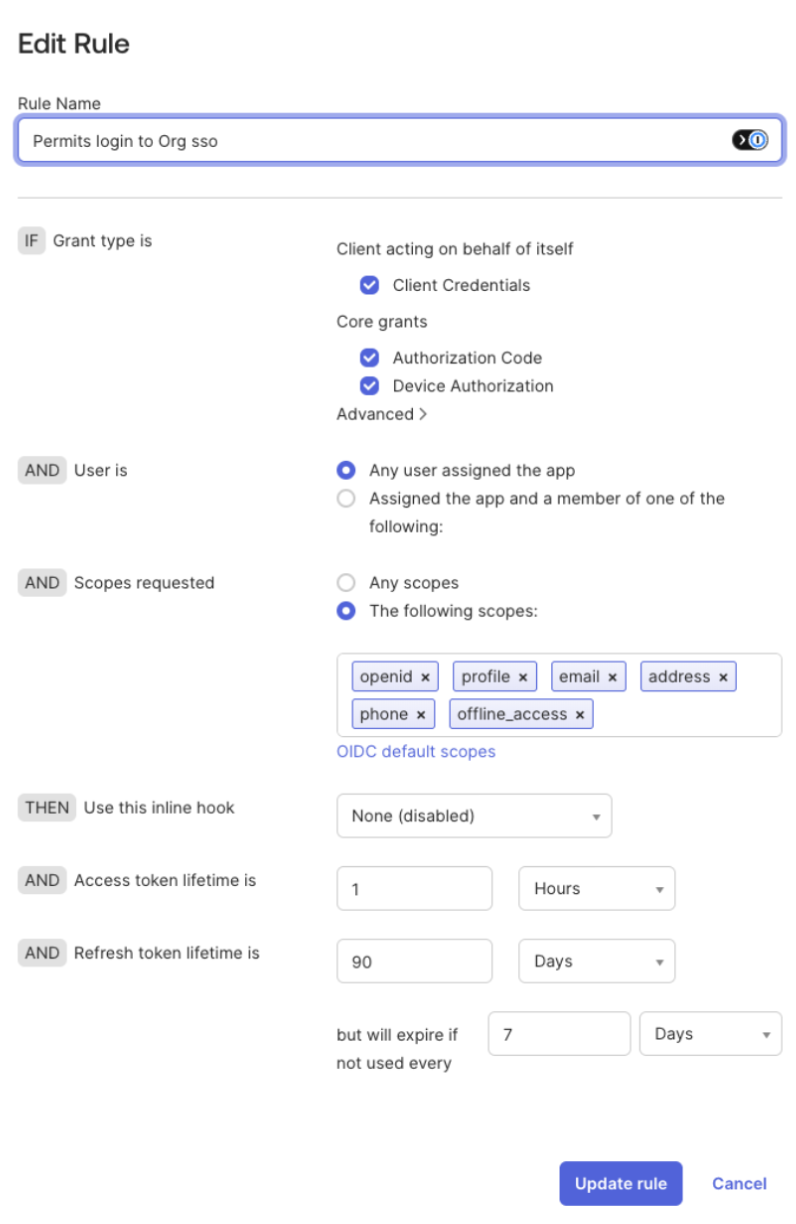
The Web Application uses your custom authorization server to sign members in. Create an access policy on the custom authorization server you identified in Step 2; without it, Okta rejects login requests even if the application is configured correctly.
- In the Okta Admin Console, go to Security → API → Authorization Servers and select your custom authorization server.
- Click the Access Policies tab, then Add New Access Policy. Name it Stardog Cloud Login Policy.
- Under Assign to, select The following clients and add your Web Application. Click Create Policy.
- Click Add Rule, give it a name (for example, Permits login to Org SSO), and configure:
- Grant type is: under Core grants, select Authorization Code.
- User is: Any user assigned the app.
- Scopes requested: select The following scopes and add
openid,profile,email, andoffline_access.offline_accessis required so Stardog Cloud receives a refresh token. - Set the access and refresh token lifetimes according to your organization’s requirements.
- Click Create Rule.
Note: Token exchange to your Stardog servers is configured separately, once SSO is in place. See Connecting a Stardog Cloud Endpoint via SSO (Okta).
Step 5: Configure SSO in Stardog Cloud
- From the organization home page, click the … (Actions) menu in the top-right corner.
- Select Configure SSO.
- In the Configure SSO dialog, select Okta and click Continue.
Complete the following fields:
Web Application
- Discovery URL: your OpenID Connect discovery endpoint in the format
https://your-domain.okta.com/oauth2/{authorizationServerId}/.well-known/openid-configuration, found in your Okta Admin Console under your Custom Authorization Server (use the server’s Metadata URI from Step 2). Do not use the org-levelhttps://your-domain.okta.com/.well-known/openid-configuration— the org authorization server does not support token exchange. - Authorization Server Audience: the Audience value from your Custom Authorization Server settings.
- Client ID: found on the General tab of your Okta Web Application (Authorization Code grant type).
- Client Secret: the client secret for your Okta Web Application.
API Services Application
A separate Okta application configured with the Token Exchange grant type, used to securely exchange user tokens for Stardog access.
- API Services Client ID: the Client ID of your Okta API Services application.
- API Services Client Secret: the client secret for your Okta API Services application.
Click Save Configuration. 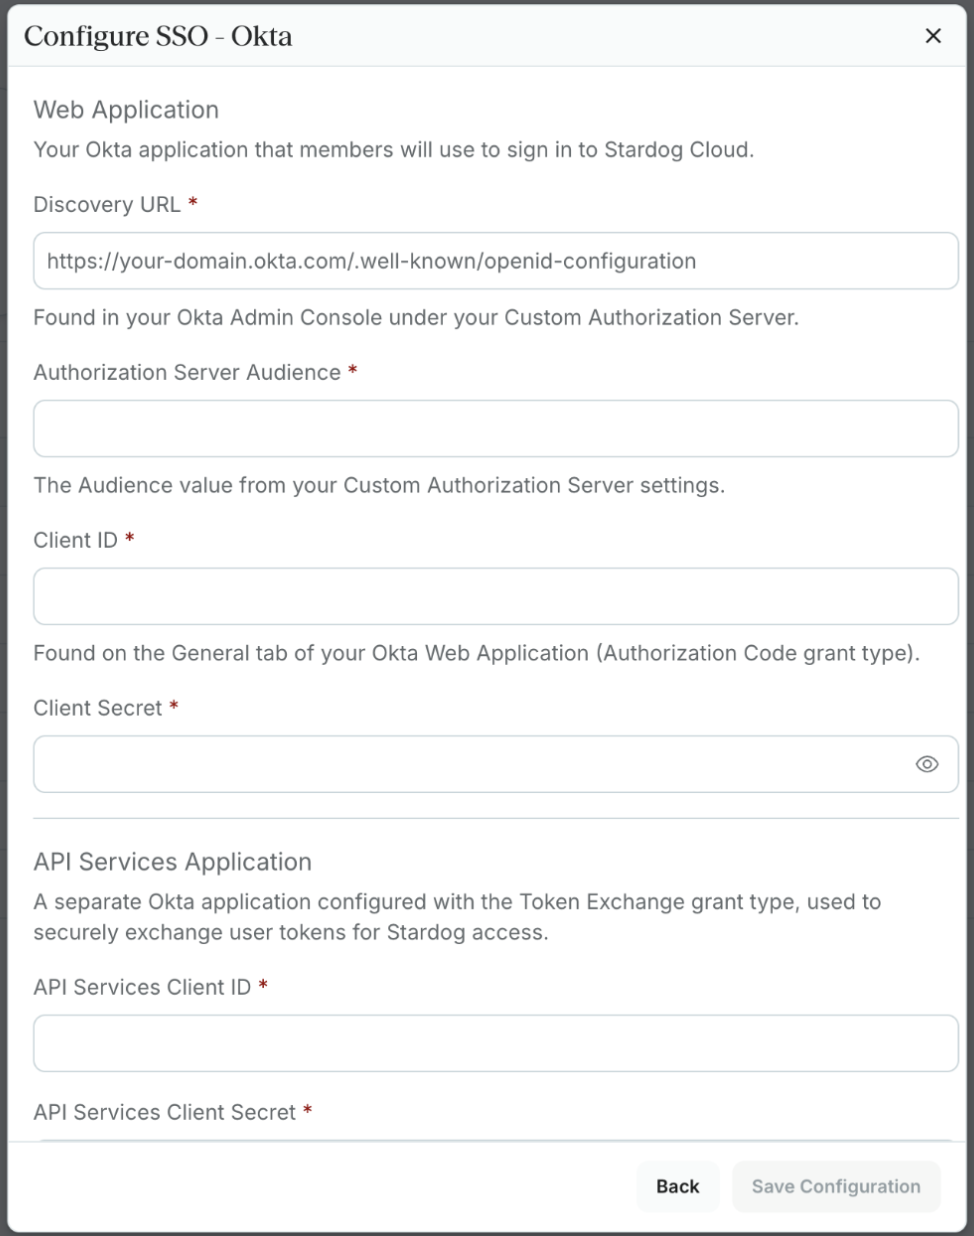
SSO Configuration Summary
Once SSO is configured, the SSO Configuration summary shows:
- Login URL: share this with your team to sign in via SSO. Members can also enter your organization’s domain name directly on the Stardog Cloud login page.
- Redirect URI and Post-Logout Redirect URI: add these to your identity provider’s allowed redirect URIs.
From this summary you can also Edit Configuration to update SSO settings or Delete Configuration to remove SSO from the organization.
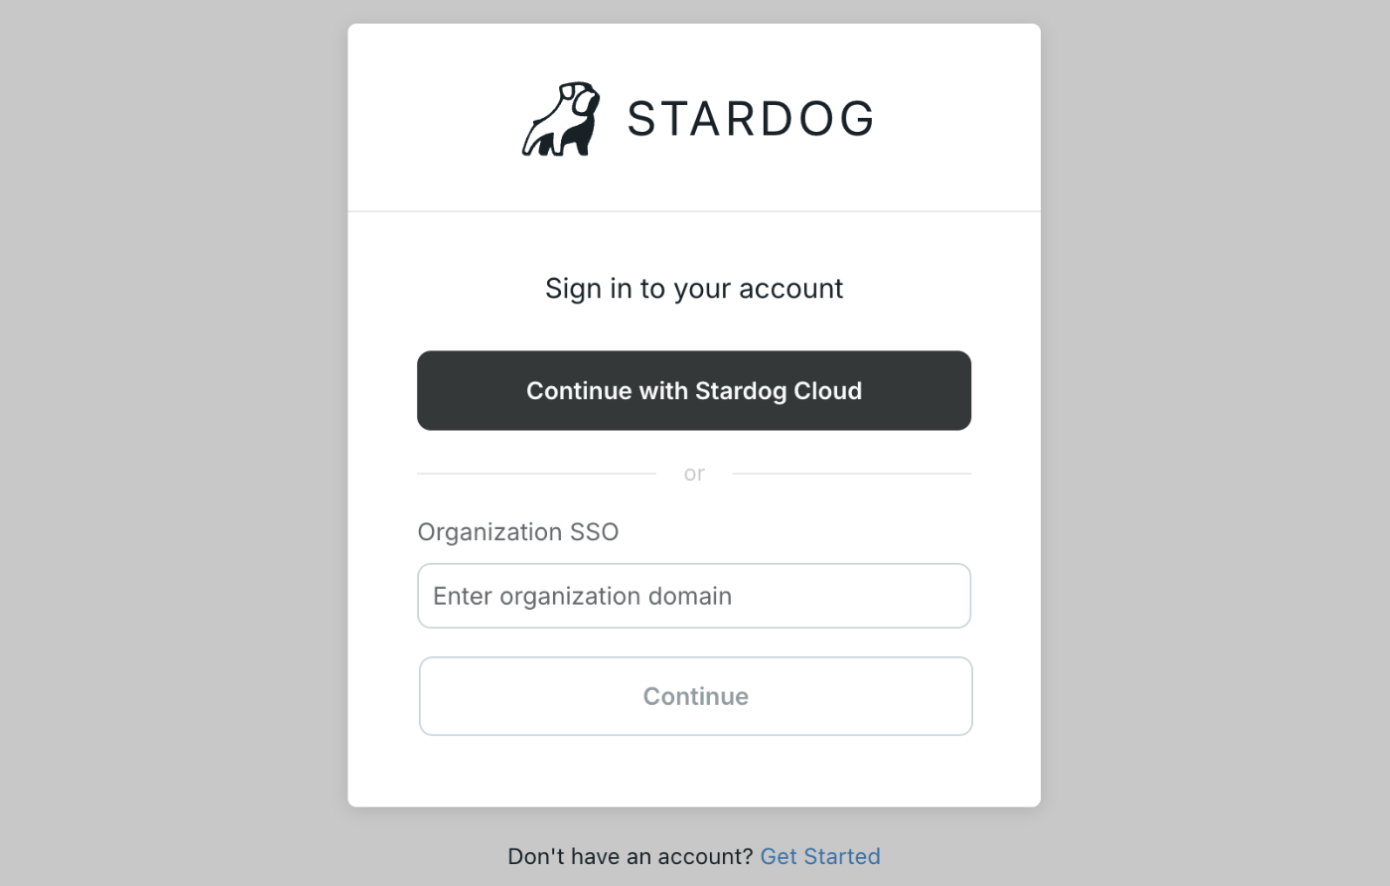
Signing In via SSO
Members of an SSO-enabled organization can sign in using their organization’s dedicated SSO login:
- Go to the Stardog Cloud login page at https://cloud.stardog.com/.
- In the Organization SSO field, enter your organization’s domain name (for example, acme).
- Click Continue. You will be redirected to your identity provider to authenticate.
Managing Organization Settings
The … (Actions) menu in the top-right corner of the organization home page provides the following options: 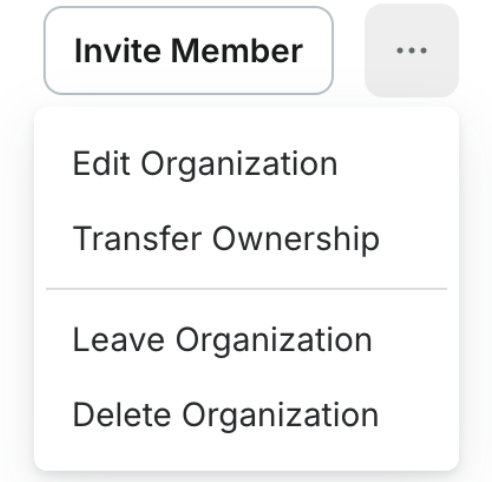
Editing Organization Details
Select Edit Organization to update details such as the organization name, description, or admins. Available to owners and admins.
Transferring Ownership
An organization can have only one owner. An owner may transfer ownership to another member of the organization via the popup modal.
Leaving an Organization
Any member or admin can leave an organization by selecting Leave Organization from the Actions menu. Owners must transfer ownership before they can leave.
Deleting an Organization
Only the owner can delete an organization. Select Delete Organization from the Actions menu. This removes all member associations and endpoint connections and cannot be undone.