JWT Authentication with Okta
Page Contents
This guide walks through configuring JWT-based authentication for Voicebox using Okta’s On-Behalf-Of (OBO) token exchange flow.
Is This Guide For You?
Use JWT authentication if you need:
- Audit trail — Track which user made each LLM request through the entire service chain
- Scoped tokens — Each service receives only the permissions it needs
- Corporate security requirements — Your LLM Gateway requires OAuth bearer tokens
If you don’t have these requirements, skip this guide and use the standard Voicebox App Key authentication.
This JWT authentication flow is currently only supported with Okta as the identity provider.
Prerequisites
Before starting, ensure you have:
- Okta account with API Access Management (required for custom authorization servers)
- Launchpad already deployed with Okta login working
- Voicebox Service deployed
- An LLM Gateway/proxy that accepts OAuth bearer tokens (required for token exchange to the LLM)
Quick Start
If you’re familiar with Okta and OAuth token exchange, here’s the minimal configuration. The full walkthrough below explains how to obtain each value.
Launchpad:
# Existing Okta login config (you should already have these)
OKTA_AUTH_ENABLED=true
OKTA_DOMAIN=your-domain.okta.com
OKTA_CLIENT_ID=0oaLoginApp123
OKTA_CLIENT_SECRET=<login-app-secret>

# JWT Authentication (add these)
OKTA_AUTHORIZATION_SERVER_ID=aus123abc
OKTA_AUTHORIZATION_SERVER_AUDIENCE=stardog-services
OKTA_BACKEND_CLIENT_ID=0oaBackendApp456
OKTA_BACKEND_CLIENT_SECRET=<backend-app-secret>
VOICEBOX_SERVICE_ENDPOINT=http://voicebox-service:8000
VOICEBOX_SERVICE_SCOPE=voicebox

# Public API Authentication (add these if using programmatic access)
# These values come from the authorization server issuing tokens to your external apps
# This can be the same auth server as above, or a different one
API_AUTH_JWT_ENABLED=true
API_AUTH_JWKS_URI=https://your-domain.okta.com/oauth2/aus123abc/v1/keys
API_AUTH_ISSUER=https://your-domain.okta.com/oauth2/aus123abc
API_AUTH_AUDIENCE=stardog-services
Voicebox Service:
# JWT validation (tokens from Launchpad)
REQUIRE_JWT_AUTH=true
JWT_ISSUER=https://your-domain.okta.com/oauth2/aus123abc
JWT_JWKS_URI=https://your-domain.okta.com/oauth2/aus123abc/v1/keys
JWT_AUDIENCE=stardog-services
JWT_REQUIRED_SCOPE=voicebox

# Token exchange (for LLM Gateway)
# Note: These are the Voicebox Service app credentials (Step 4), NOT Launchpad's
TOKEN_EXCHANGE_PROVIDER=okta
OKTA_CLIENT_ID=0oaVoiceboxApp789
OKTA_CLIENT_SECRET=<voicebox-app-secret>
OKTA_DISCOVERY_URL=https://your-domain.okta.com/oauth2/aus123abc/.well-known/openid-configuration
OKTA_LLM_GATEWAY_AUDIENCE=llm-gateway-api
OKTA_LLM_GATEWAY_SCOPE=llm-gateway
Voicebox config file (vbx-config.json):
{
  "default_llm_config": {
    "llm_provider": "openai",
    "llm_name": "gpt-4o",
    "server_url": "https://your-llm-gateway.example.com/v1/"
  }
}
Token exchange is currently supported with llm_provider: openai only.
How It Works
JWT authentication creates a chain of trust from the user through to the LLM:
User → Launchpad → Voicebox Service → LLM Gateway
- User logs in to Launchpad via Okta
- Launchpad exchanges the user’s token for a Voicebox-scoped token (OBO flow)
- Voicebox validates the token and exchanges it for an LLM Gateway token
- LLM Gateway receives a scoped token traceable to the original user
sequenceDiagram
    participant User
    participant Launchpad
    participant Okta
    participant Voicebox
    participant LLM as LLM Gateway

    User->>Launchpad: Login
    Launchpad->>Okta: OIDC authentication
    Okta-->>Launchpad: User token
    Launchpad-->>User: Session established

    User->>Launchpad: Voicebox request
    Launchpad->>Okta: Token exchange (OBO)
    Okta-->>Launchpad: Voicebox-scoped token
    Launchpad->>Voicebox: Request + JWT
    Voicebox->>Okta: Token exchange (OBO)
    Okta-->>Voicebox: LLM Gateway token
    Voicebox->>LLM: Request + JWT
    LLM-->>Voicebox: Response
    Voicebox-->>Launchpad: Response
    Launchpad-->>User: Response
This diagram shows the simple case where all components use the same authorization server. For multi-authorization-server setups, see Advanced Configuration.
Okta Setup
Step 1: Create a Custom Authorization Server
- In Okta Admin Console, go to Security → API → Authorization Servers
- Click Add Authorization Server
- Configure:
- Name: e.g., “Stardog Services”
- Audience: e.g.,
stardog-services— note this value, you’ll use it in multiple places
- After saving, note the Authorization Server ID from the Metadata URI:
https://{domain}/oauth2/{AUTHORIZATION_SERVER_ID}/.well-known/oauth-authorization-server
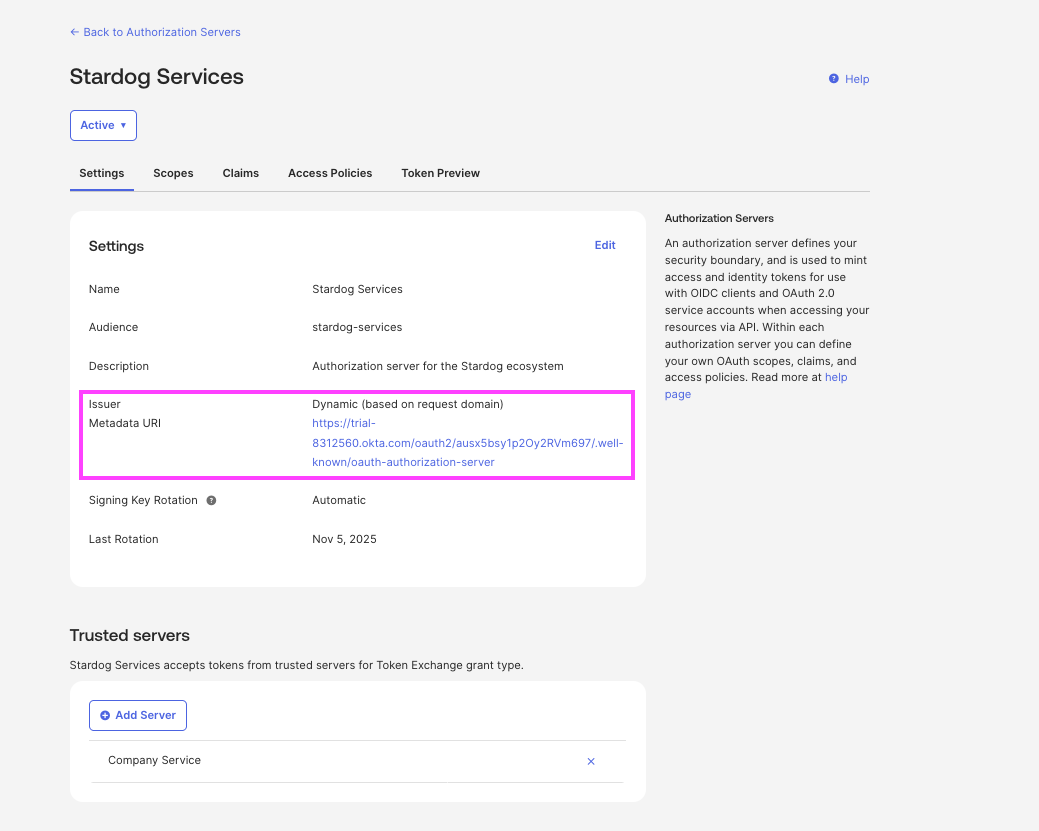
Verify: The authorization server appears in your list and you can access its settings.
Step 2: Create Scopes
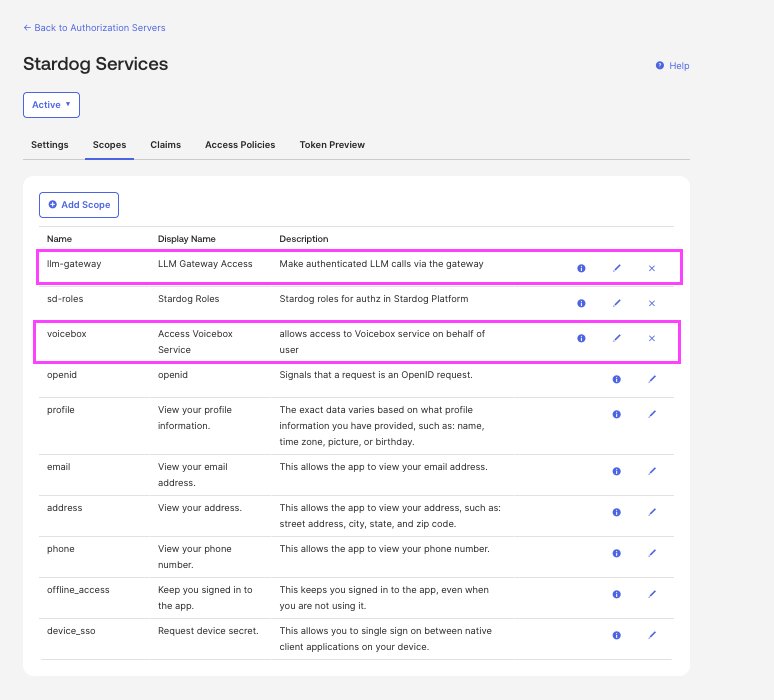
- In your authorization server, go to Scopes tab
- Click Add Scope for each:
| Scope Name | Description |
|---|---|
voicebox | Access to Voicebox service |
llm-gateway | Access to LLM Gateway |
You can name these scopes whatever you prefer. Just ensure consistency across your configuration.
Verify: Both scopes appear in the Scopes tab.
Step 3: Create the Launchpad Backend Application
Okta requires a separate API Services application for token exchange (different from the web app used for login).
- Go to Applications → Applications
- Click Create App Integration
- Select API Services
- Configure:
- Name: e.g., “Launchpad Backend”
- After creation, note:
- Client ID →
OKTA_BACKEND_CLIENT_ID - Client Secret →
OKTA_BACKEND_CLIENT_SECRET(or configure public/private key →OKTA_BACKEND_CLIENT_PRIVATE_KEY_FILE)
- Client ID →
- Under General → Advanced → Non-interactive grants:
- Check Token Exchange
- Do NOT enable “Require DPoP header”
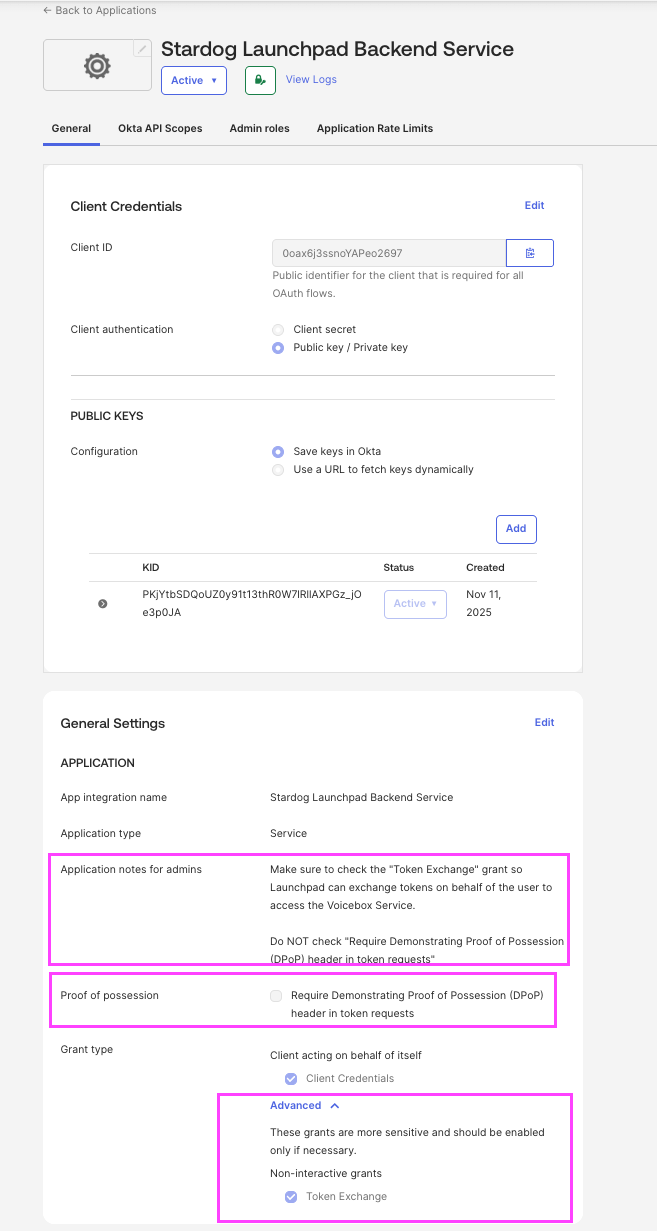
The screenshot shows public/private key authentication. See Private Key Authentication for configuration details.
Verify: The application shows “Token Exchange” enabled under grants.
Step 4: Create the Voicebox Service Application
- Go to Applications → Applications
- Click Create App Integration
- Select API Services
- Configure:
- Name: e.g., “Voicebox Service”
- After creation, note:
- Client ID → Voicebox’s
OKTA_CLIENT_ID - Client Secret → Voicebox’s
OKTA_CLIENT_SECRET(or configure public/private key →OKTA_PRIVATE_KEY_PATH)
- Client ID → Voicebox’s
- Under General → Advanced → Non-interactive grants:
- Check Token Exchange
- Do NOT enable “Require DPoP header”
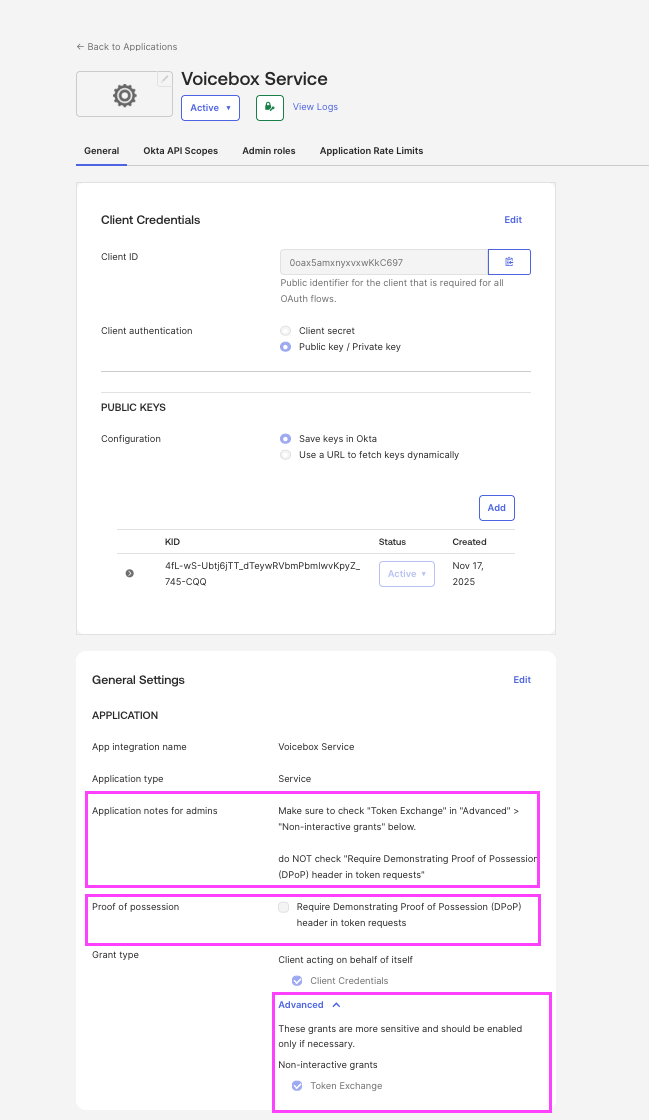
Verify: The application shows “Token Exchange” enabled.
Step 5: Configure Access Policies
Create policies to control which applications can request which scopes.
Policy 1: User Login
Allows users to log into Launchpad using your existing login application.
- In your authorization server, go to Access Policies
- Add Policy:
- Name: “Launchpad Login”
- Assign to: Your existing Launchpad login web application (the same one configured with
OKTA_CLIENT_ID)
- Add Rule:
- Name: “Allow login”
- Scopes:
openid,profile,email,offline_access
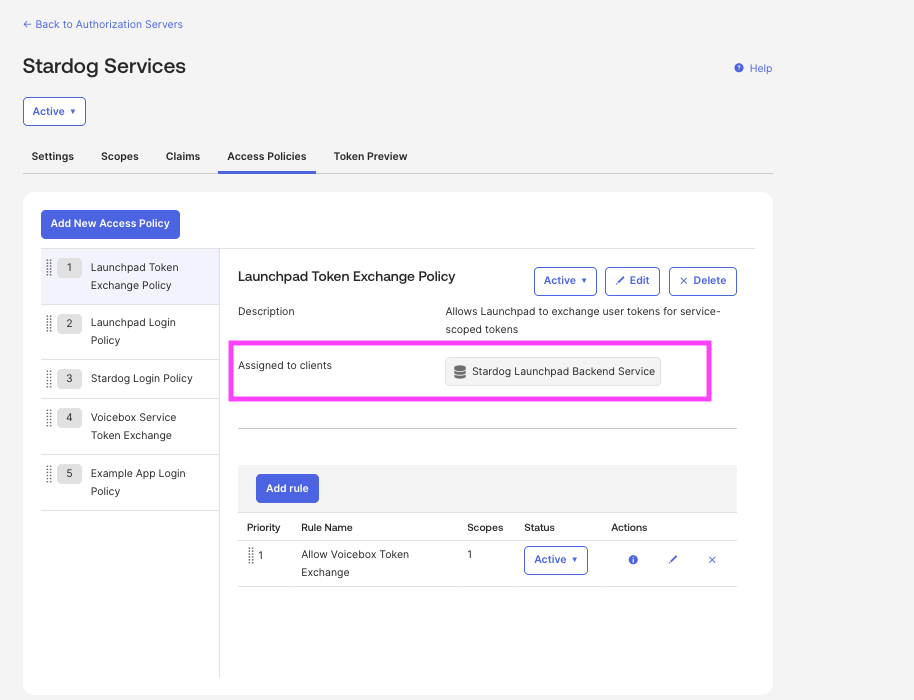
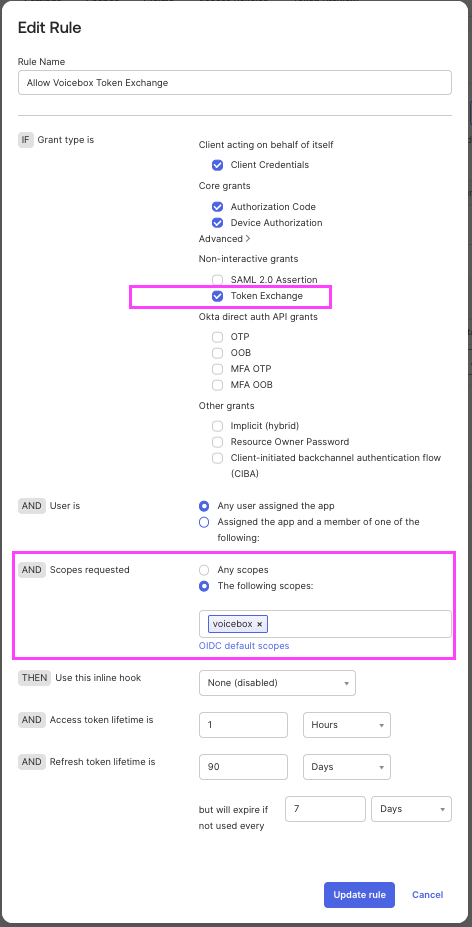
Policy 2: Launchpad Token Exchange
Allows Launchpad backend to exchange tokens for Voicebox access.
- Add Policy:
- Name: “Launchpad Token Exchange”
- Assign to: Launchpad Backend app (from Step 3)
- Add Rule:
- Name: “Exchange for Voicebox”
- Under Advanced → Core grants: Check Token Exchange
- Scopes:
voicebox
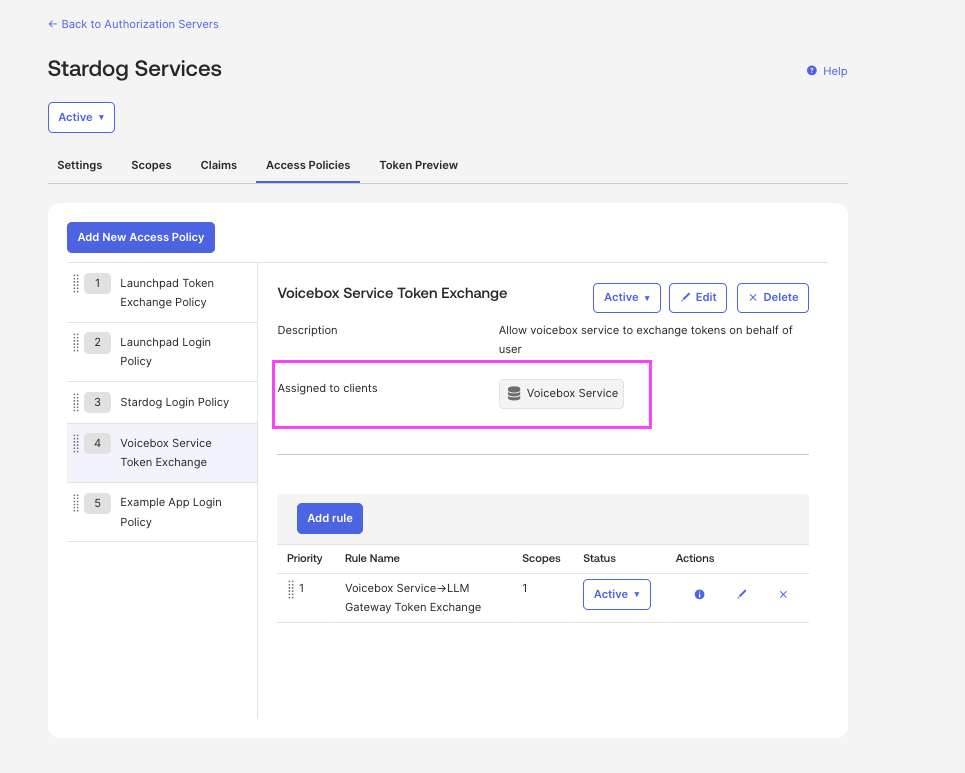
Policy 3: Voicebox Token Exchange
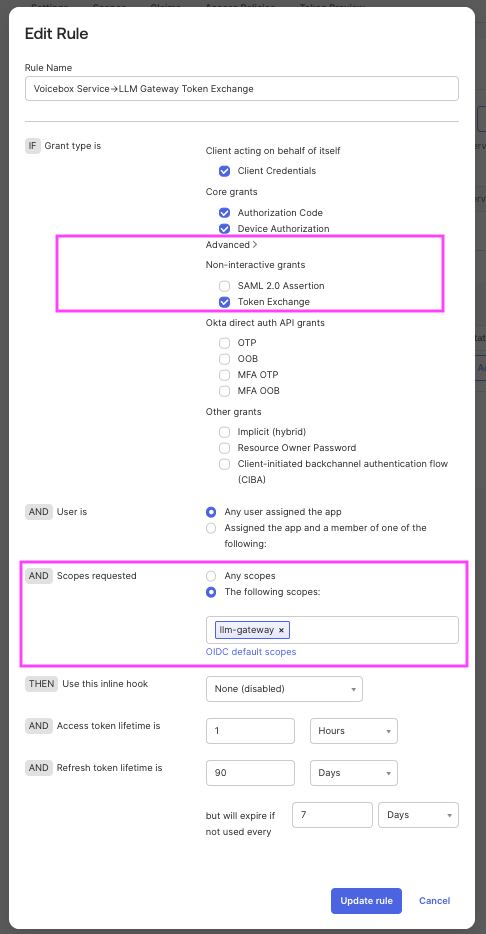
Allows Voicebox to exchange tokens for LLM Gateway access.
- Add Policy:
- Name: “Voicebox Token Exchange”
- Assign to: Voicebox Service app (from Step 4)
- Add Rule:
- Name: “Exchange for LLM Gateway”
- Under Advanced → Core grants: Check Token Exchange
- Scopes:
llm-gateway
Verify: Use Okta’s Token Preview tab to test token exchange with each application.
Launchpad Configuration
Add these environment variables to your Launchpad deployment:
# Custom Authorization Server
OKTA_AUTHORIZATION_SERVER_ID=<from-step-1>
OKTA_AUTHORIZATION_SERVER_AUDIENCE=<from-step-1>

# Backend Application (for token exchange)
OKTA_BACKEND_CLIENT_ID=<from-step-3>
OKTA_BACKEND_CLIENT_SECRET=<from-step-3>

# Voicebox
VOICEBOX_SERVICE_ENDPOINT=http://voicebox-service:8000
VOICEBOX_SERVICE_SCOPE=voicebox
| Variable | Description |
|---|---|
OKTA_AUTHORIZATION_SERVER_ID | ID of your custom authorization server |
OKTA_AUTHORIZATION_SERVER_AUDIENCE | Audience value from the authorization server |
OKTA_BACKEND_CLIENT_ID | Client ID of the Launchpad Backend app |
OKTA_BACKEND_CLIENT_SECRET | Client secret (or use OKTA_BACKEND_CLIENT_PRIVATE_KEY_FILE) |
VOICEBOX_SERVICE_SCOPE | Scope to request for Voicebox access |
If using private key authentication instead of client secret, set OKTA_BACKEND_CLIENT_PRIVATE_KEY_FILE to the path of the PEM file in the container. Private key takes precedence if both are configured.
Voicebox Service Configuration
JWT Validation
Configure Voicebox to validate tokens from Launchpad:
REQUIRE_JWT_AUTH=true
JWT_ISSUER=https://{domain}/oauth2/{authorization-server-id}
JWT_JWKS_URI=https://{domain}/oauth2/{authorization-server-id}/v1/keys
JWT_AUDIENCE=<same-as-OKTA_AUTHORIZATION_SERVER_AUDIENCE>
JWT_REQUIRED_SCOPE=<same-as-VOICEBOX_SERVICE_SCOPE>
Optional settings:
| Variable | Default | Description |
|---|---|---|
JWT_SCOPE_CLAIM_NAME | scp | Claim containing scopes |
JWT_ALLOWED_ALGORITHMS | RS256 | Allowed signing algorithms |
JWT_LEEWAY_SECONDS | 60 | Clock skew tolerance |
JWKS_CACHE_TTL | 3600 | JWKS cache duration (seconds) |
Token Exchange (for LLM Gateway)
Configure Voicebox to exchange tokens for LLM Gateway access:
TOKEN_EXCHANGE_PROVIDER=okta
OKTA_CLIENT_ID=<voicebox-app-client-id>
OKTA_CLIENT_SECRET=<voicebox-app-client-secret>
OKTA_DISCOVERY_URL=https://{domain}/oauth2/{auth-server-id}/.well-known/openid-configuration
OKTA_LLM_GATEWAY_AUDIENCE=<llm-gateway-audience>
OKTA_LLM_GATEWAY_SCOPE=llm-gateway
Optional settings:
| Variable | Default | Description |
|---|---|---|
TOKEN_CACHE_TTL_SECONDS | 3600 | Max cache time for exchanged tokens |
TOKEN_CACHE_EXPIRY_BUFFER_SECONDS | 300 | Refresh tokens before expiry |
Voicebox Config File
Token exchange requires the openai LLM provider:
{
  "default_llm_config": {
    "llm_provider": "openai",
    "llm_name": "gpt-4o",
    "server_url": "https://your-llm-gateway.example.com/v1/",
    "provider_args": {
      "headers": {
        "X-Custom-Header": "value"
      }
    }
  }
}
The exchanged token is automatically added to the Authorization header for LLM Gateway requests.
Public API Authentication
External applications can access the Voicebox API programmatically using their own OAuth tokens.
Public API authentication requires the full Okta setup above (Steps 1-5) plus the Launchpad and Voicebox Service configuration.
Enable Public API JWT Auth
Add to Launchpad:
API_AUTH_JWT_ENABLED=true
API_AUTH_JWKS_URI=https://{domain}/oauth2/{auth-server-id}/v1/keys
API_AUTH_ISSUER=https://{domain}/oauth2/{auth-server-id}
API_AUTH_AUDIENCE=<audience>

# Optional
API_AUTH_REQUIRED_SCOPES=openid,profile
API_AUTH_ACCESS_TOKEN_IDP=okta  # Required if multiple login providers enabled
Making API Requests
curl -X POST "https://launchpad.example.com/api/v1/voicebox/ask" \
  -H "Authorization: Bearer $ACCESS_TOKEN" \
  -H "X-Voicebox-App-Key: your-app-key" \
  -H "X-Client-Id: my-client" \
  -H "X-SD-Auth-Token: $STARDOG_TOKEN" \
  -H "Content-Type: application/json" \
  -d '{"message": "Who is Bob?"}'
Required headers:
Authorization: Bearer <token>— User’s access token from your IDPX-Voicebox-App-Key— Voicebox application API keyX-Client-Id— Client identifierX-SD-Auth-Token— Stardog authentication token (e.g., JWT from Okta for Stardog SSO connection)
The OAuth token identifies the user making the request. The Voicebox App Key identifies the application and determines which Voicebox configuration (connection, database) to use.
Your application must obtain the user’s access token using an authorization code flow (or similar user-interactive flow). The token must represent a real user, not a client credentials token.
Advanced Configuration
Using Multiple Authorization Servers
In some architectures, different components use different authorization servers:
| Component | Can Use Different Auth Server? |
|---|---|
| Launchpad Login | Yes (this is your base server) |
| Launchpad Backend | No — must match Login |
| Voicebox Service | No — must match Launchpad |
| Public API Client | Yes |
| LLM Gateway | Yes |
When using different servers, you must configure trusted server relationships. The downstream server must trust the upstream server’s tokens.
To add a trusted server in Okta: In your authorization server settings, add the upstream authorization server to the trusted servers list.
Multi-Server Flow Diagram
sequenceDiagram
    participant Client as Public API Client
    participant AuthzC as Client's Auth Server
    participant Launchpad
    participant AuthzA as Launchpad Auth Server
    participant Voicebox
    participant AuthzB as LLM Gateway Auth Server
    participant LLM as LLM Gateway

    Client->>AuthzC: Get token
    AuthzC-->>Client: Access token

    Client->>Launchpad: API request
    Launchpad->>AuthzC: Validate token
    Launchpad->>AuthzA: Exchange for voicebox token
    Launchpad->>Voicebox: Request
    Voicebox->>AuthzA: Validate
    Voicebox->>AuthzB: Exchange for LLM token
    Voicebox->>LLM: Request
If your LLM Gateway uses a different authorization server:
- Set Voicebox’s
OKTA_DISCOVERY_URLto that server’s discovery endpoint - Set
OKTA_LLM_GATEWAY_AUDIENCEto match that server’s audience - Add Voicebox’s auth server as a trusted server in the LLM Gateway’s auth server
Private Key Authentication
Instead of client secrets, you can use private key JWT authentication:
Launchpad:
OKTA_BACKEND_CLIENT_PRIVATE_KEY_FILE=/path/to/key.pem
# Omit OKTA_BACKEND_CLIENT_SECRET
Voicebox:
OKTA_PRIVATE_KEY_PATH=/path/to/key.pem
# Omit OKTA_CLIENT_SECRET
Mount the key file into the container and ensure the path is accessible.