Okta Configuration
Page Contents
- Login Provider Configuration
- SSO Connection Configuration
SSOCONNECTION_<unique_identifier>_OKTA_CLIENT_IDSSOCONNECTION_<unique_identifier>_OKTA_DOMAINSSOCONNECTION_<unique_identifier>_OKTA_CLIENT_SECRETSSOCONNECTION_<unique_identifier>_OKTA_CLIENT_PRIVATE_KEY_FILESSOCONNECTION_<unique_identifier>_OKTA_REQUIRE_PKCESSOCONNECTION_<unique_identifier>_OKTA_AUTHORIZATION_SERVER_IDSSOCONNECTION_<unique_identifier>_OKTA_ROLES_SCOPESSOCONNECTION_<unique_identifier>_OKTA_STARDOG_ENDPOINTSSOCONNECTION_<unique_identifier>_OKTA_STARDOG_INTERNAL_ENDPOINTSSOCONNECTION_<unique_identifier>_OKTA_DISPLAY_NAME- Setting up an Okta SSO Connection
- Step 1: Create a New OIDC Application in Okta
- Step 2: Configure Application Settings for Stardog SSO connection
- Client Secret
- Private Key JWT Authentication
- Step 3: Configure Custom Authorization Server and Scopes
- Step 4: Create a Claim for Stardog Roles
- Step 5: Configure Custom Authorization Server’s Access Policies
- Step 6: Configure Launchpad Settings
- Step 7: Configure Stardog to accept Okta Access Tokens
Okta can be used both as a login provider to authenticate users into Launchpad and as an SSO connection provider to authenticate users against Stardog endpoints.
For Voicebox JWT authentication with Okta (On-Behalf-Of token exchange flow), see JWT Authentication with Okta.
Login Provider Configuration
The following configuration options are available for Okta SSO.
See How to Create an Okta Application to login with Okta in Launchpad for additional information.
OKTA_AUTH_ENABLED
The OKTA_AUTH_ENABLED setting is used to enable or disable Okta authentication to log users into Launchpad.
- Required: Yes (if using Okta)
- Default:
false
OKTA_CLIENT_ID
The OKTA_CLIENT_ID is the client id of the Okta Application used to log users into Launchpad.
- Required: Yes (if using Okta)
- Default: not set
OKTA_DOMAIN
The OKTA_DOMAIN is the domain of the Okta Application used to log users into Launchpad.
- Required: Yes (if using Okta)
- Default: not set
OKTA_CLIENT_SECRET
The OKTA_CLIENT_SECRET is the client secret of the Okta Application used to log users into Launchpad.
- Required: Yes (if using Okta and not using
OKTA_CLIENT_PRIVATE_KEY_FILE) - Default: not set
OKTA_CLIENT_PRIVATE_KEY_FILE
The OKTA_CLIENT_PRIVATE_KEY_FILE is the path (in the Docker container) to the private key file corresponding to the certificate used as a credential with the Okta Application.
This should be used if not using a client secret (OKTA_CLIENT_SECRET).
- Required: Yes (if using
private_key_jwtauth with Okta) - Default: not set
OKTA_REQUIRE_PKCE
The OKTA_REQUIRE_PKCE is used to require Proof Key for Code Exchange (PKCE) for the Okta Application.
- Required: Yes (if this setting is checked in the Okta Application)
- Default:
false
OKTA_POST_LOGOUT_REDIRECT_URI
The OKTA_POST_LOGOUT_REDIRECT_URI is the URL that users will be redirected to after logging out of Launchpad.
The URL must be registered in the Okta Application or the user will not be redirected.
- Required: No
- Default: not set
JWT Authentication Variables
The following variables are only required when using JWT Authentication with Okta for Voicebox service communication.
| Variable | Description |
|---|---|
OKTA_AUTHORIZATION_SERVER_ID | ID of the custom authorization server |
OKTA_AUTHORIZATION_SERVER_AUDIENCE | Audience value configured in the authorization server |
OKTA_BACKEND_CLIENT_ID | Client ID of the API Services app for token exchange |
OKTA_BACKEND_CLIENT_SECRET | Client secret (if not using private key) |
OKTA_BACKEND_CLIENT_PRIVATE_KEY_FILE | Path to private key file (if not using client secret) |
How to Create an Okta Application to login with Okta in Launchpad
1. Create a new application in Okta
- Sign into your Okta Admin Dashboard
- Navigate to Applications > Applications
- Click “Create App Integration”
- Choose “OIDC - OpenID Connect” as the Sign-in method
- Click “Next”
2. Configure the application
- General Settings
- App Integration Name: Name your application (e.g. “Stardog Launchpad”)
- Sign-in redirect URIs:
{BASE_URL}/oauth/okta/redirect- See
BASE_URLfor more information on what the value should.
- See
- Sign out redirect URIs: This can be set to
BASE_URLif you want users to be redirected to the Launchpad home page after logging out. You will need to set theOKTA_POST_LOGOUT_REDIRECT_URIenvironment variable to this value.- See
BASE_URLfor more information on what the value should.
- See
- Assignments: Assign the application to users or groups
- Click “Save”
3. Configure Application Client Credentials
After creating the application, you will need to decide between using a client secret or public/private key pair for authentication. These are for client_secret_basic and private_key_jwt authentication methods, respectively.
Aside from the client authentication method, there is an option to “Require Proof Key for Code Exchange (PKCE) as additional verification” in the Okta Application. If you enable this setting, you will need to set OKTA_REQUIRE_PKCE=true when configuring Launchpad.
Client Secret
This is the simpler method, however it is less secure than using private key JWT authentication. It is also the default method used for Okta when creating an application through their wizard.
- Navigate to the “General” tab of the application
- Under Client Credentials
- Make note of your Client ID - you will need this later when configuring Launchpad
- Click “Show Client Secret” and copy the value to somewhere safe. You will need this later when configuring Launchpad.
Public/Private Key (Private Key JWT)
- Navigate to the “General” tab of the application
- Under Client Credentials, click “Edit” to change the Client Authentication method to Public/Private Key
- A new section will appear within the Client Credentials section called Public/Private Key
- You can choose to upload a public key or generate a new key pair in Okta. If you choose to generate a new key pair, you will need to copy the private key in PEM format to a safe location. You will need this later when configuring Launchpad.
- Make note of your Client ID - you will need this later when configuring Launchpad.
4. Configure Launchpad
OKTA_AUTH_ENABLED=true
OKTA_CLIENT_ID=<client_id>
OKTA_DOMAIN=<okta_domain>

# optional
OKTA_POST_LOGOUT_REDIRECT_URI=<post_logout_uri>

# required if setting checked in Okta Application
OKTA_REQUIRE_PKCE=true
Depending on the authentication method you chose, you will need to set either OKTA_CLIENT_SECRET or OKTA_CLIENT_PRIVATE_KEY_FILE.
# Using client secret
OKTA_CLIENT_SECRET=<client_secret>

# Using private key JWT
OKTA_CLIENT_PRIVATE_KEY_FILE=/path/to/private-key/in/container.pem
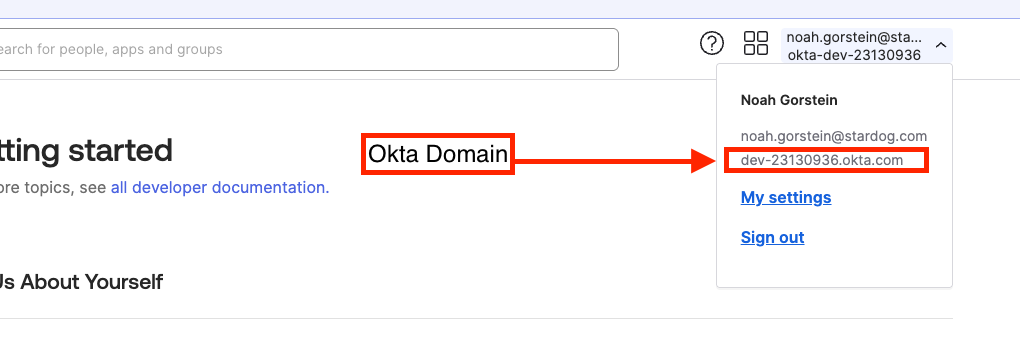
The Okta domain can be found in the right side of the upper navigation bar after clicking on your username.
If using OKTA_CLIENT_PRIVATE_KEY_FILE, the private key must be accessible in the Docker container. This can be done by mounting a volume to the path specified in the environment variable.
SSO Connection Configuration
The following configuration options are available for Okta SSO Connections, which allow users to authenticate against Stardog endpoints using Okta tokens.
SSOCONNECTION_<unique_identifier>_OKTA_CLIENT_ID
The SSOCONNECTION_<unique_identifier>_OKTA_CLIENT_ID is the client id of the Okta application used to authenticate and authorize users to connect to the Stardog endpoint.
- Required: Yes
- Default: not set
SSOCONNECTION_<unique_identifier>_OKTA_DOMAIN
The SSOCONNECTION_<unique_identifier>_OKTA_DOMAIN is the domain of the Okta application used to authenticate and authorize users to connect to the Stardog endpoint.
- Required: Yes
- Default: not set
SSOCONNECTION_<unique_identifier>_OKTA_CLIENT_SECRET
The SSOCONNECTION_<unique_identifier>_OKTA_CLIENT_SECRET is the client secret of the Okta application used to authenticate and authorize users to connect to the Stardog endpoint.
- Required: Yes (if not using
SSOCONNECTION_<unique_identifier>_OKTA_CLIENT_PRIVATE_KEY_FILE) - Default: not set
SSOCONNECTION_<unique_identifier>_OKTA_CLIENT_PRIVATE_KEY_FILE
The SSOCONNECTION_<unique_identifier>_OKTA_CLIENT_PRIVATE_KEY_FILE is the path (in the Docker container) to the private key file corresponding to the certificate used as a credential with the Okta application.
- Required: Yes (if using Public/Private Key authentication with Okta)
- Default: not set
SSOCONNECTION_<unique_identifier>_OKTA_REQUIRE_PKCE
The SSOCONNECTION_<unique_identifier>_OKTA_REQUIRE_PKCE is used to require Proof Key for Code Exchange (PKCE) for the Okta application.
- Required: Yes (if this setting is checked in the Okta application)
- Default:
false
SSOCONNECTION_<unique_identifier>_OKTA_AUTHORIZATION_SERVER_ID
The SSOCONNECTION_<unique_identifier>_OKTA_AUTHORIZATION_SERVER_ID is the ID of the custom authorization server in Okta. The custom authorization server is used to issue access tokens with custom claims for the Stardog endpoint. A custom claim is used to specify the Stardog roles assigned to the user in the Stardog endpoint. If not set, the default authorization server (with ID of default) will be used.
- Required: Yes
- Default:
default
SSOCONNECTION_<unique_identifier>_OKTA_ROLES_SCOPE
The SSOCONNECTION_<unique_identifier>_OKTA_ROLES_SCOPE is the scope used to retrieve the roles assigned to the user from the Okta application.
- Required: Yes
- Default: not set
SSOCONNECTION_<unique_identifier>_OKTA_STARDOG_ENDPOINT
The SSOCONNECTION_<unique_identifier>_OKTA_STARDOG_ENDPOINT is the URL of the Stardog endpoint that users will connect to using this SSO Connection. This is not required. If not set, users will need to manually enter the Stardog endpoint URL when creating an SSO connection. If provided, it will be pre-filled in the SSO Connection form.
- Required: No
- Default: not set
SSOCONNECTION_<unique_identifier>_OKTA_STARDOG_INTERNAL_ENDPOINT
The SSOCONNECTION_<unique_identifier>_OKTA_STARDOG_INTERNAL_ENDPOINT is an additional internal or private endpoint URL for the Stardog server. When configured, this endpoint is used by Launchpad for server-side operations, particularly for the Voicebox service container. This is useful in architectures where backend services cannot access Stardog on the public endpoint but can communicate using an internal endpoint.
When both endpoints are configured, Voicebox requests automatically use the internal endpoint while browser-based requests (Studio, Explorer, etc.) continue using the public endpoint. The internal endpoint can be overridden by users under “Advanced Options” in the SSO connection dialog.
- Required: No
- Default: not set
SSOCONNECTION_<unique_identifier>_OKTA_DISPLAY_NAME
The SSOCONNECTION_<unique_identifier>_OKTA_DISPLAY_NAME is the user-facing display name for this SSO Connection. This is the name that will be displayed to users when they are selecting an SSO Connection to connect to a Stardog endpoint. If not set, the unique identifier will be used as the display name.
- Required: No
- Default:
Setting up an Okta SSO Connection
These steps walk through how to configure Okta and Stardog to allow users to create SSO Connections in Launchpad to use Okta access tokens to authenticate and authorize against Stardog.
Step 1: Create a New OIDC Application in Okta
- Sign in to your Okta Admin Dashboard
- Navigate to Applications > Applications
- Click Create App Integration
- Select OIDC - OpenID Connect as the Sign-in method
- Choose Web Application as the Application type
- Click Next
Step 2: Configure Application Settings for Stardog SSO connection
- General Settings:
- App integration name: Enter a name for your SSO connection (e.g., “Stardog Developer Server SSO”)
- Grant types:
- Ensure Authorization Code is selected
- Additionally, select Refresh Token to enable token refresh capability
- Sign-in redirect URIs:
- Add your redirect URI:
{BASE_URL}/auth/sso-connection- See
BASE_URLfor more information on what the value should.
- See
- Add your redirect URI:
- Assignments:
- Choose who can access this integration
-
Click Save
- Configure client credentials. After creating the application, you’ll need to decide between using client secret or public key/private key JWT authentication.
Client Secret
This is the simpler approach and default but less secure than private key JWT authentication.
- Navigate to the General tab of your application.
- Under Client Credentials:
- Client secret should be checked for Client authentication
- Note your Client ID
- Note your Client Secret by clicking on the “Eye” icon to unhide the Client Secret or copy it to your clipboard.
Private Key JWT Authentication
- Navigate to the General tab of your application.
- Under Client Credentials, click Edit to change the Client authentication mode to Public Key / Private Key
- A new section should appear within Client Credentials, named Public Keys. You can choose how you want to configure your keys but for simplicity here, you can click Add Key which should open a modal asking you to paste your own public key or automatically generate a new key pair. Click Generate new key, and copy the PEM format of your private key to a file. This will be used later and is only shown once by Okta for security.
- Note your Client ID for later use.
Step 3: Configure Custom Authorization Server and Scopes
In order to auto-create users in Stardog and authorize them based on claims representing Stardog roles in access tokens issued from Okta, you need to utilize a custom authorization server in Okta to add custom claims into an access token.
Per Okta, an authorization server defines your security boundary, and is used to mint access and identity tokens for use with OIDC clients and OAuth 2.0 service accounts when accessing your resources via API. Within each authorization server you can define your own OAuth scopes, claims, and access policies. Read more in the Okta docs
- Navigate to Security > API > Authorization Servers
- You can either:
- Use the default server (should be named “default”)
- Create a new authorization server by clicking Add Authorization Server
- If creating a new server:
- Provide a Name and Description
- Set the Audience (this will be the
audclaim for access tokens minted by this server). This audience should match theaudiencefield in the JWT configuration for Stardog. - Click Save
- Select your authorization server (new or
default) - Go to the Scopes tab
- Click Add Scope
- Complete the form:
- Name:
sd-dev-roles(or your preferred scope name) - Description: “Stardog Roles for Authorization”
- Enable Include in public metadata
- Click Create
- Name:
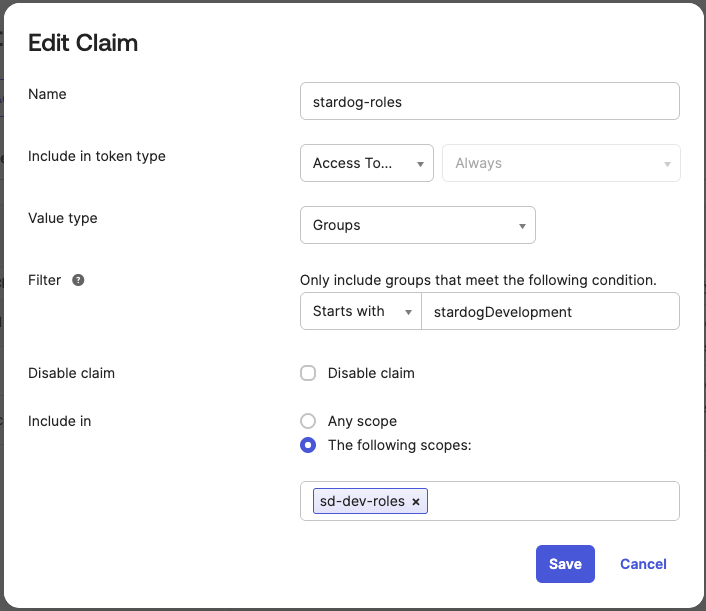
Step 4: Create a Claim for Stardog Roles
- Still in your authorization server, go to the Claims tab
- Click Add Claim
- Complete the form:
- Name:
stardog-roles(or your preferred claim name) - Include in token type: Select Access Token
- Value type: Choose appropriate type (Groups or Expression)
- Value/Filter: Enter an expression that maps some information about the user to Stardog roles
- Include in: Select specific scopes including the
sd-dev-rolesscope (or whatever you named your custom scope) you created. - Click Create
- Name:
The Value/Filter field should be an expression that maps some information about the user to Stardog role names that exist in your Stardog instance. For example, if you have a groups in Okta that represent roles in Stardog that are prepended with stardogDevelopment, you can add a filter to make it such that only users in groups that start with stardogDevelopment are assigned the roles in Stardog. This is up to you how you want to map the roles in Okta to roles in Stardog.
Step 5: Configure Custom Authorization Server’s Access Policies
- Still in your authorization server, go to the Access Policies tab
- Click Add Policy
- Complete the policy configuration:
- Name: Enter a name for your policy (e.g. “Stardog SSO Connection Policy”)
- Assign to: Choose which clients this policy applies to. You’ll want to select the client you created in Step 1.
- Click Create Policy
- Click Add Rule
- Configure the new rule:
- Scopes: Select which scopes can be requested, including:
openid,profile,email,offline_accessandsd-dev-roles(or whatever you named your custom scope)
- Scopes: Select which scopes can be requested, including:
- Click Create Rule
Step 6: Configure Launchpad Settings
SSOCONNECTION_STAGING_OKTA_CLIENT_ID=your-client-id-from-okta
SSOCONNECTION_STAGING_OKTA_CLIENT_SECRET=your-client-secret-from-okta
SSOCONNECTION_STAGING_OKTA_DOMAIN=your-okta-domain.okta.com
SSOCONNECTION_STAGING_OKTA_AUTHORIZATION_SERVER_ID=default
SSOCONNECTION_STAGING_OKTA_ROLES_SCOPE=sd-dev-roles

# optional but recommended
SSOCONNECTION_STAGING_OKTA_DISPLAY_NAME=Stardog Staging
SSOCONNECTION_STAGING_OKTA_STARDOG_ENDPOINT=http://localhost:5825

# if using private_key_jwt_auth, set the path to the private key file
# make sure to remove the client secret if using private_key_jwt_auth
# SSOCONNECTION_STAGING_OKTA_CLIENT_PRIVATE_KEY_FILE=/path/to/key.pem

# if requiring PKCE
# SSOCONNECTION_STAGING_OKTA_REQUIRE_PKCE=true
STAGINGis the unique identifier for this SSO Connection.OKTAis the provider identifier for this SSO Connection.- The
SSOCONNECTION_STAGING_OKTA_CLIENT_IDandSSOCONNECTION_DEVOKTA_OKTA_CLIENT_SECRETare the client id and client secret of the Okta application you created. - The
SSOCONNECTION_STAGING_OKTA_DOMAINis the domain of your Okta application. - The
SSOCONNECTION_STAGING_OKTA_AUTHORIZATION_SERVER_IDis the ID of the custom authorization server in Okta. If not set, thedefaultauthorization server will be used. - The
SSOCONNECTION_STAGING_OKTA_DISPLAY_NAMEis the user-facing display name for this SSO Connection. - The
SSOCONNECTION_STAGING_OKTA_STARDOG_ENDPOINTis the URL of the Stardog endpoint that users will connect to using this SSO Connection. This is not required. If not set, users will need to manually enter the Stardog endpoint URL when creating an SSO connection. - The
SSOCONNECTION_STAGING_OKTA_ROLES_SCOPEis the additional scope used to retrieve the roles assigned to the user from the Okta application.
If you are using private key JWT authentication, set SSOCONNECTION_STAGING_OKTA_CLIENT_PRIVATE_KEY_FILE to the path of the private key file in the Docker container. You will need to mount a volume to the path specified in the environment variable.
The custom authorization server ID can be found by navigating to Security > API > Authorization Servers in the Okta Admin Dashboard and selecting the custom authorization server you created or the default server. There should be a Metadata URI that contains the authorization server ID that follows the pattern:
https://{$DOMAIN}/oauth2/{$AUTHORIZATION_SERVER_ID}/.well-known/oauth-authorization-server
The authorization server ID is generally an alphanumeric string that is unique to the authorization server.
Step 7: Configure Stardog to accept Okta Access Tokens
Add the following entry to Stardog’s jwt.yml, replacing all templated values.
issuers:
  https://<domain>/oauth2/<custom-auth-server-id>:
    usernameField: sub
    autoCreateUsers: True
    audience: <custom-auth-server-audience>
    rolesClaimPath: <custom-claim>
    algorithms:
      RS256:
        keyUrl: https://<domain>/oauth2/<custom-auth-server-id>/v1/keys
https://<domain>/oauth2/<custom-auth-server-id>is the issuer URL for Okta. Replace<domain>with your Okta domain and<custom-auth-server-id>with the ID of the custom authorization server in Okta.subis the claim in the JWT token that contains the username of the user. You can change this if you have a different claim that contains the username.autoCreateUsersis set toTrueto allow Stardog to auto-create users based on therolesclaim in the JWT token.audienceis the audience configured for the custom authorization server in Okta.rolesClaimPathis the path to the claim in the JWT token that contains the app roles assigned to the user. This should match the claim you created in Okta.keyUrlis the URL to the public key used to verify the JWT token.
Using the Token Preview tab under your custom authorization server, you can see the decoded token claims for a token you would be issued, which can help troubleshoot this integration. You’ll want to make sure you request the sd-dev-roles scope (or whatever you named your custom scope) when you authenticate to get a token with the stardog-roles claim.