Microsoft Entra Configuration
Page Contents
- Login Provider Configuration
- How To Create an Entra App Registration to login with Microsoft Entra in Launchpad
- SSO Connection Configuration
- SSO Connection Methods Comparison
- Interactive (Traditional) SSO Connections
- On-Behalf-Of (OBO) Flow SSO Connections
- Interactive (Traditional) SSO Connections
SSOCONNECTION_<unique_identifier>_AZURE_CLIENT_IDSSOCONNECTION_<unique_identifier>_AZURE_CLIENT_SECRETSSOCONNECTION_<unique_identifier>_AZURE_TENANTSSOCONNECTION_<unique_identifier>_AZURE_STARDOG_ENDPOINTSSOCONNECTION_<unique_identifier>_AZURE_STARDOG_INTERNAL_ENDPOINTSSOCONNECTION_<unique_identifier>_AZURE_DISPLAY_NAMESSOCONNECTION_<unique_identifier>_AZURE_GOV_CLOUD_USSSOCONNECTION_<unique_identifier>_AZURE_AUTH_BASE_URLSSOCONNECTION_<unique_identifier>_AZURE_GRAPH_BASE_URL
- Setting up Interactive (Traditional) Microsoft Entra SSO Connections
- Setting up On-Behalf-Of (OBO) Flow SSO Connections

Microsoft Entra can be used both as a login provider to authenticate users into Launchpad and as an SSO connection provider to authenticate users against Stardog endpoints.
Login Provider Configuration
The following configuration options are available for Microsoft Entra login provider.
See How to Create an Entra App Registration to Login with Microsoft Entra in Launchpad for instructions on how to create an Entra App Registration to login with Microsoft Entra in Launchpad.
AZURE_AUTH_ENABLED
The AZURE_AUTH_ENABLED is used to enable or disable Microsoft Entra authentication to log users into Launchpad.
- Required: Yes (if using Microsoft Entra)
- Default:
false
AZURE_CLIENT_ID
The AZURE_CLIENT_ID is the client id of the Entra App Registration used to sign users into Launchpad.
- Required: Yes (if using Microsoft Entra)
- Default: not set
AZURE_CLIENT_SECRET
The AZURE_CLIENT_SECRET is the client secret of the Entra App Registration used to sign users into Launchpad.
This should be used if not using a client certificate (AZURE_CLIENT_CERTIFICATE_FILE or AZURE_CLIENT_CERTIFICATE_THUMBPRINT).
- Required: Yes (if using Microsoft Entra)
- Default: not set
AZURE_TENANT
The AZURE_TENANT is the tenant id of the Entra App Registration used to sign users into Launchpad.
- Required: Yes (if using Microsoft Entra)
- Default:
organizations
AZURE_CLIENT_PRIVATE_KEY_FILE
The AZURE_CLIENT_PRIVATE_KEY_FILE is the path (in the Docker container) to the private key file corresponding to the certificate used as a credential with Entra App Registration;
This should be used if not using a client secret (AZURE_CLIENT_SECRET). The private key must not be password protected.
- Required: Yes (if using client certificate with Microsoft Entra)
- Default: not set
AZURE_CLIENT_CERTIFICATE_FILE
The AZURE_CLIENT_CERTIFICATE_FILE is the path (in the Docker container) to the certificate file used as a credential with the Entra App Registration.
This should be set if AZURE_CLIENT_CERTIFICATE_THUMBPRINT not specified.
- Required: Yes (if using client certificate with Microsoft Entra and not using
AZURE_CLIENT_CERTIFICATE_THUMBPRINT) - Default: not set
AZURE_CLIENT_CERTIFICATE_THUMBPRINT
Thumbprint of the certificate used as a credential with the Entra App Registration.
This should be set if AZURE_CLIENT_CERTIFICATE_FILE not specified)
- Required: Yes (if using client certificate with Microsoft Entra and not using
AZURE_CLIENT_CERTIFICATE_FILE) - Default: not set
AZURE_GOV_CLOUD_US
The AZURE_GOV_CLOUD_US is used to set the Azure cloud environment to the Azure US Government Cloud.
- Required: Yes (if using Azure US Government Cloud)
- Default:
false
AZURE_AUTH_BASE_URL
The AZURE_AUTH_BASE_URL is used to set the base URL for Microsoft Entra. This is the URL that users will use to authenticate with Microsoft Entra.
If AZURE_GOV_CLOUD_US is set to true, this will be automatically set to https://login.microsoftonline.us
- Required: No
- Default:
https://login.microsoftonline.com
AZURE_GRAPH_BASE_URL
The AZURE_GRAPH_BASE_URL is used to set the base URL for the Microsoft Graph API. This is used to retrieve user information from Microsoft Entra.
If AZURE_GOV_CLOUD_US is set to true, this will be automatically set to https://graph.microsoft.us
- Required: No
- Default:
https://graph.microsoft.com
AZURE_ON_BEHALF_OF_USER_FLOW_ENABLED
The AZURE_ON_BEHALF_OF_USER_FLOW_ENABLED option enables the Entra OAuth 2.0 On-Behalf-Of (OBO) flow for all Azure SSO connections. The OBO flow means that once you log in to Launchpad with the Azure login provider, you can then authenticate to SSO connections automatically without additional login prompts. When enabled, users authenticate once via Azure and gain non-interactive access to all connected Stardog instances without interactive sign-in prompts for individual connections.
Before enabling this flag, ensure you have completed the Microsoft Entra setup required for the OBO flow, as it depends on properly configured API permissions and exposed scopes between your Launchpad and Stardog app registrations. See Setting up On-Behalf-Of (OBO) Flow SSO Connections for detailed configuration instructions.
When enabled (true):
- All Azure SSO connections automatically use the OBO flow
- Users authenticate once via logging into Launchpad and gain non-interactive access to all connected Stardog instances
- Interactive sign-in prompts for individual connections are eliminated
- Client secrets are not required for SSO connections
- Requires corresponding Entra app registration changes (see Setting up On-Behalf-Of (OBO) Flow SSO Connections)
SSO connection registrations and environment variables are still required - OBO eliminates interactive prompts, not the underlying SSO connection setup
When disabled (false, default):
- Maintains existing behavior where users interactively sign into each Azure SSO connection
- Client secrets are required for each SSO connection
- No additional Entra configuration required
- Provides backward compatibility for existing deployments
This configuration applies globally to all Azure SSO connections within the Launchpad instance.
- Required: No
- Default:
false
Secondary Authentication Provider
Launchpad’s Entra login provider supports using a secondary authentication provider for users with specific app roles. This feature allows you to require certain users to authenticate with an additional provider (such as Duo) after successfully authenticating with Microsoft Entra, providing an extra layer of security.
AZURE_SECONDARY_AUTH_PROVIDER
The AZURE_SECONDARY_AUTH_PROVIDER specifies which secondary authentication provider to use. When a user with the required app roles logs in with Microsoft Entra, they will be redirected to authenticate with this secondary provider.
Only OIDC (OpenID Connect) providers can be used as secondary authentication providers.
Supported secondary OIDC providers:
duooktapinggoogle
When a provider is configured as a secondary auth provider for Azure, it can no longer be used as a primary login provider.
- Required: No
- Default: not set
AZURE_SECONDARY_AUTH_ROLES
The AZURE_SECONDARY_AUTH_ROLES is a comma-separated list of app roles assigned to users in the Microsoft Entra app registration. Users with these roles will be required to authenticate with the secondary provider after successful Microsoft Entra authentication.
For example, if set to stardog-admin,security-team, users assigned either the stardog-admin or security-team app roles in Microsoft Entra will need to complete secondary authentication.
- Required: Yes (if using secondary auth provider)
- Default: not set
Secondary Authentication Flow
The secondary authentication flow works as follows:
flowchart TD
    A[User attempts to login] --> B[Authenticate with Microsoft Entra]
    B --> C{Authentication successful?}
    C -->|No| D[Login failed]
    C -->|Yes| E[Check user's app roles in Entra]
    E --> F{User has secondary auth roles?<br/>e.g., stardog-admin}
    F -->|No| G[Login complete - Single auth flow]
    F -->|Yes| H[Redirect to secondary provider<br/>e.g., Duo]
    H --> I[User authenticates with secondary provider]
    I --> J{Secondary authentication successful?}
    J -->|No| K[Login failed - Secondary auth required]
    J -->|Yes| L[Login complete - Secondary auth flow]
- User attempts to log into Launchpad
- User authenticates with Microsoft Entra (primary provider)
- Launchpad checks if the user has any of the configured
AZURE_SECONDARY_AUTH_ROLES - If the user has required roles:
- User is redirected to the secondary authentication provider
- User must successfully authenticate with the secondary provider
- Login is completed only after both authentications succeed
- If the user does not have required roles:
- Login is completed after Microsoft Entra authentication
Demo
Demo of the secondary authentication flow with Microsoft Entra and Duo:
Example Configuration
Here’s an example configuration using Duo as a secondary authentication provider:
# Microsoft Entra Login Provider (Primary)
AZURE_AUTH_ENABLED=true
AZURE_CLIENT_ID=<azure_client_id>
AZURE_CLIENT_SECRET=<azure_client_secret>
AZURE_TENANT=<tenant_id>
AZURE_SECONDARY_AUTH_PROVIDER=duo
AZURE_SECONDARY_AUTH_ROLES=stardog-admin,security-team

# Duo Secondary Authentication Provider (OIDC)
DUO_AUTH_ENABLED=true
DUO_CLIENT_ID=<duo_client_id>
DUO_CLIENT_SECRET=<duo_client_secret>
DUO_DISCOVERY_URL=https://sso-<your-account>.sso.duosecurity.com/oidc/<client_id>/.well-known/openid-configuration
Setting Up Secondary Authentication
To configure secondary authentication with Microsoft Entra:
- Create App Roles in Microsoft Entra
- Navigate to your Launchpad app registration in Azure Portal
- Go to “App roles”
- Create roles that indicate users requiring secondary authentication (e.g.,
stardog-admin) - Assign these roles to appropriate users in “Enterprise applications”
- Configure Secondary OIDC Provider
- Configure your secondary provider using the same setup process as you would for a primary login provider
- For example, if using Duo as a secondary provider, follow the Duo provider configuration steps
- The configuration variables and setup process are identical to primary provider setup
- Update Launchpad Configuration
- Enable the secondary provider using the same configuration variables as you would for a primary login provider
- Set
AZURE_SECONDARY_AUTH_PROVIDERto the provider name (e.g.duo) - Configure
AZURE_SECONDARY_AUTH_ROLESwith the comma separated list of app roles requiring secondary auth - Once you specify a provider as secondary for Azure, it can no longer be used as a primary login provider
How To Create an Entra App Registration to login with Microsoft Entra in Launchpad
- Create App Registration
- Open Azure Portal (https://portal.azure.com)
- Navigate to Microsoft Entra ID > App registrations
- Click “New registration”
- Name application (e.g., “Stardog Launchpad”)
- Select “Accounts in this organizational directory only”
- Click “Register”
- Configure Authentication
- Go to app’s “Authentication”
- Add web platform redirect URI:
- Type: Web
- Redirect URI:
{BASE_URL}/oauth/azure/redirect - See
BASE_URLfor more information on what the value should.
- Enable “ID tokens (used for implicit and hybrid flows)”
- Generate Credentials
- Option 1: Client Secret
- Go to “Certificates & secrets”
- Click “New client secret”
- Set expiration
- Copy secret value immediately - this is only shown while creating a secret. It cannot be retrieved later.
- Option 2: Certificate
- Go to “Certificates & secrets”
- Upload certificate to app registration
- If you don’t have a certificate, you can create a self-signed certificate using
openssl, however, it is recommended to use a certificate from a trusted certificate authority. - Note certificate thumbprint in the web interface
- Option 1: Client Secret
- Collect Configuration Values
- Client ID: Found in “Overview”
- Tenant ID: Found in “Overview”
- Client Secret or Certificate details
-
Configure Launchpad Environment Variables
- Using Client Secret:
AZURE_AUTH_ENABLED=true AZURE_CLIENT_ID=<client_id> AZURE_TENANT=<tenant_id> AZURE_CLIENT_SECRET=<client_secret>- Using Certificate:
AZURE_AUTH_ENABLED=true
AZURE_CLIENT_ID=<client_id>
AZURE_TENANT=<tenant_id>
# Use AZURE_CLIENT_CERTIFICATE_FILE or AZURE_CLIENT_CERTIFICATE_THUMBPRINT. See note below.
# AZURE_CLIENT_CERTIFICATE_FILE=<path_to_certificate_file-in-docker-image>
AZURE_CLIENT_CERTIFICATE_THUMBPRINT=<certificate_thumbprint>
AZURE_CLIENT_PRIVATE_KEY_FILE=<path_to_private_key_file-in-docker-image>
There is no need to set both AZURE_CLIENT_CERTIFICATE_FILE and AZURE_CLIENT_CERTIFICATE_THUMBPRINT. Use one or the other. If both are set, AZURE_CLIENT_CERTIFICATE_THUMBPRINT will be used.
If your tenant is in the Azure US Government Cloud, set AZURE_GOV_CLOUD_US=true.
SSO Connection Configuration
Microsoft Entra supports two distinct methods for configuring SSO connections to authenticate users against Stardog endpoints:
- Interactive (Traditional) SSO Connections - Users interactively sign into each SSO connection individually
- On-Behalf-Of (OBO) Flow SSO Connections - Users authenticate once during login and gain non-interactive access to all connected Stardog instances without additional prompts
SSO Connection Methods Comparison
Interactive (Traditional) SSO Connections
- Architecture: Each Stardog app registration configured for interactive OAuth flows
- Stardog Setup: App registrations with redirect URIs (
{BASE_URL}/auth/sso-connection) - Launchpad Setup: Standard login provider configuration
- User Experience: Users authenticate separately for each Stardog connection
- Client Secrets: Required for each Stardog connection
- Global Setting: Works with
AZURE_ON_BEHALF_OF_USER_FLOW_ENABLED=false(default) - When to Use: Launchpad version <
3.4.0, mixed authentication needs
On-Behalf-Of (OBO) Flow SSO Connections
- Architecture: Launchpad acts as intermediary, requesting tokens on behalf of users
- Stardog Setup: App registrations expose APIs (scopes) instead of redirect flows
- Launchpad Setup: Requires delegated permissions to access each Stardog API
- User Experience: Single login, automatic access to all configured connections
- Client Secrets: Not required (uses delegated permissions)
- Global Setting: Requires
AZURE_ON_BEHALF_OF_USER_FLOW_ENABLED=true - When to Use: Streamlined user experience, Launchpad version >=
3.4.0
Interactive (Traditional) SSO Connections
The following configuration options are available for interactive (traditional) Microsoft Entra SSO Connections, where users authenticate interactively for each connection.
For step-by-step setup instructions, see Setting up Interactive (Traditional) Microsoft Entra SSO Connections below.
SSOCONNECTION_<unique_identifier>_AZURE_CLIENT_ID
The SSOCONNECTION_<unique_identifier>_AZURE_CLIENT_ID is the client id of the Entra App Registration used to authenticate and authorize users to connect to the Stardog endpoint.
- Required: Yes
- Default: not set
SSOCONNECTION_<unique_identifier>_AZURE_CLIENT_SECRET
The SSOCONNECTION_<unique_identifier>_AZURE_CLIENT_SECRET is the client secret of the Entra App Registration used to authenticate and authorize users to connect to the Stardog endpoint.
Client secrets are not required when using the Entra On-Behalf-Of (OBO) flow (AZURE_ON_BEHALF_OF_USER_FLOW_ENABLED=true).
- Required: Yes (when OBO flow is disabled)
- Default: not set
SSOCONNECTION_<unique_identifier>_AZURE_TENANT
The SSOCONNECTION_<unique_identifier>_AZURE_TENANT is the tenant id of the Entra App Registration used to authenticate and authorize users to connect to the Stardog endpoint.
- Required: Yes
- Default: not set
SSOCONNECTION_<unique_identifier>_AZURE_STARDOG_ENDPOINT
The SSOCONNECTION_<unique_identifier>_AZURE_STARDOG_ENDPOINT is the URL of the Stardog endpoint that users will connect to using this SSO Connection. This is not required. If not set, users will need to manually enter the Stardog endpoint URL when creating an SSO connection. If provided, it will be pre-filled in the SSO Connection form.
- Required: No
- Default: not set
SSOCONNECTION_<unique_identifier>_AZURE_STARDOG_INTERNAL_ENDPOINT
The SSOCONNECTION_<unique_identifier>_AZURE_STARDOG_INTERNAL_ENDPOINT is an additional internal or private endpoint URL for the Stardog server. When configured, this endpoint is used by Launchpad for server-side operations, particularly for the Voicebox service container. This is useful in architectures where backend services cannot access Stardog on the public endpoint but can communicate using an internal endpoint.
When both endpoints are configured, Voicebox requests automatically use the internal endpoint while browser-based requests (Studio, Explorer, etc.) continue using the public endpoint. The internal endpoint can be overridden by users under “Advanced Options” in the SSO connection dialog.
- Required: No
- Default: not set
SSOCONNECTION_<unique_identifier>_AZURE_DISPLAY_NAME
The SSOCONNECTION_<unique_identifier>_AZURE_DISPLAY_NAME is the user-facing display name for this SSO Connection. This is the name that will be displayed to users when they are selecting an SSO Connection to connect to a Stardog endpoint. If not set, the unique identifier will be used as the display name.
- Required: No
- Default:
SSOCONNECTION_<unique_identifier>_AZURE_GOV_CLOUD_US
The SSOCONNECTION_<unique_identifier>_AZURE_GOV_CLOUD_US is used to set the Azure cloud environment. If set to true, it’s assumed that the Entra App Registration is in your tenant in the Azure US Government Cloud.
- Required: Yes (if using Azure US Government Cloud)
- Default:
false
SSOCONNECTION_<unique_identifier>_AZURE_AUTH_BASE_URL
The SSOCONNECTION_<unique_identifier>_AZURE_AUTH_BASE_URL is used to set the base URL for Microsoft Entra. This is the URL that users will use to authenticate with Microsoft Entra.
If SSOCONNECTION_<unique_identifier>_AZURE_GOV_CLOUD_US is set to true, this will be automatically set to https://login.microsoftonline.us
- Required: No
- Default:
https://login.microsoftonline.com
SSOCONNECTION_<unique_identifier>_AZURE_GRAPH_BASE_URL
The SSOCONNECTION_<unique_identifier>_AZURE_GRAPH_BASE_URL is used to set the base URL for the Microsoft Graph API. This is used to retrieve user information from Microsoft Entra.
If SSOCONNECTION_<unique_identifier>_AZURE_GOV_CLOUD_US is set to true, this will be automatically set to https://graph.microsoft.us
- Required: No
- Default:
https://graph.microsoft.com
Setting up Interactive (Traditional) Microsoft Entra SSO Connections
Setting up an interactive (traditional) Microsoft Entra SSO connection consists of 3 main steps:
- Creating the Microsoft Entra App Registration
- Configuring the Launchpad environment variables using the App Registration details
- Configuring the Stardog endpoint to accept JWT tokens from Microsoft Entra App Registration
SSO connections leverage Stardog’s JWT token authentication. This means that the Stardog endpoint must be configured to accept JWT tokens from the SSO provider. Stardog is able to auto-create users and assign roles based on the claims in the JWT token, provided that the roles claimed in the JWT token are valid roles in Stardog. This is explained in more detail below, but see the Stardog Documentation for more information.
1. Creating the Microsoft Entra App Registration
- Create App Registration
- Open Azure Portal (https://portal.azure.com)
- Navigate to Microsoft Entra ID > App registrations
- Click “New registration”
- Name application (e.g., “Stardog Development Endpoint”)
- Select “Accounts in this organizational directory only”
- Click “Register”
- Configure Authentication
- Go to app’s “Authentication”
- Add web platform redirect URI:
- Type: Web
- Redirect URI:
{BASE_URL}/auth/sso-connection - See
BASE_URLfor more information on what the value should.
- Generate Credentials
- Go to “Certificates & secrets”
- Click “New client secret”
- Set expiration - Copy secret value immediately - this is only shown while creating a secret. It cannot be retrieved later.
- Modify Manifest
- Go to “Manifest”
- Set
requestedAccessTokenVersionunderapito2
- Create and Assign App Roles
- Go to “App roles”
- Click “Create app role”
- Create roles that you want to assign to users connecting to the Stardog endpoint. These roles should match the roles in Stardog.
- Assign roles to users in the “Enterprise applications” service.
- Collect Configuration Values
- Client ID: Found in “Overview”
- Tenant ID: Found in “Overview”
- Client Secret: From Step 3.
2. Configuring the Launchpad environment variables using the App Registration details
SSOCONNECTION_<unique-identifier>_AZURE_CLIENT_ID=<client_id>
SSOCONNECTION_<unique-identifier>_AZURE_CLIENT_SECRET=<client>
SSOCONNECTION_<unique-identifier>_AZURE_TENANT=<tenant_id>
SSOCONNECTION_<unique-identifier>_AZURE_STARDOG_ENDPOINT=<stardog_endpoint> # optional
SSOCONNECTION_<unique-identifier>_AZURE_DISPLAY_NAME=<user-facing-display-name> # optional
If your tenant is in the Azure US Government Cloud, set SSOCONNECTION_<unique-identifier>_AZURE_GOV_CLOUD_US=true.
3. Configuring the Stardog endpoint to accept JWT tokens from the Microsoft Entra App Registration
- Add the Microsoft Entra issuer entry to the Stardog endpoint’s JWT configuration
- The JWT configuration for the Stardog server needs to be customized. To provide a configuration file for JWT configuration to Stardog, set the following property in the
stardog.propertiesfile:
jwt.conf=/path/to/jwt.yaml- The
jwt.yamlfile should contain the following configuration:
issuers: https://login.microsoftonline.com/<SSOCONNECTION_$uid_AZURE_TENANT>/v2.0: usernameField: preferred_username audience: <AZURE_CLIENT_ID> algorithms: RS256: keyUrl: https://login.microsoftonline.com/<SSOCONNECTION_$uid_AZURE_TENANT>/discovery/v2.0/keys autoCreateUsers: True rolesClaimPath: roleshttps://login.microsoftonline.com/<SSOCONNECTION_$uid_AZURE_TENANT>/v2.0is the issuer URL for Microsoft Entra. Replace<SSOCONNECTION_$uid_AZURE_TENANT>with the tenant id of the Entra App Registration for the SSO connection.usernameFieldis the claim in the JWT token that contains the username of the user. This should be set topreferred_username.audienceis the client id of the Entra App Registration.algorithmsis the algorithm used to sign the JWT token. In this case, it isRS256. ThekeyUrlis the URL to the public key used to verify the JWT token.autoCreateUsersis set toTrueto allow Stardog to auto-create users based on therolesclaim in the JWT token.rolesClaimPathis the path to the claim in the JWT token that contains the app roles assigned to the user.
If you are using Microsoft Entra in the Azure US Government Cloud, the issuer URL should be
https://login.microsoftonline.us/<SSOCONNECTION_$uid_AZURE_TENANT>/v2.0and thekeyUrlshould behttps://login.microsoftonline.us/<SSOCONNECTION_$uid_AZURE_TENANT>/discovery/v2.0/keys. - The JWT configuration for the Stardog server needs to be customized. To provide a configuration file for JWT configuration to Stardog, set the following property in the
-
Make sure to restart the Stardog server after making these changes.
- Create the roles in Stardog that match the app roles in the Entra App Registration.
- This is required for Stardog to auto-create users and assign roles based on the claims in the JWT token.
On-Behalf-Of (OBO) Flow SSO Connections
When the global OBO flow is enabled (AZURE_ON_BEHALF_OF_USER_FLOW_ENABLED=true), all Microsoft Entra SSO connections automatically use the on behalf of authentication flow. The following configuration options are available for OBO flow SSO connections:
For step-by-step setup instructions, see Setting up On-Behalf-Of (OBO) Flow SSO Connections.
Before using OBO flow SSO connections, you must first enable the global OBO flow setting and complete the Microsoft Entra setup described in the setup guide above.
The same SSOCONNECTION_<unique_identifier>_AZURE_* environment variables are used as with traditional SSO connections, with these key differences:
- Client secrets are not required (
SSOCONNECTION_<unique_identifier>_AZURE_CLIENT_SECRETcan be omitted) - Interactive authentication prompts are eliminated - users authenticate automatically
- Additional scope configuration is available via
SSOCONNECTION_<unique_identifier>_AZURE_OBO_SCOPE
For complete environment variable documentation, see the Interactive (Traditional) SSO Connections section above. The OBO-specific configuration option is:
SSOCONNECTION_<unique_identifier>_AZURE_OBO_SCOPE
The SSOCONNECTION_<unique_identifier>_AZURE_OBO_SCOPE allows you to customize the OAuth 2.0 scope used for the On-Behalf-Of (OBO) flow for this specific SSO connection. By default, the OBO flow uses the scope format api://{client_id}/user_login for Stardog servers. This is the scope Launchpad will request when fetching an access token on behalf of the user to access the Stardog endpoint.
This allows you to:
- Use different scope formats for different Stardog servers
- Customize the scope to match your specific Microsoft Entra app registration setup
This setting only applies when the Entra OBO flow is enabled (AZURE_ON_BEHALF_OF_USER_FLOW_ENABLED=true). Microsoft Entra uses your “Application ID URI” as the base of the exposed scope, which by default is api://<client-id>, but this is configurable in your app registration.
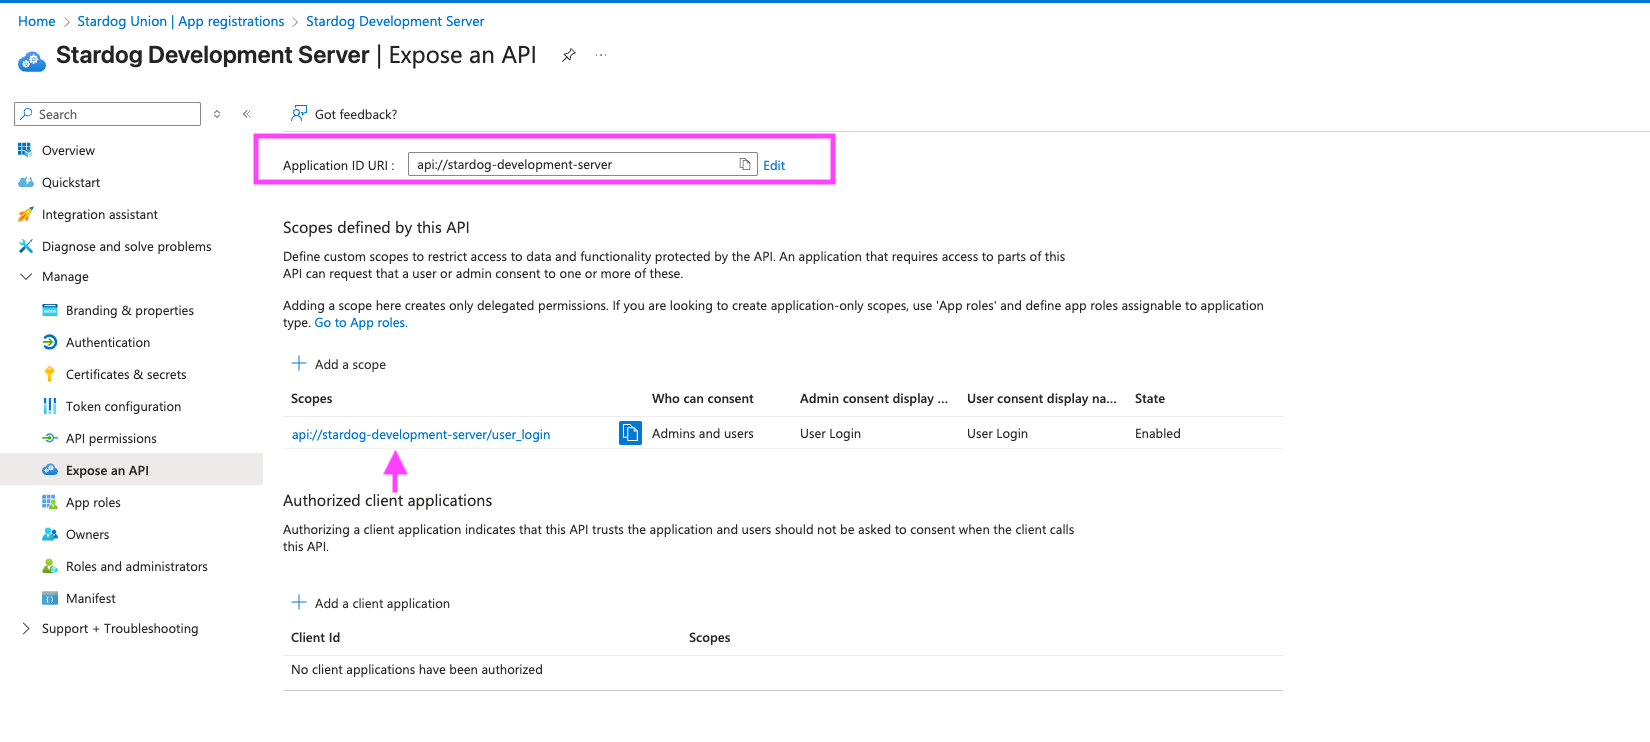
Example usage:
SSOCONNECTION_CUSTOM_AZURE_CLIENT_ID="e067faf1-f720-4459-94ba-796ef91225a2"
SSOCONNECTION_CUSTOM_AZURE_TENANT="ff24ca66-bbaa-4def-8acf-43f2635ada42"
SSOCONNECTION_CUSTOM_AZURE_DISPLAY_NAME="Custom Stardog Server"
SSOCONNECTION_CUSTOM_AZURE_STARDOG_ENDPOINT="http://localhost:5825"
SSOCONNECTION_CUSTOM_AZURE_OBO_SCOPE="api://custom-stardog-server/advanced_access"
- Required: No
- Default:
api://{client_id}/user_login
Setting up On-Behalf-Of (OBO) Flow SSO Connections
Entra On-Behalf-Of (OBO) flow support was added in Launchpad v3.4.0.
The Entra OAuth 2.0 On-Behalf-Of (OBO) flow means that once you log in to Launchpad with the Entra login provider, you can then authenticate to SSO connections without being prompted to interactively sign into each Stardog connection separately.
SSO connection registrations (app registrations and environment variables) are still required. The OBO flow eliminates interactive authentication prompts but does not remove the need for properly configured SSO connections.
OBO Flow Configuration Requirements
The OBO flow requires configuring two separate app registrations in Microsoft Entra ID:
- Launchpad App Registration - The main application that users authenticate with initially
- Stardog App Registration - Represents each downstream Stardog instance that Launchpad will access on behalf of users
The key relationship is that the Launchpad app registration needs delegated permissions to access the API scopes exposed by each Stardog app registration.
Step-by-Step OBO Setup
1. Configure Launchpad App Registration
This should follow the same setup as documented above, however you’ll need to adjust the API Permissions to give it delegated access to the API exposed by each Stardog app registration:
- In “API Permissions” in the left sidebar navigation, click “Add a Permission”
- When the modal opens, select the “My APIs” tab
- Select the app registration for your Stardog server
- Select the
user_loginpermission (or custom scope) exposed by that app registration - Repeat for each Stardog server you want to connect to
2. Configure Stardog App Registration
For each Stardog server, create a separate app registration:
- Create App Registration
- Register a new application for your Stardog server
- Name: “Stardog Development Server” (or appropriate name)
- Supported account types: “Accounts in this organizational directory only”
- Redirect URI: No redirect URI needed
- Expose an API
- In “Expose an API” in the left sidebar navigation, click “Add a scope” under the “Scopes defined by this API” section
- Scope name:
user_login - Who can consent?: “Admins and users”
- You can use whatever descriptions and display names you like
- Configure App Roles
- Add “App Roles” to the app registration that match roles that exist on the actual Stardog server
- This step is identical to the standard SSO connection setup
- The JWT configuration for Stardog should also look the same
- Modify Manifest
- Go to “Manifest”
- Set
requestedAccessTokenVersionunderapito2
- Configure Launchpad Environment Variables
- Add
SSOCONNECTIONenvironment variables for Launchpad so users can create connections to Stardog using OBO SSO - Note: No client secret is required when using OBO flow
- Add
Example On-Behalf-Of (OBO) Flow SSO Connection Configuration
With the below configuration, users will authenticate once via the Launchpad Entra login provider and gain automatic access to the Stardog server without additional prompts. User’s will click the “Add SSO Endpoint” button in Launchpad, and select the SSO connection “registration” named “Entra Development” to connect to the Stardog server. That’s the name defined as the DISPLAY_NAME for the connection registration.
AZURE_AUTH_ENABLED=true
AZURE_CLIENT_ID=<launchpad_client_id>
AZURE_TENANT=<tenant_id>
AZURE_CLIENT_SECRET=<launchpad_client_secret>
# Enable OBO flow globally
AZURE_ON_BEHALF_OF_USER_FLOW_ENABLED=true

# You would have multiple SSO connection "registrations" for each Stardog server
# so your users can select which Stardog server to connect to
SSOCONNECTION_ENTRA1_AZURE_CLIENT_ID=<stardog_client_id>
SSOCONNECTION_ENTRA1_AZURE_TENANT=<tenant_id>
SSOCONNECTION_ENTRA1_AZURE_DISPLAY_NAME="Entra Staging"
SSOCONNECTION_ENTRA1_AZURE_STARDOG_ENDPOINT="http://localhost:5825"
# Optional: Custom OBO scope. By default it will use `api://<stardog_client_id>/user_login`
SSOCONNECTION_ENTRA1_AZURE_OBO_SCOPE="api://custom-stardog/user_login"
3. Configure Stardog Server JWT Authentication
Even with the OBO flow enabled, each Stardog server must still be configured to accept JWT tokens from Microsoft Entra. The JWT configuration process is identical for both traditional SSO connections and OBO flow connections.
This step is required for OBO flow to work. The OBO flow changes how tokens are obtained (automatically vs. interactively), but Stardog still needs to be configured to validate and accept those JWT tokens.
For detailed instructions on configuring Stardog’s JWT authentication, see:
The JWT configuration will use the same client ID and tenant ID from your Stardog app registration (step 2 above).
Migrating from Standard SSO Connections to OBO Flow
To migrate existing Azure SSO connections to use the Entra OBO flow:
- Enable the OBO flow: Set
AZURE_ON_BEHALF_OF_USER_FLOW_ENABLED=true - Update app registrations: Follow the OBO setup steps above for your existing app registrations
- Remove client secrets: Client secrets are no longer required for SSO connection environment variables
- Verify Stardog JWT configuration: The existing JWT configuration on your Stardog servers remains the same - no changes needed
- Test the migration: Verify that users can authenticate and connect to Stardog instances without interactive prompts
Existing SSO connections that relied on interactive authentication will fail once OBO is enabled, since the interactive authentication flow is disabled. Complete the OBO app registration setup before enabling this feature to ensure a non-interactive user experience.